New in Chargebee: Explore Reveal and understand your payment performance end-to-end.Try Now
Docschargebee docs
HomeBillingPaymentsRevRecGrowthReveal
Support

Product Updates


  • Release Notes

Getting Started


  • Overview
  • Chargebee Billing Data Centers
  • Object Relationship Model
  • Understanding Sites
  • Chargebee Tech Glossary
  • Articles and FAQ

Implementing Chargebee


  • Implementation Guide
  • Go-live Checklist
  • Articles and FAQ

Agentic AI


  • Chargebee Copilot
  • MCP Servers

Developer Resources


  • Developer Resources Overview
  • API Explorer
  • Articles and FAQ

Product Catalog


  • Product Catalog Overview
  • Coupons
  • Articles and FAQ

Subscriptions


  • Working with Subscriptions
  • Billing
  • Orders
  • Articles and FAQ

Customers


  • Managing Customers
  • Account Hierarchy
  • Email Notifications
  • Branding
  • Configure Multiple Languages
  • Articles and FAQ

Entitlements


  • Entitlements Overview
  • Features Overview
  • Feature Management
  • Managing Product Entitlements
  • Subscription Entitlements
  • Customer Entitlements
  • Grandfathering Entitlements
  • Articles and FAQ

Usage Based Billing


  • Understanding Usages
  • Setting up Usage Based Billing
  • Usage Alerts
  • Prepaid credits
  • Metered Billing
  • Articles and FAQ

Chargebee CPQ


  • Chargebee CPQ
  • Chargebee CPQ for Salesforce
  • Chargebee CPQ for HubSpot

Invoices, Credit Notes, and Quotes


  • Invoices
  • Credit Notes
  • Quotes [Legacy]
  • Transactions
  • Articles and FAQ

Taxes


  • Overview
  • Configuring Taxes
  • Country-specific Taxes
  • Articles and FAQ

Hosted Capabilities


  • Overview
  • Hosted Checkout
  • Hosted Self-Serve Portal
  • Hosted Pages Features
  • Additional Hosted Pages
  • Payment Components
  • Pricing Table
  • Managing Payments with Chargebee.js
  • Mobile-Optimized Hosted Pages
  • Articles and FAQ

Site Configuration


  • Users & Roles
  • Custom Fields & Metadata
  • Approvals
  • Mandatory Fields
  • File Attachments & Comments
  • Advanced Filter Options
  • Multicurrency Pricing
  • Multi-decimal Support
  • Configuring Reason Codes
  • Events and Webhooks
  • API Keys
  • Time Zone
  • Time Machine
  • Transfer Configurations
  • Articles and FAQ

Multi Business Entity


  • Multi Business Entity Overview
  • Customer Transfer Overview
  • Articles and FAQ

Mobile Subscriptions


  • Overview
  • Omnichannel Subscriptions
  • Omnichannel One-Time Orders
  • Mobile Subscriptions (Legacy)

Reports and Analytics


  • RevenueStory
  • Home Dashboard
  • Frequently Asked Questions
  • FAQs for Classic Reports Sunset
  • Articles and FAQ

Integrations


  • Sales
  • Customer Support and Success
  • Finance
  • Tax
  • eInvoicing
  • Marketing
  • Stitch
  • Collaboration
  • Contract Management
  • Ecommerce Management
  • Articles and FAQ

Data Privacy & Security


  • Two Factor Authentication
  • SAML Single Sign-On
  • System for Cross-Domain Identity Management (SCIM)
  • EU-GDPR
  • Consent Management
  • Personal Data Management
  • Compliance Certificates
  • HIPAA Guidelines
  • PCI Recommendations and Integration Types
  • Articles and FAQ

Data Operations


  • Bulk Operations
  • Migration
  • Articles and FAQ
  1. Billing
  2. Hosted Capabilities
  3. Articles and FAQ
  4. Checkout V3 - Pop Up
  1. Billing
  2. Hosted Capabilities
  3. Articles and FAQ
  4. Checkout V3 - Pop Up

How can I add or remove ‘Go to App' from the self-service portal?

Problem Statement

You want to know how can I add or remove ‘go to app’ from the self-service portal.

Scope

How to remove the 'go to app' option on the Manage payment methods page?

Summary

When you call the API 'Manage Payment Source' and add the input parameter 'redirect_url' with the URL information, the Go to app button will appear at the bottom of the portal.

In similar instances, to remove this button, you can stop passing the redirect_url parameter in the API call and the button will not appear.

Solution

We can define redirect URLs in plan levels or any checkout generated for subscription creation or upgrade easily by defining it in the Chargebee's UI. You can learn more about adding these URLs on the checkout page here.

However, the 'Manage Payment sources' page which is available in the self-service portal, does not allow you to apply the URL via the Chargebee UI. Hence, you can add or remove this URL embedded to a 'Go to App' button by using API calls.

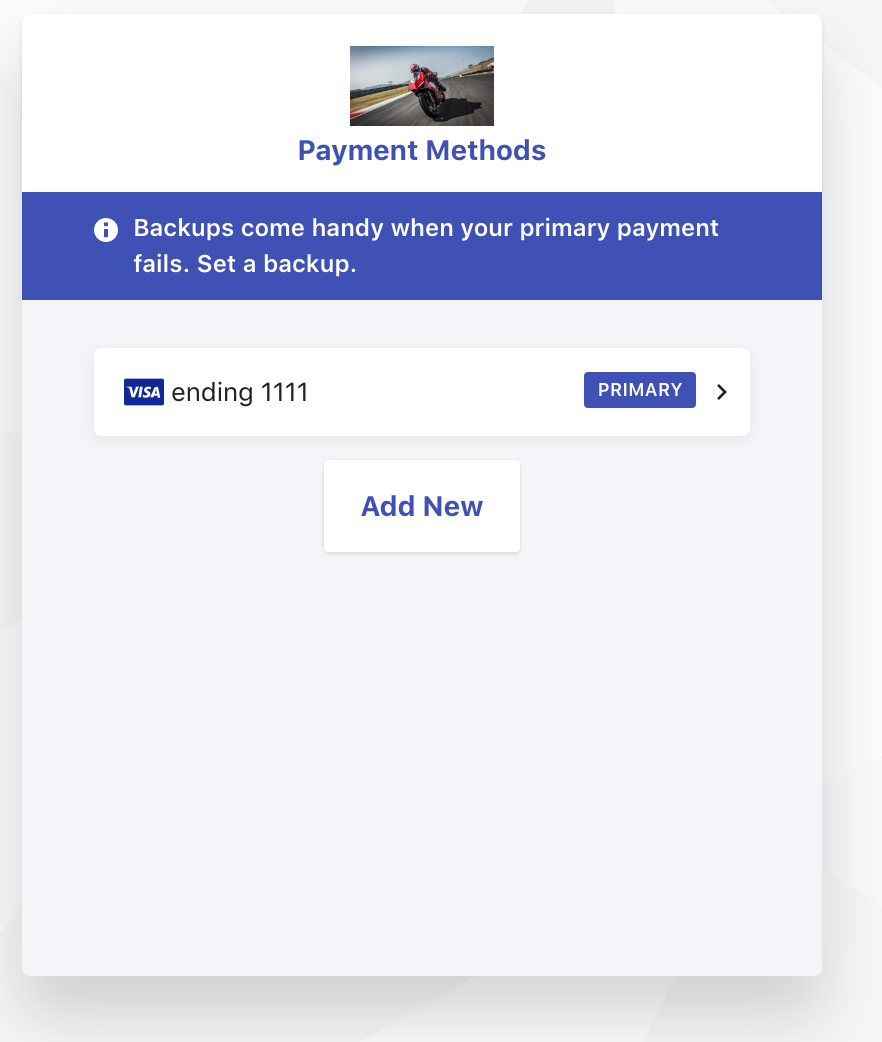
By default, the Manage Payment Sources page will look like the screenshot below,

image

You call the API 'Manage Payment Source', add the input parameter 'redirect_url' with the URL information, and the button will appear as provided in the screenshot below,

image

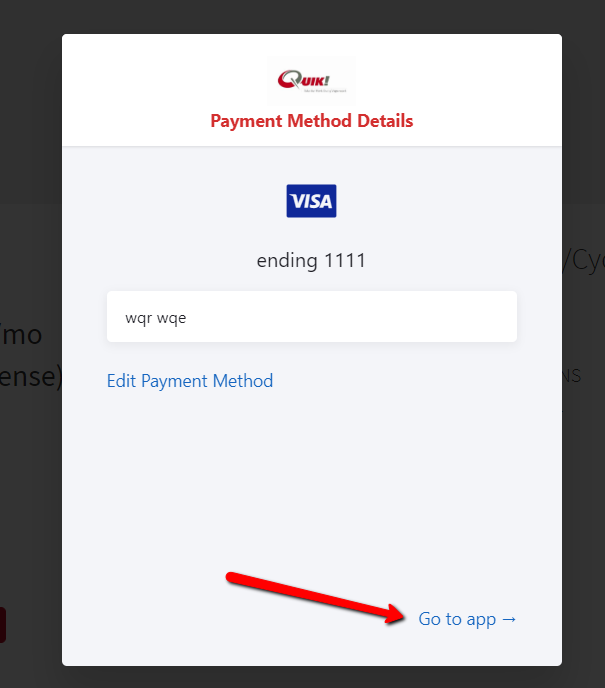
In similar instances, to remove this button, you can stop passing this parameter ('redirect_url') in the API call and the button will not appear.

Related Articles

How do I remove autofill of address fields in Checkout or portal?
What is the hosted pages/checkout pages of Chargebee?
How to edit the Addon quantity from the portal?
How to differentiate between Addon and Charges in Portal?
How can I pass prefilled Custom Fields through checkout via Drop-in Script?
“Sorry,the URL or the some of the parameters are not valid” error with Hosted Pages API
How to customize the V3 (In-app) checkout - hosted pages?
“Blocked autofocusing on a element in a cross-origin subframe” due to CSP headers
How to customize the In-app checkout pages (HPv3) in Chargebee?
How to configure return/redirect URLs for one-time payments checkout in Chargebee?
What are the benefits of Chargebee's checkout page?
'Error: New checkout is not enabled on your test site.'
How to add a unit-based charge on the URL?
Existing customer with plan based URL in Latest Product Catalog - V3 checkout
Why do Plans 'Preview' on the Live site show the configurations of the Test site‌?

Show more

Was this article helpful?