Chargebee Actions in Salesforce
Note
Add Chargebee UI elements manually Add the following user interface elements to the Page Layouts of the various Salesforce objects:
- Buttons for all Chargebee actions in Salesforce discussed on this page.
- Custom fields introduced by Chargebee for standard Salesforce objects.
- Chargebee custom objects to be added to related lists of Salesforce standard objects.
Editing fields on pages If you edit fields on Salesforce pages, the changes are not synced to Chargebee. The only exception is the Account object whose data can be pushed using the Create/Update Chargebee Customer action.
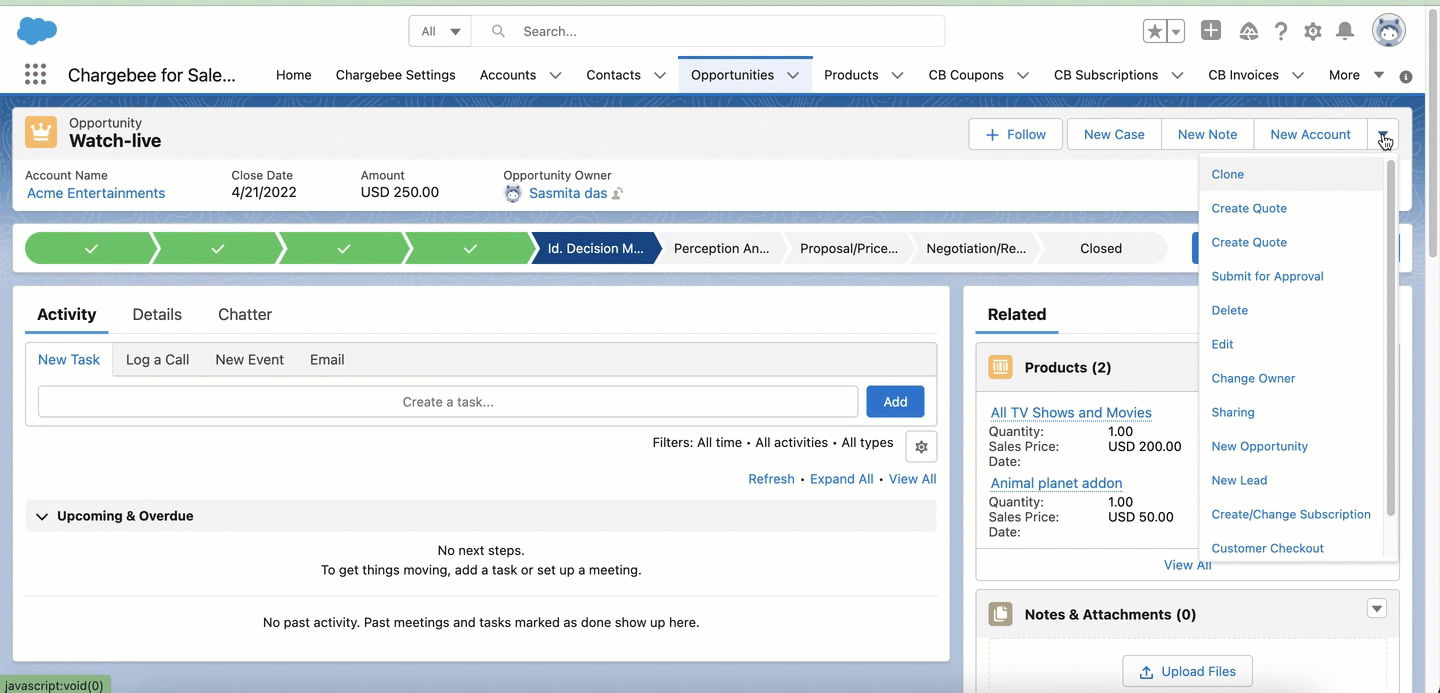
Account Actions
The actions listed in this section are those that can be performed from a Salesforce account.
Note
On carrying out any of the below-mentioned actions from an account, all the subscriptions, and invoices of the associated Chargebee customer record begin syncing to Salesforce immediately. This speeds up the availability of the subscriptions and invoices related to an account within Salesforce.
Create/Update Chargebee Customer
Available under: Account
Description
Pushes the account information into a Chargebee customer record as explained in the Sales Driven flow. If the account has not been mapped to a customer in Chargebee then a new customer record is created in Chargebee first. You can also automate this process for any account by selecting the Sync with Chargebee checkbox on its page layout. Selecting the box immediately triggers this operation and also triggers it for every update made to the account thereafter. Clear the checkbox to stop the triggers from firing.
Note
After the first time you use the Create/Update Chargebee Customer option to update a particular Chargebee Customer, updating it thereafter overwrites the customer record in Chargebee with the new inputs from the Salesforce account even if it is more recent than that in the Salesforce account.
Configure e-invoicing for customers
You can configure e-invoices for customers who are authorized to receive them when creating or updating Chargebee customers in Salesforce.
Ensure the following prior to configuring e-invoicing for customers.
- Enable e-invoicing for the Chargebee site connected to the Salesforce account.
- The customer must belong to a country that supports e-invoices.
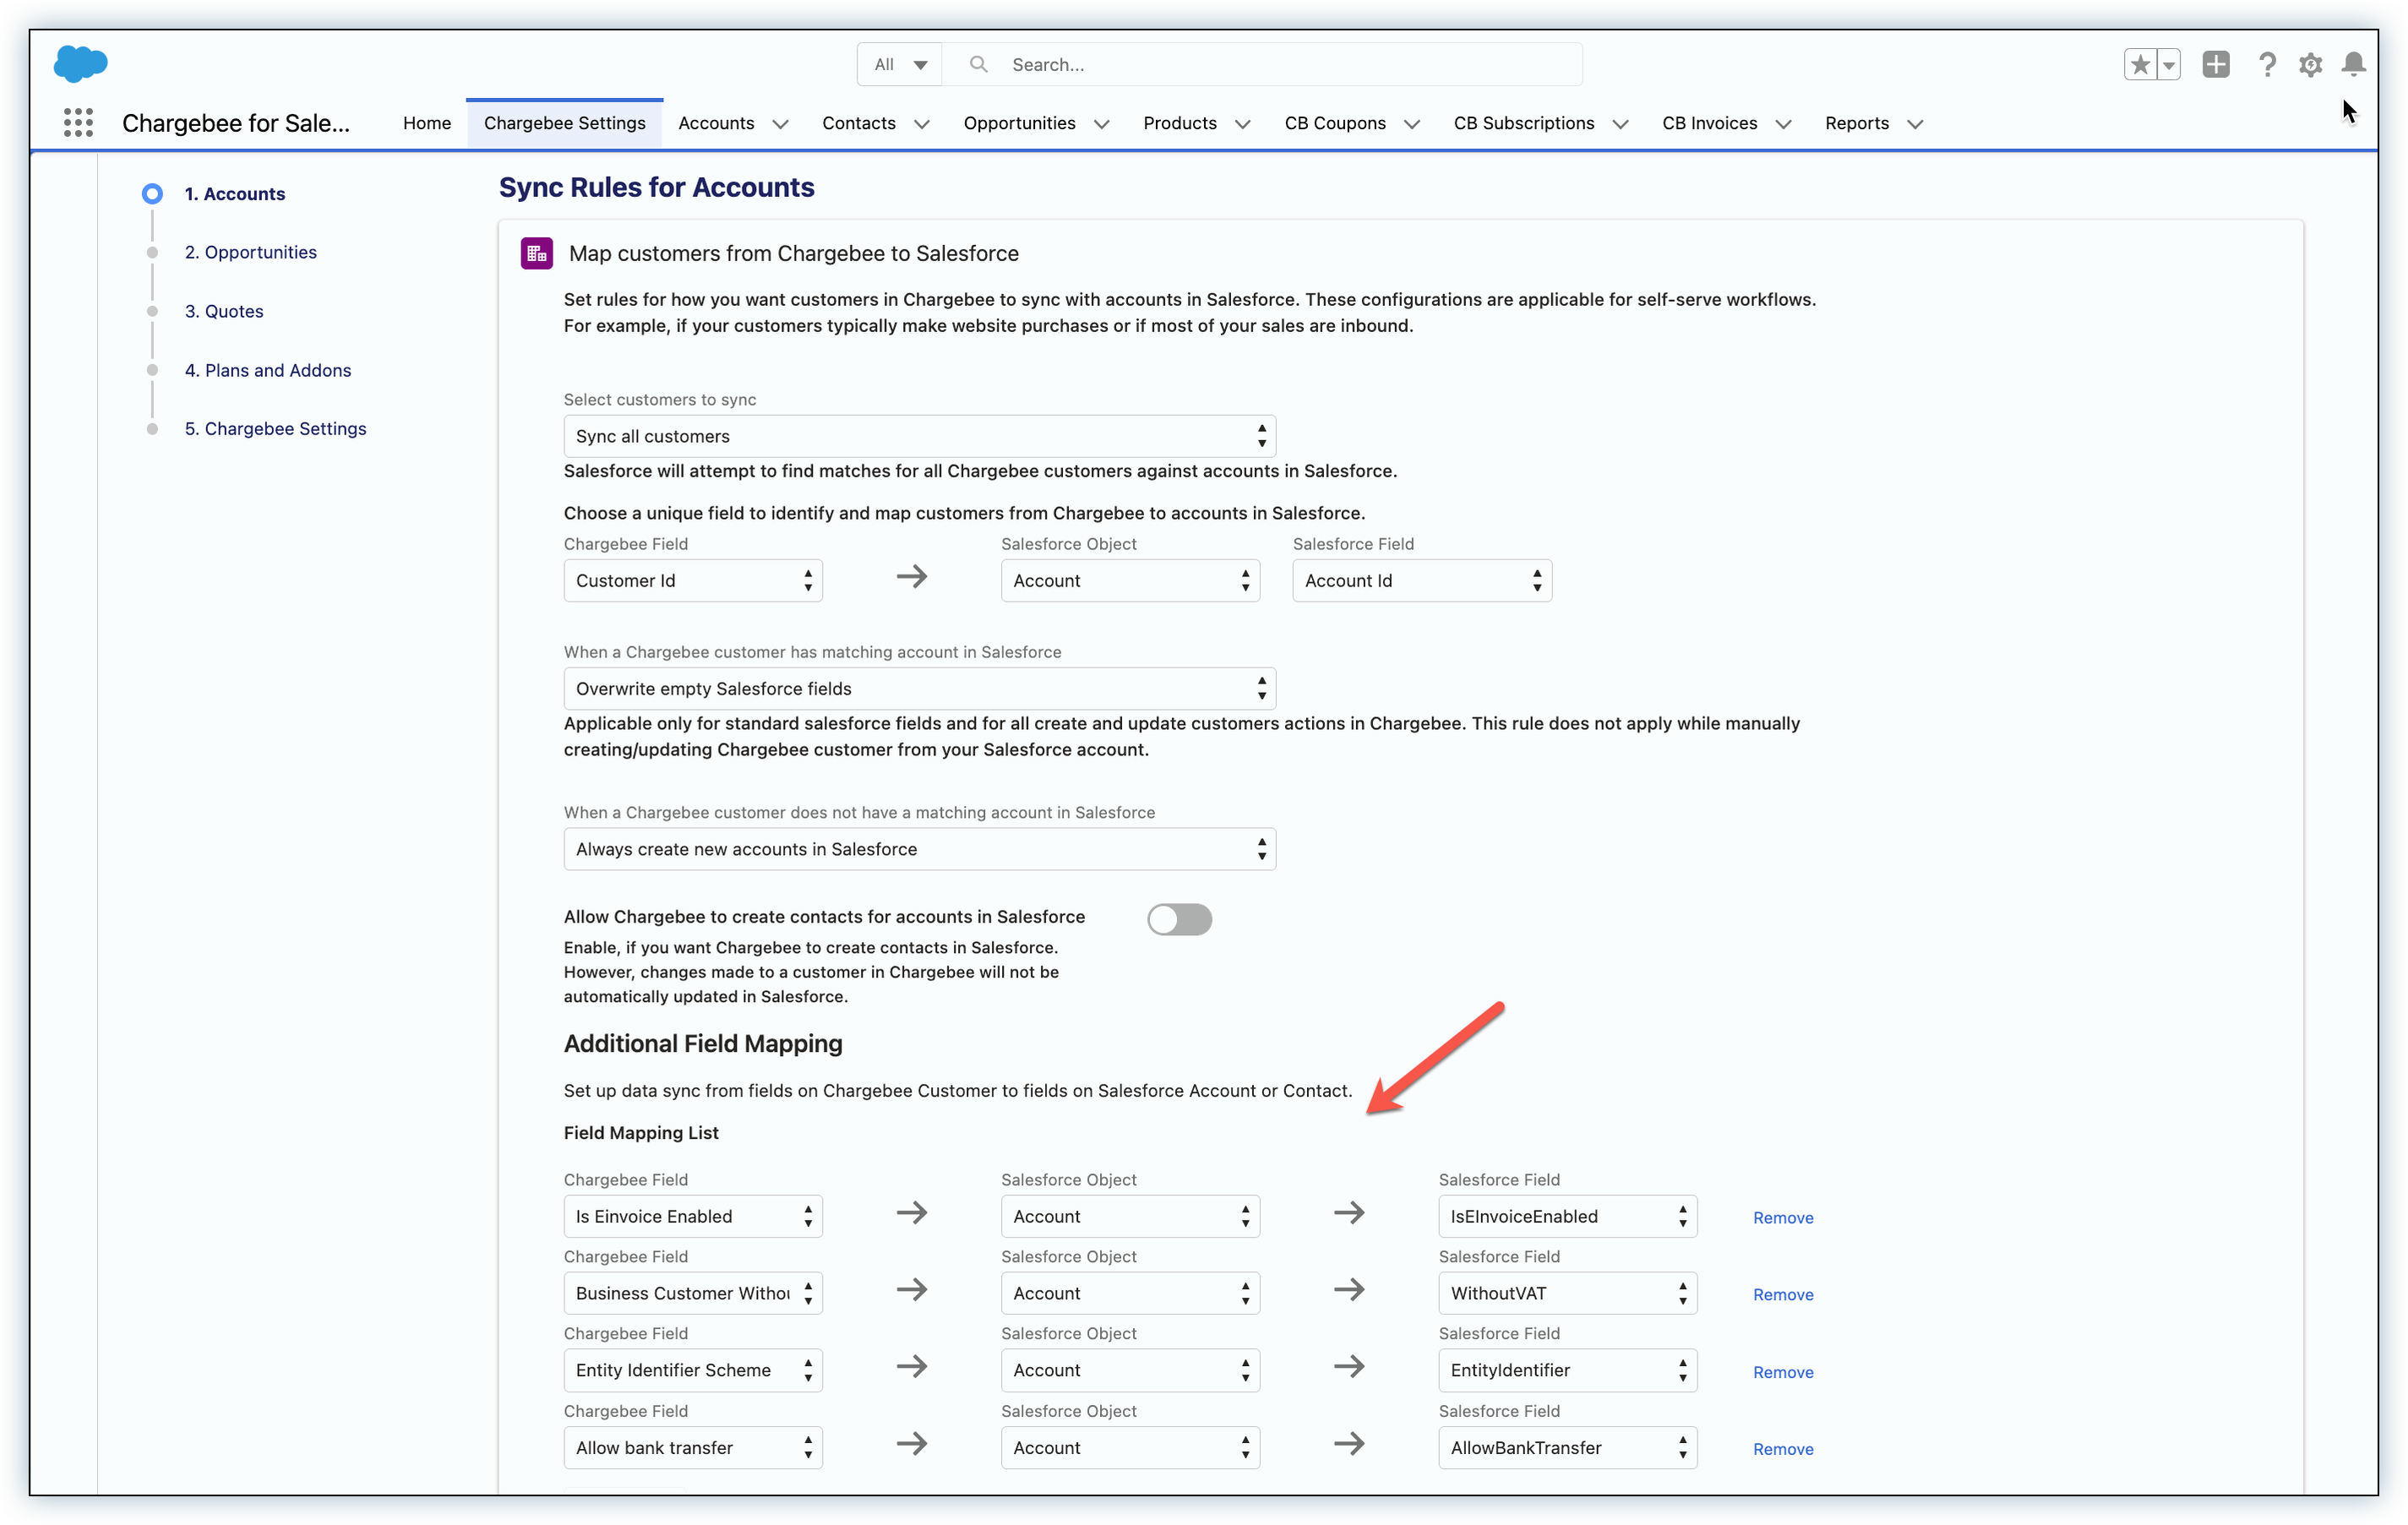
- Create the following three fields on the Account object in Salesforce and configure the field mappings on the Chargebee settings while setting up sync rules for accounts.
| Field Label | Field Type |
|---|---|
| Is Einvoice Enabled | Boolean/check_box |
| Business Customer Without VAT Number | Boolean/check_box |
| Entity Identifier Scheme | String/Text (20) |
The following screenshot displays the above fields added as part of additional field mapping for accounts.
To configure e-invoicing, perform the steps below:
- From the Salesforce account, click Create/Update Chargebee Customer.
- Select the Chargebee site from the Site dropdown list.
- Select Send e-invoice to this customer.
- In the VAT Settings section, select This is a valid business customer.
- Enter tax registration number if applicable, else select This customer does not have a VAT number.
- Click Update Customer.
Note
Multiple Chargebee sites
- If multiple Chargebee sites are connected to Salesforce, the configuration is available for the site having e-invoicing enabled.
- If multiple Chargebee sites have been connected to Salesforce, then on clicking Create/Update Chargebee Customer, you will be prompted to choose one of them to sync to.
Set/View Chargebee Hierarchy
Available under: Account
Note
Account hierarchy must be enabled in Chargebee for this action to work.
This action sets the account hierarchy in Chargebee for a pair of customers, in accordance with how it has been set for the accounts in Salesforce. If any of the pair of accounts have not been synced to Chargebee before, this action syncs them first before setting the hierarchy. You must invoke this action from the child account. If you want to set a hierarchy in Chargebee that involves multiple customer records, you must build it from the bottom, linking one parent after another.
Note
Viewing the Hierarchy
If the account hierarchy has already been set in Chargebee, the action displays the currently set hierarchy in Chargebee.
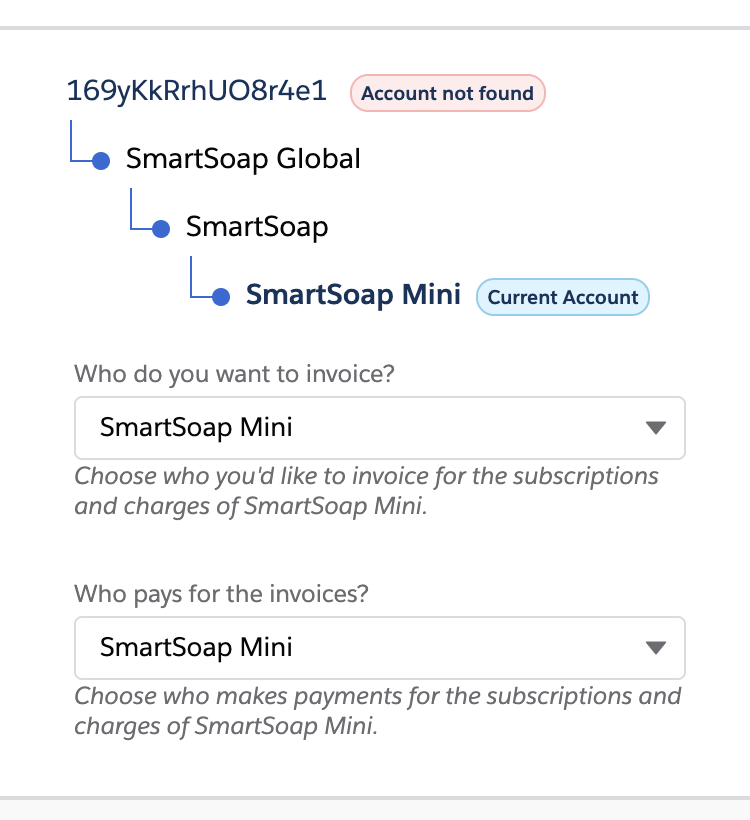
When setting the hierarchy in Chargebee as described above, you must also choose the invoice owner and payment owner for the subscriptions created for the child account. The following options are available:
- Who do you want to invoice? Select which account should be invoiced for the subscriptions of the customer. This customer will receive the invoice for the subscription. You can choose either the child customer or any of its ancestors.
- Who pays the Invoice? Select who should make the payment for the subscriptions of the customer. The options available here depend on what's chosen in the previous setting:
- If the invoice owner selected is the same as the customer in question, then the payment owner can be: either the same customer or any one of its ancestors.
- If the invoice owner selected is an ancestor of the child, the payment owner can only be set to whoever is set as the invoice owner.
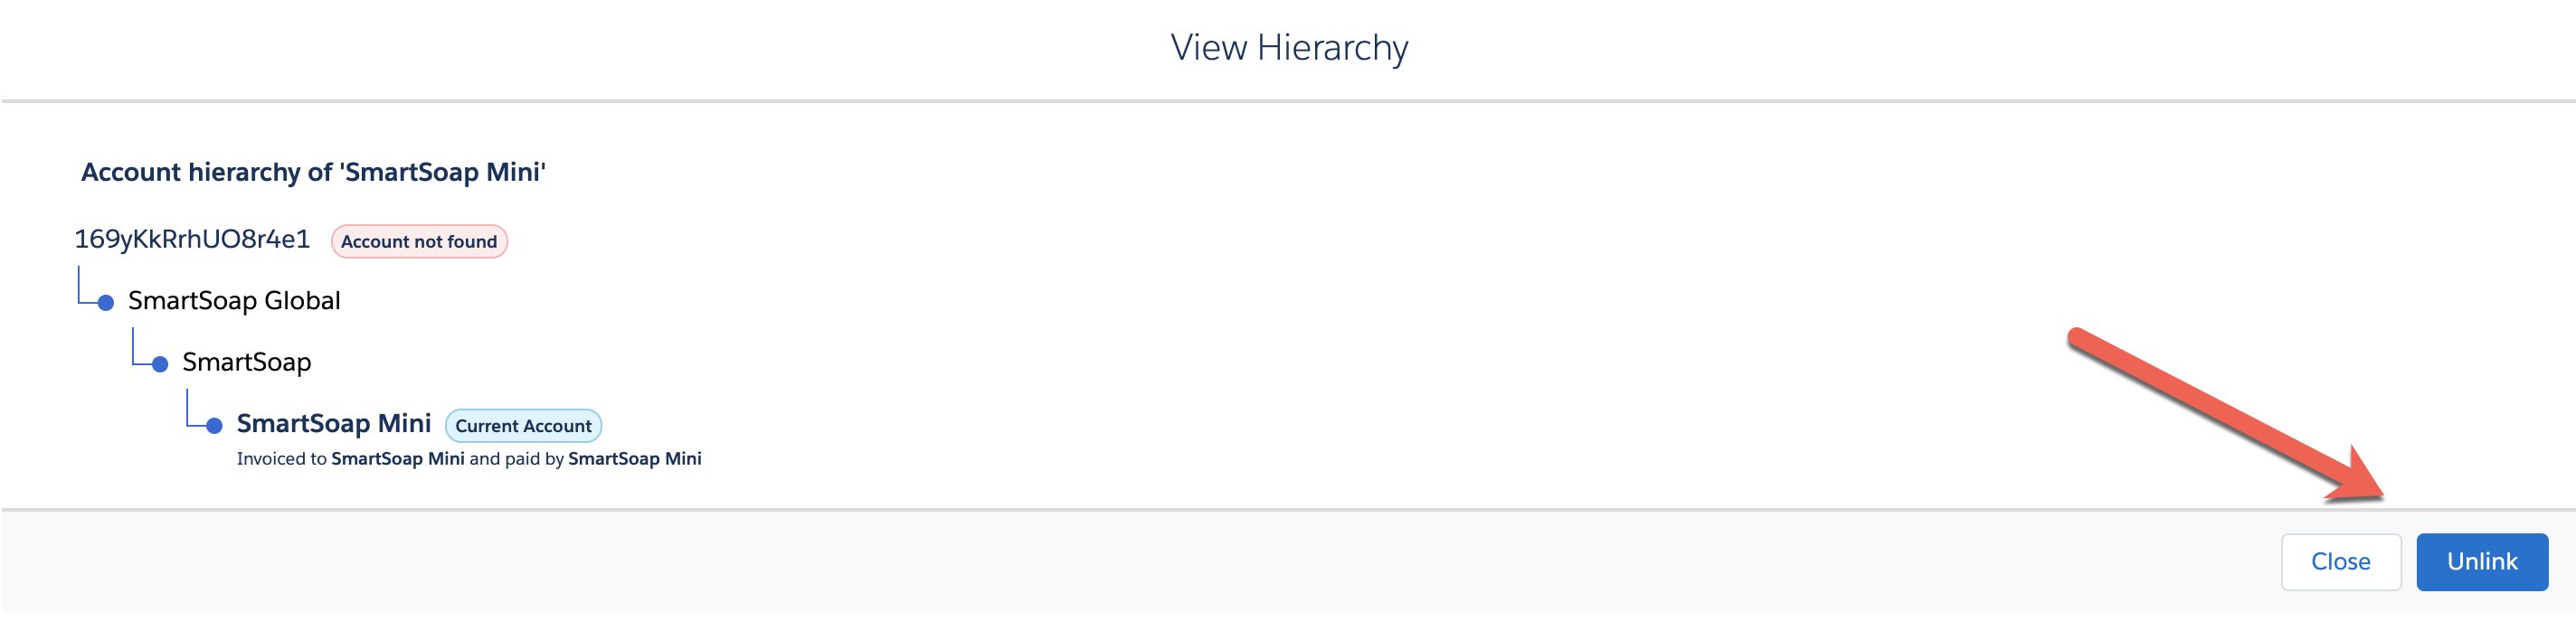
Unlinking a hierarchy
If a hierarchy is already set in Chargebee you can also use this feature to unlink it.
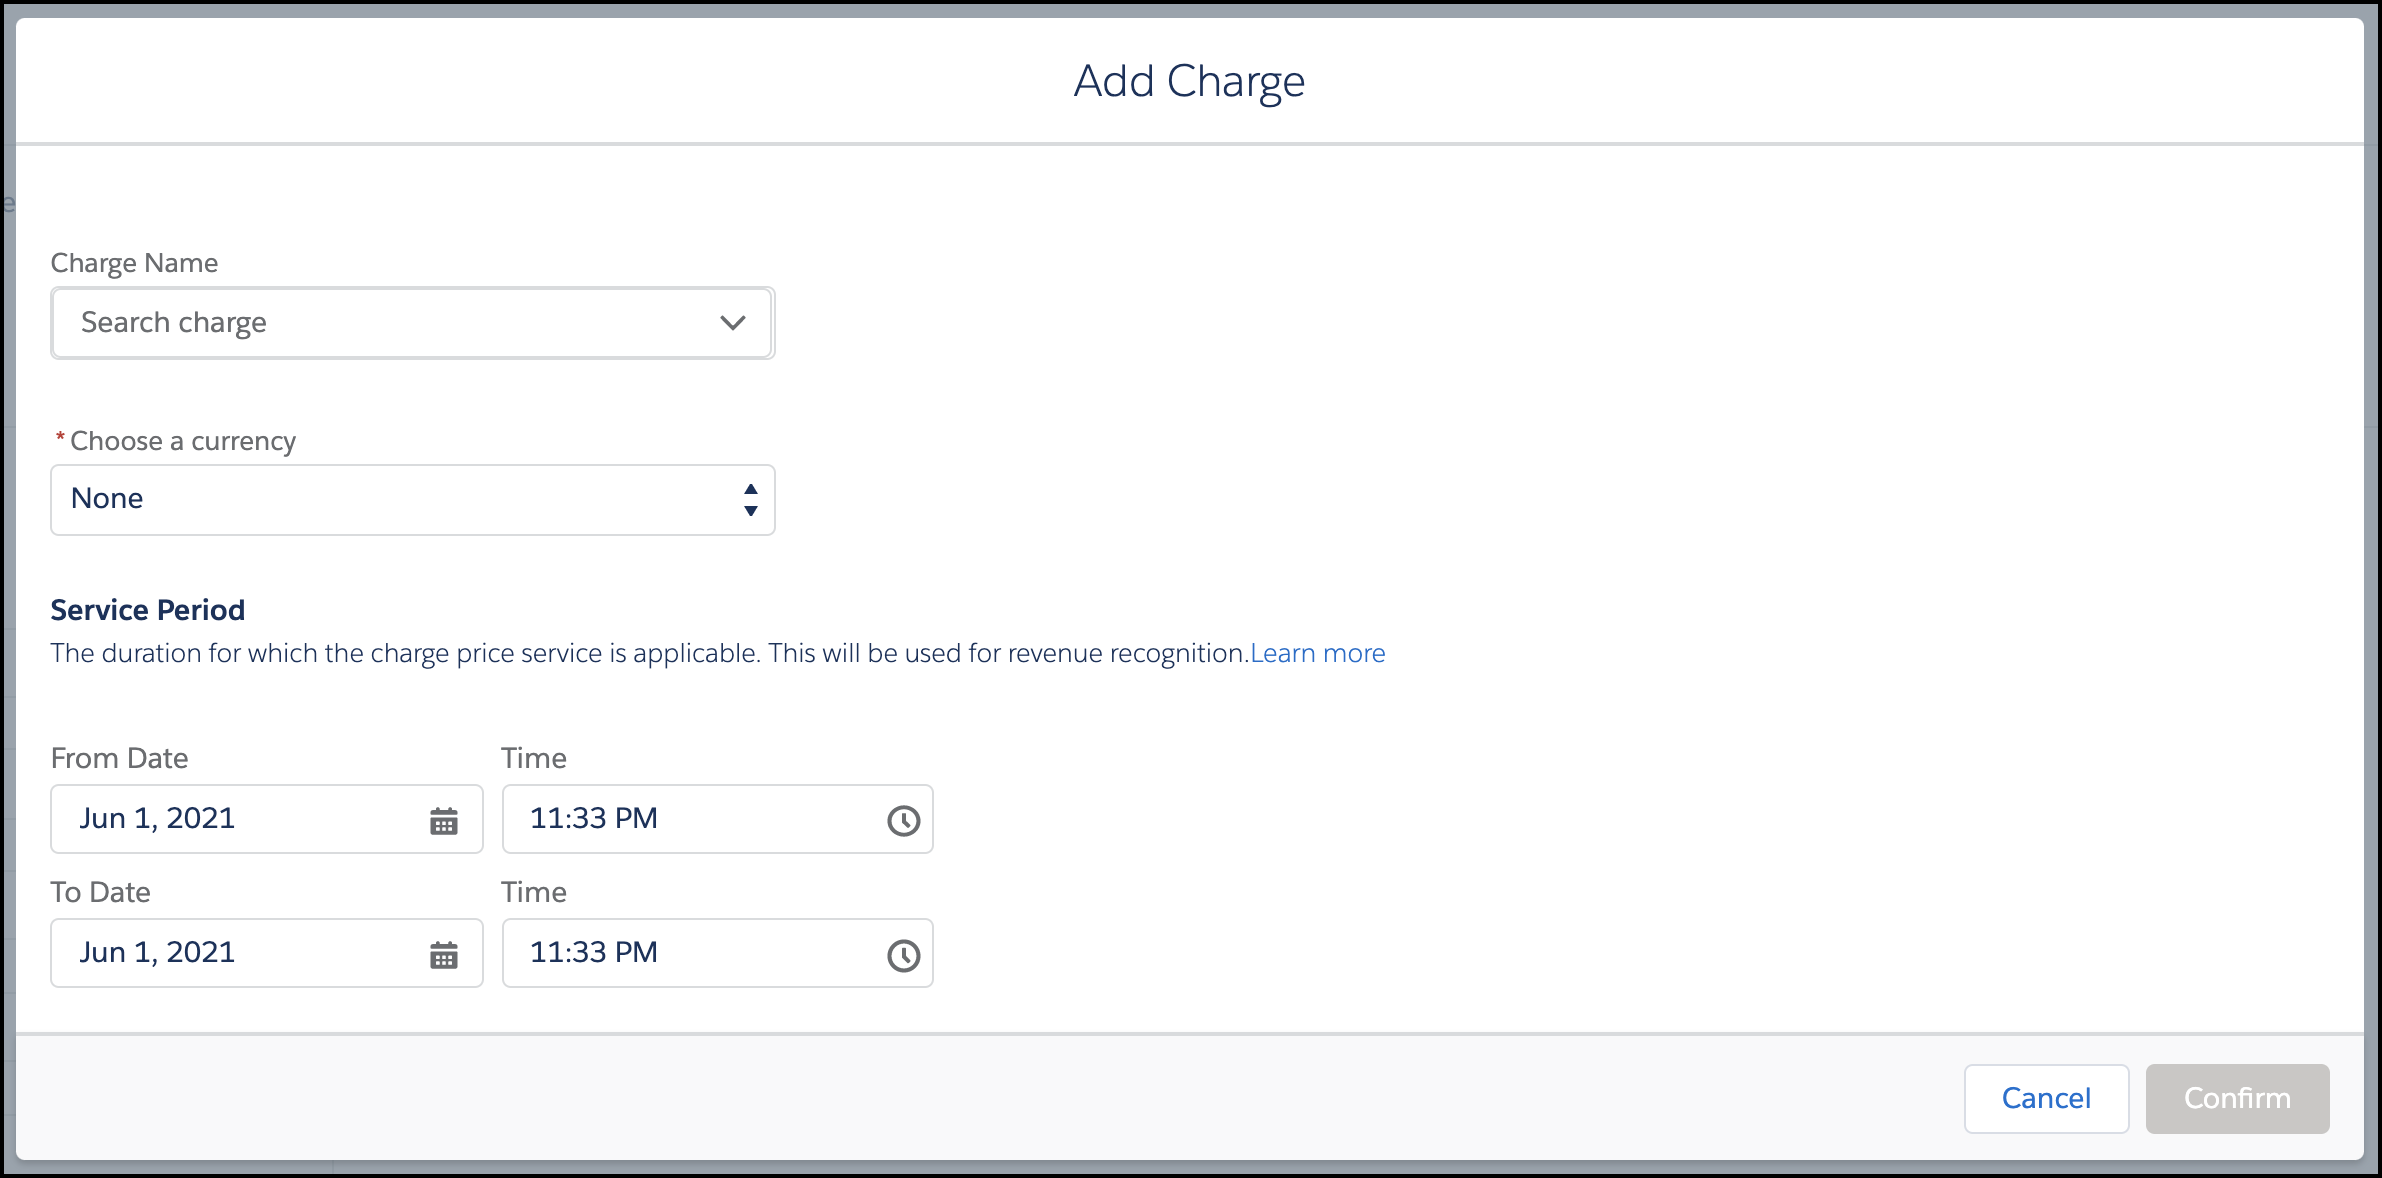
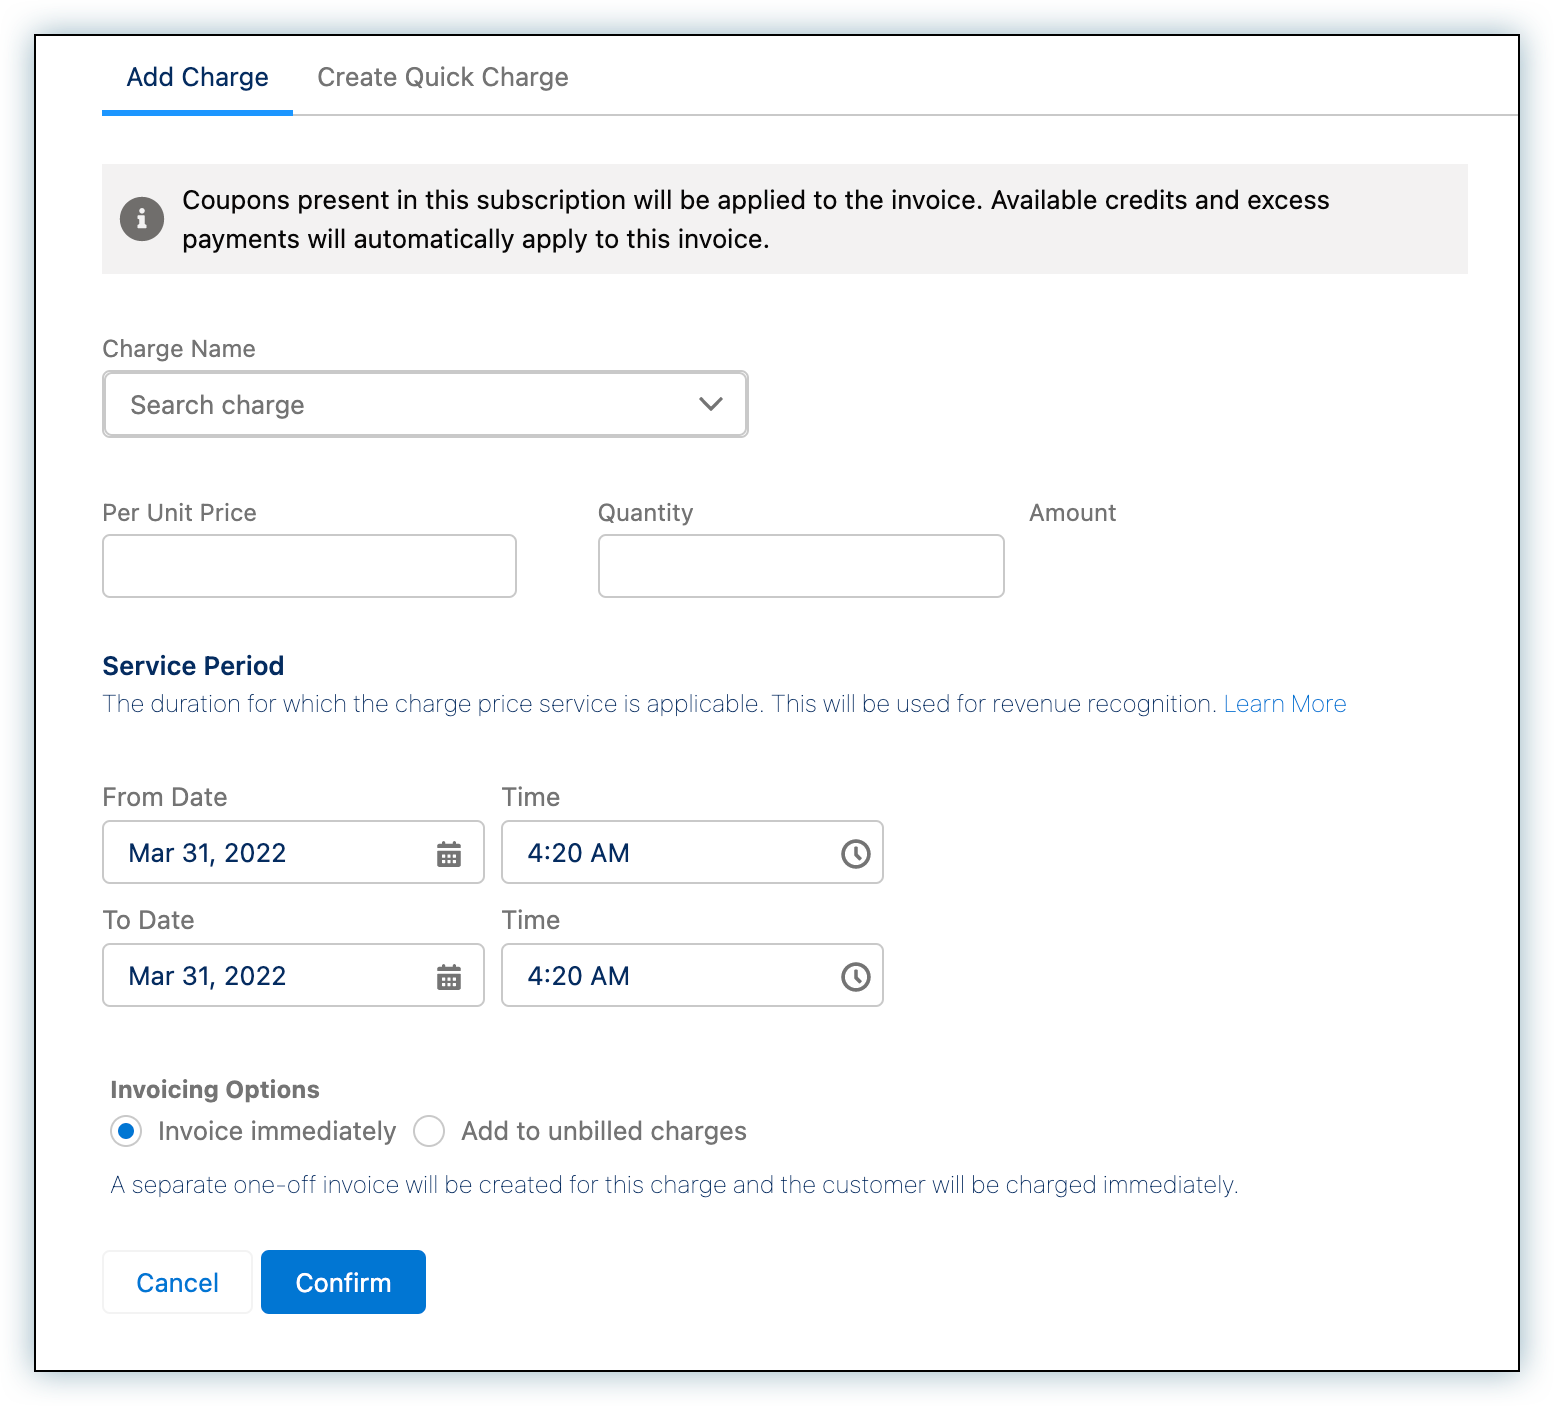
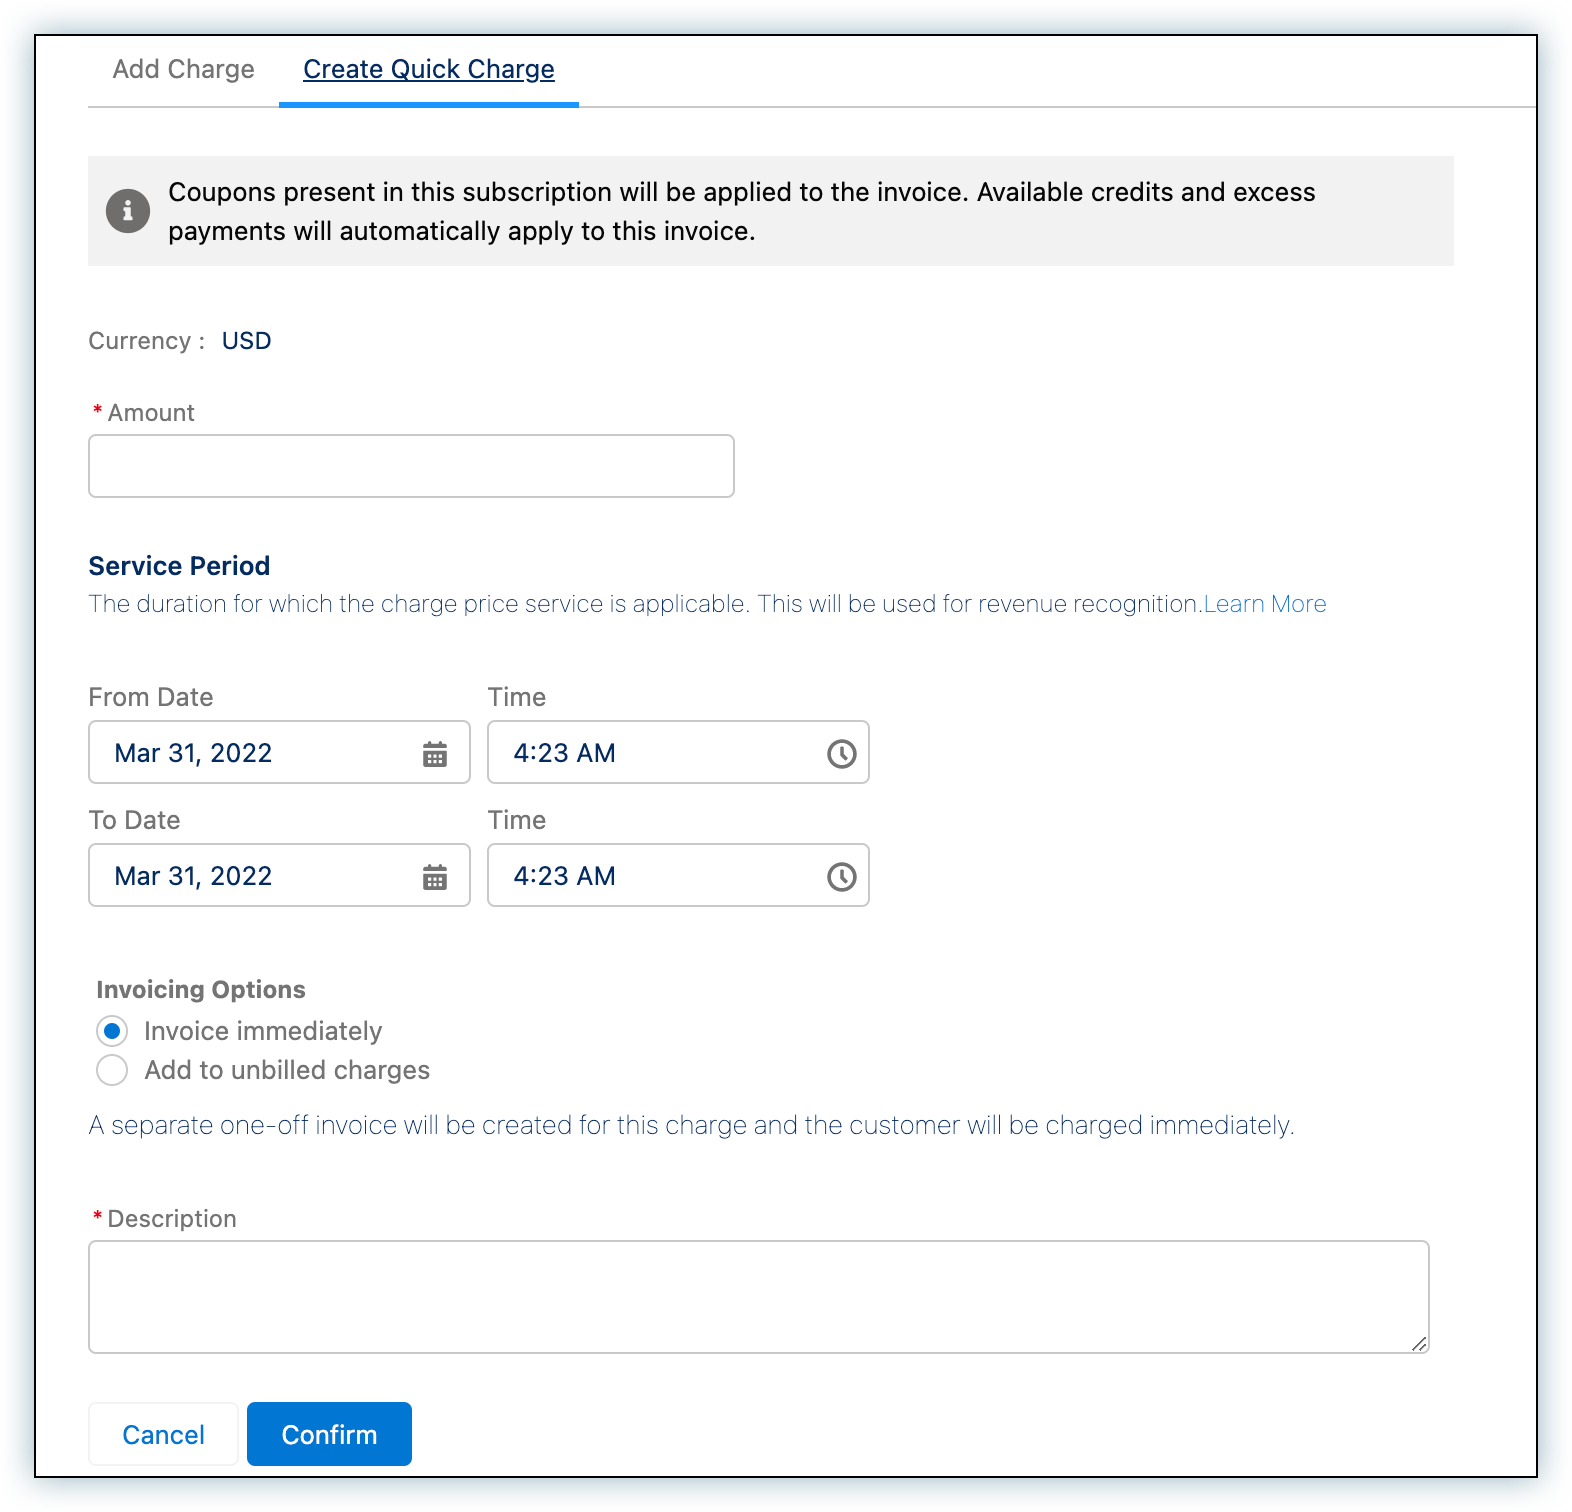
Add/Create Charge
Available under: Account
Charges and quick charges are non-recurring amounts that can be added to accounts in Salesforce (customer records in Chargebee). Charges must be predefined in Chargebee's product catalog whereas quick charges are ad-hoc and not predefined in Chargebee. Both can be added directly to accounts without being associated with subscriptions.
See also
Add/Create Charge for CB Subscriptions
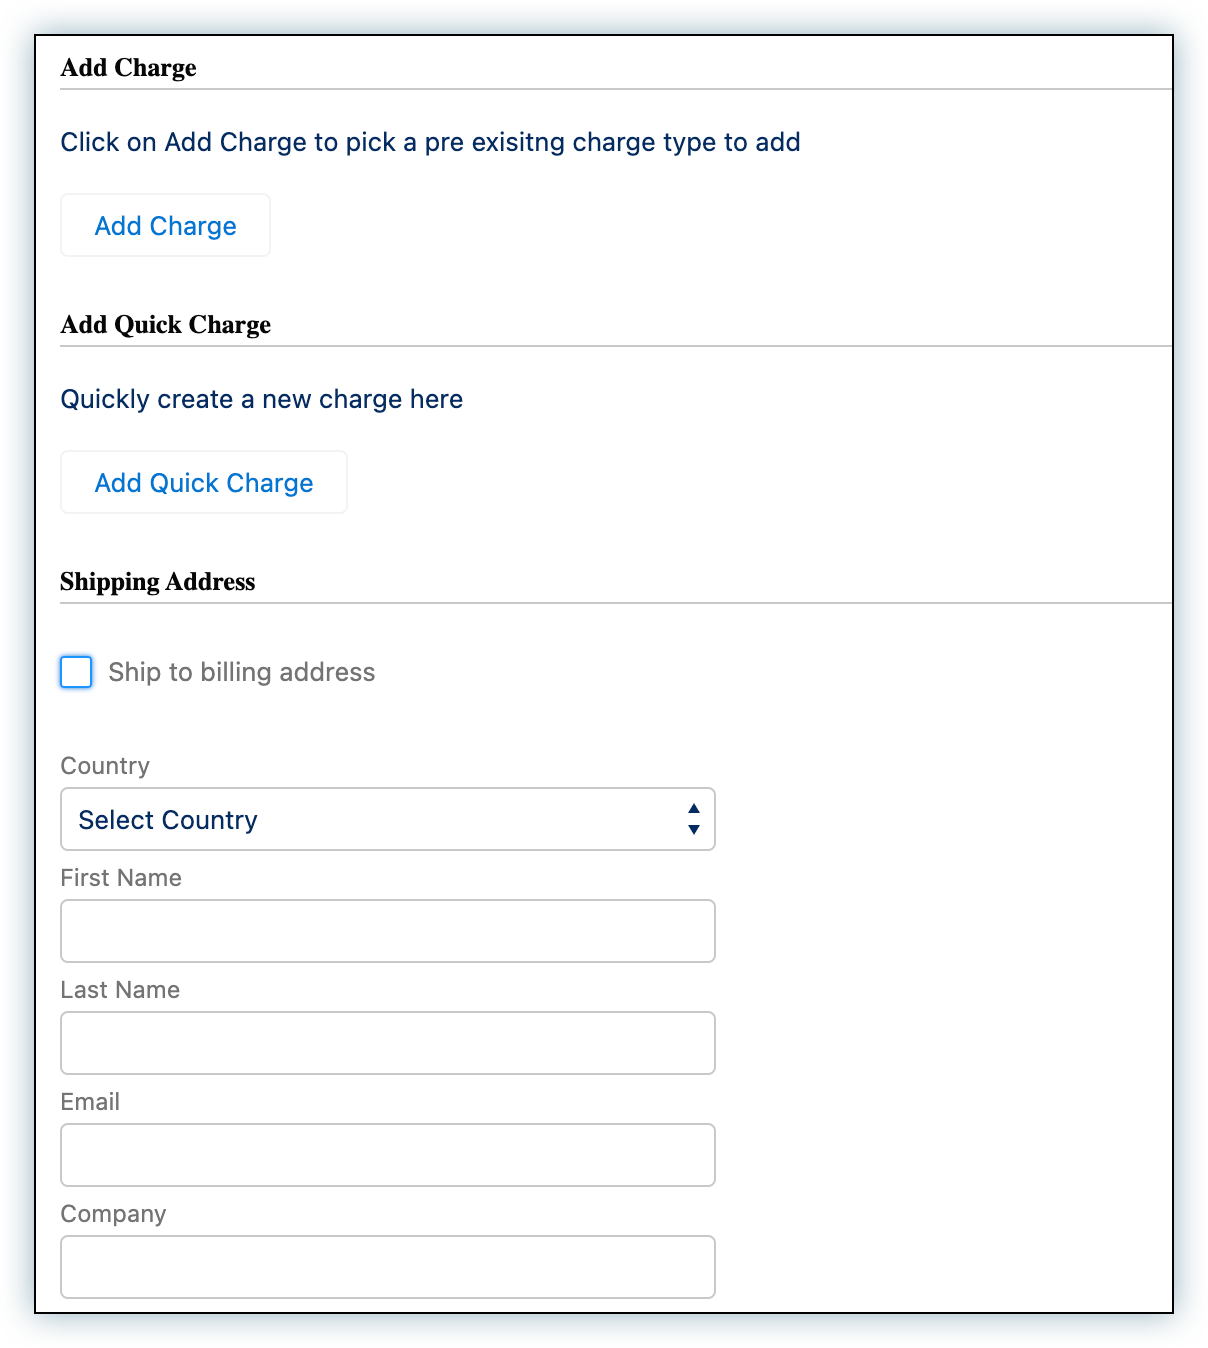
Follow the steps below to add charges and quick charges to an account:
-
From an account, click the Add/Create Charge button.
-
If the account has never been synced to Chargebee, then the Create/Update Chargebee Customer workflow kicks in automatically.
-
Click Add Charge to add charges from the product catalog in Chargebee. A modal is displayed with the following options:
- Under Charge Name, select the charge.
- Choose a currency.
- You can change the Per Unit Price for the charge provided price overriding is enabled in Chargebee. The number of decimal places you can provide is configured in Chargebee under Multi-decimal Support.
- Enter the Quantity if applicable. The number of decimal places you can provide is configured in Chargebee under Multi-decimal Support.
- Select the Service Period for this charge.
- Click Confirm and the charge details are displayed on the previous screen.
-
Add as many charges as needed by repeating step 3.
-
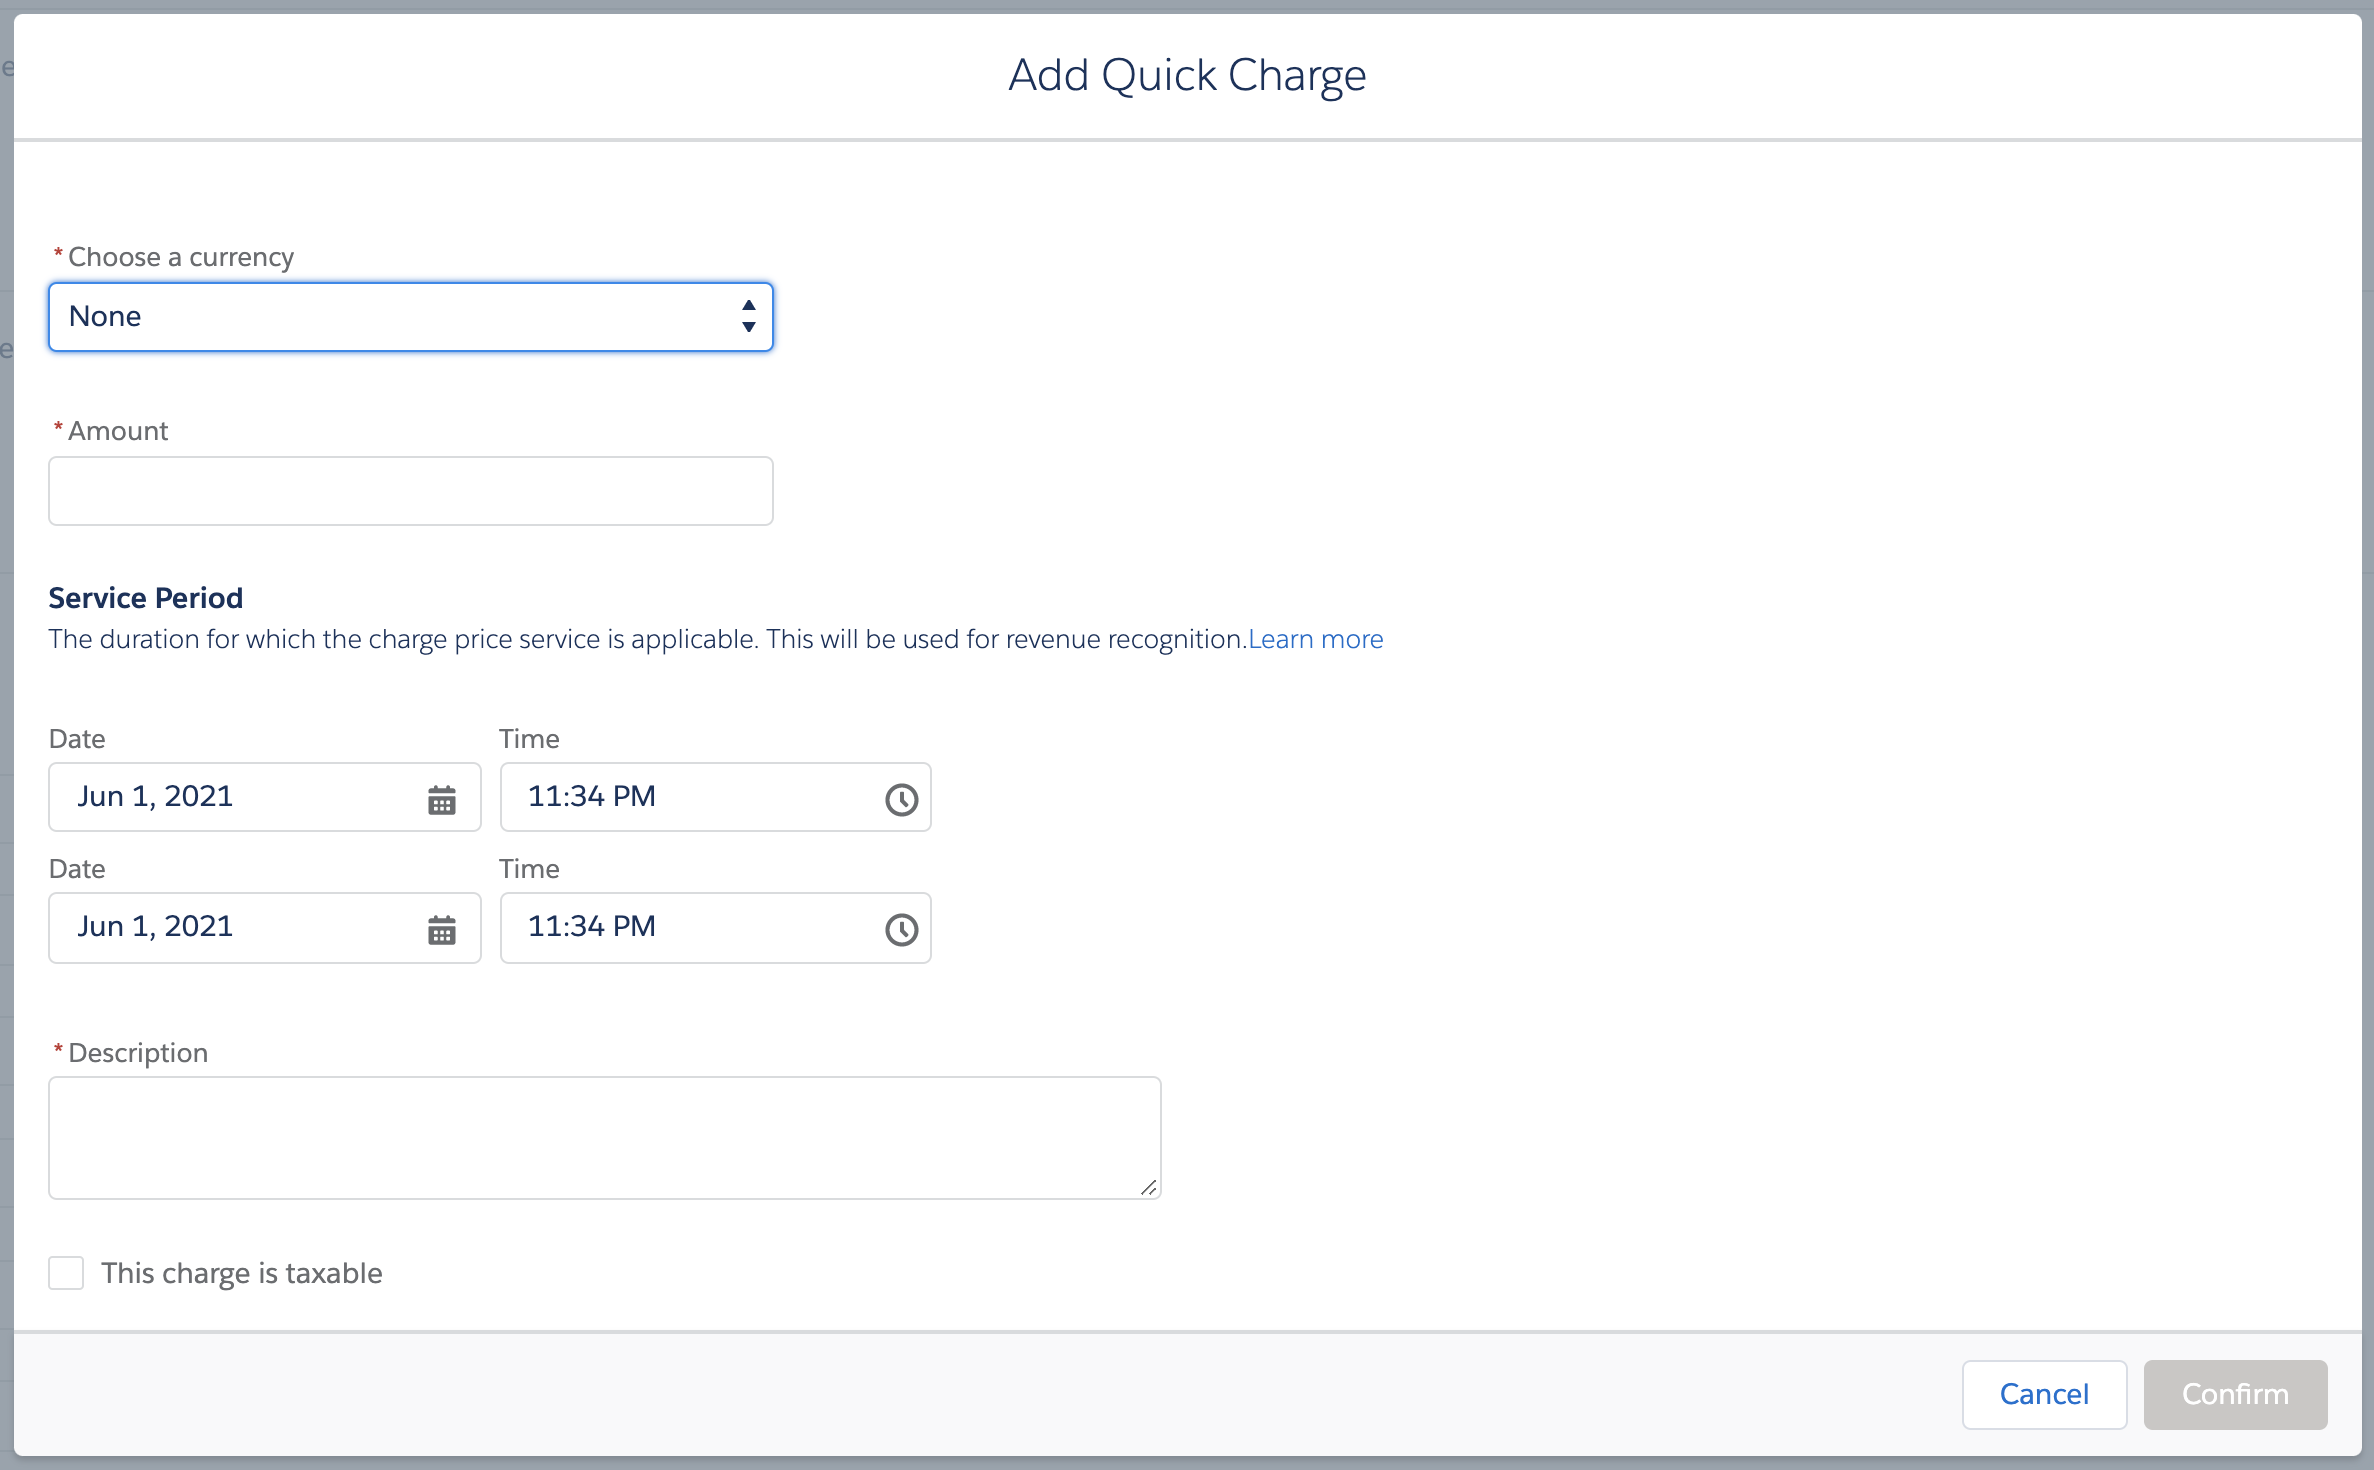
Click Add Quick Charge to add ad-hoc charges to the account. A dialog is displayed with the following options:
- Choose a currency.
- Enter the Amount.
- Select the Service Period for the quick charge.
- Enter a Description for the quick charge.
- Select the This charge is taxable checkbox to apply taxes as configured in Chargebee.
- Click Confirm and the quick charge details are displayed on the previous screen.
-
Add as many quick charges as needed by repeating step 5.
-
Click Add Coupon to apply any available coupons to the charges and quick charges.
-
Select the Ship to billing address checkbox to auto-fill the address from the Account. Clear the checkbox to enter a shipping address that's different from the billing address.
-
Enter the PO Number as applicable.
-
Under Invoice Notes, add any notes that should be displayed on the invoice PDF to be sent to the customer.
-
Click Preview and Send and a modal is shown with the preview of the invoice that would be generated.
-
Click Create Invoice to actualize the charges and quick charges.
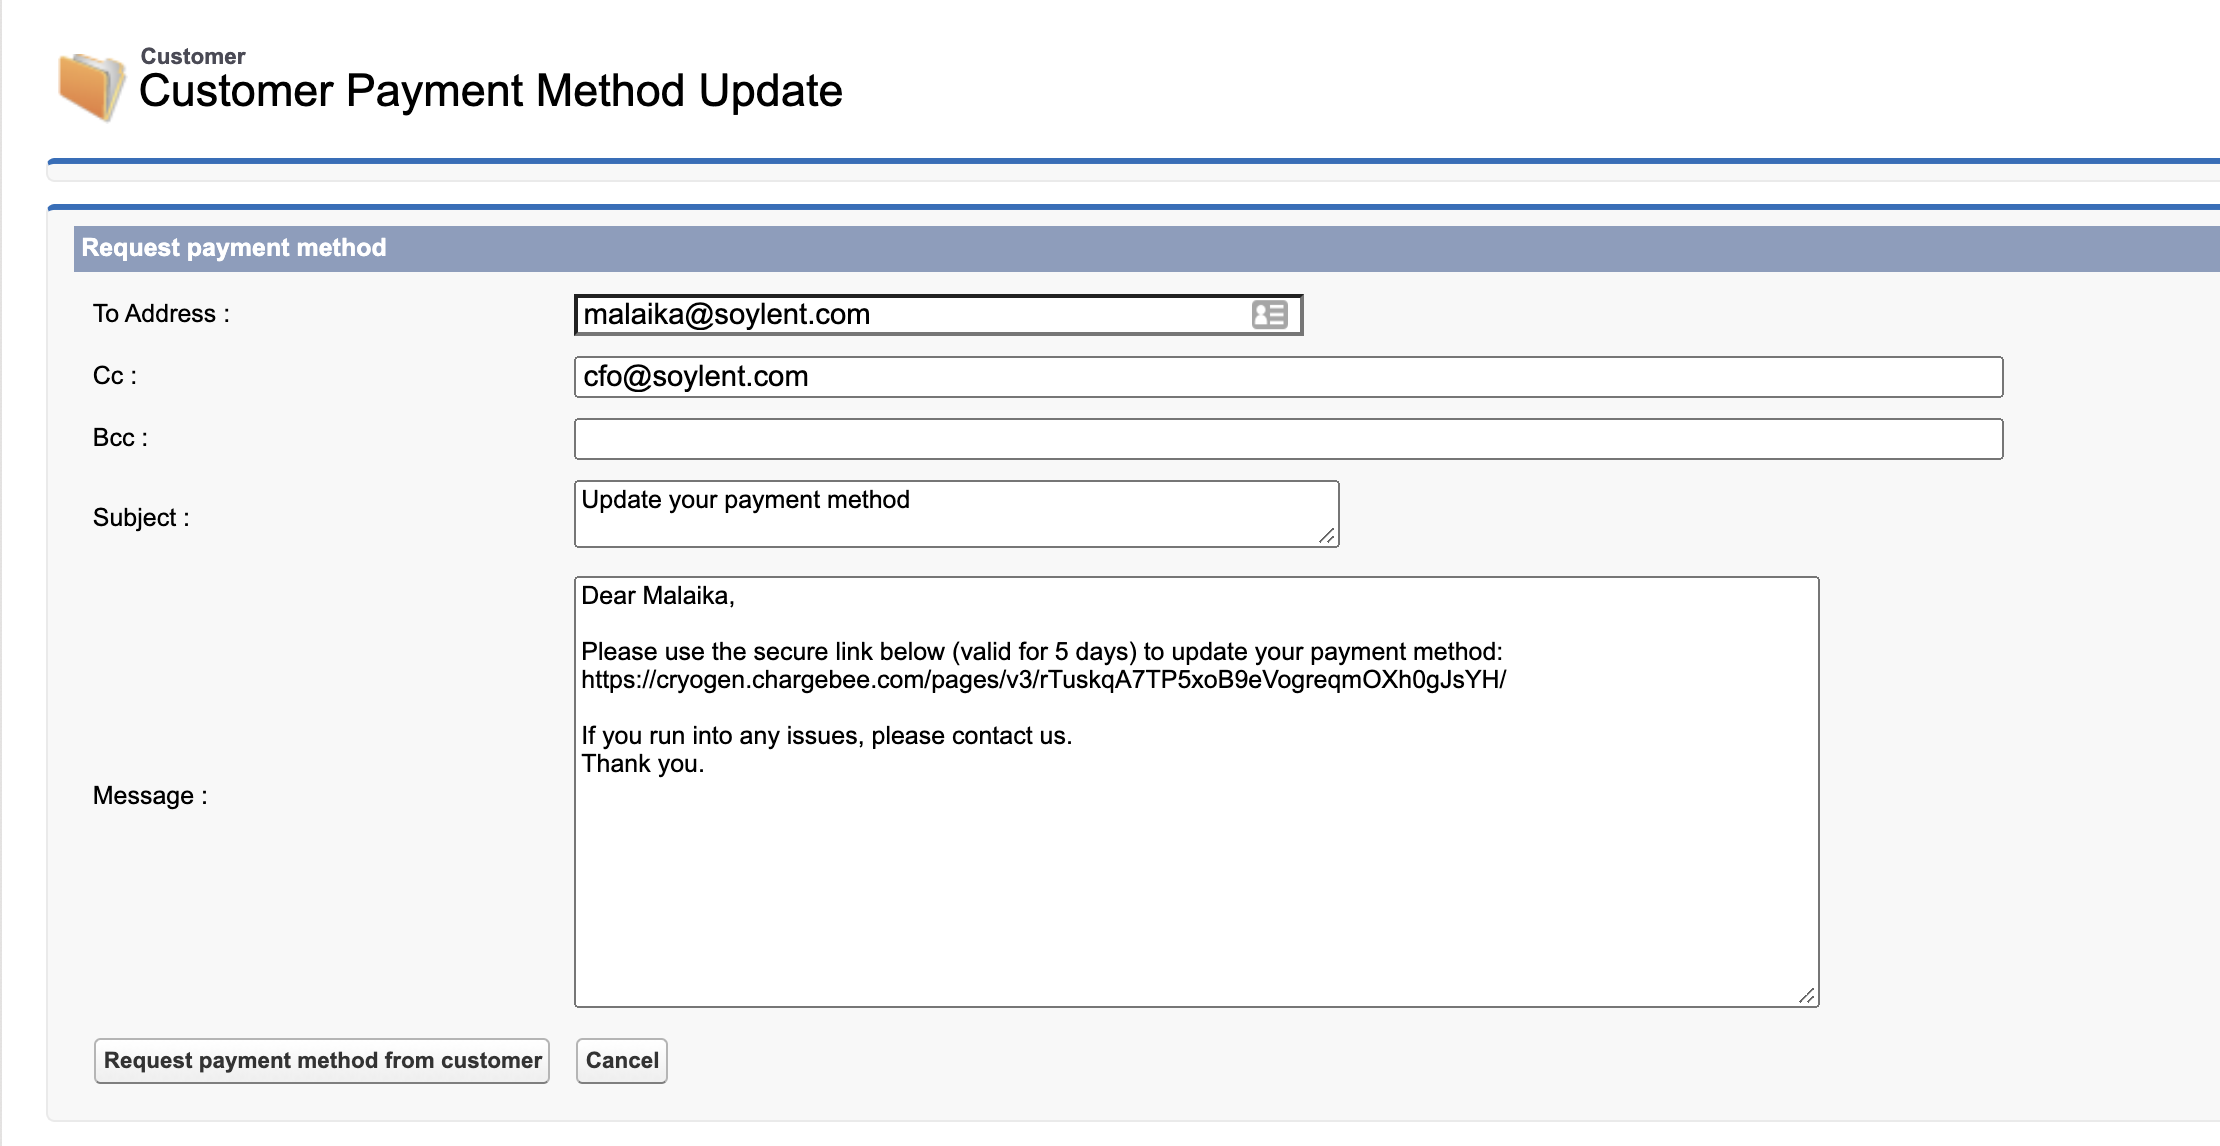
Update Payment Method (Email)
Available under: Account
Sends an email via Chargebee to the account prompting them to update their payment method. The email contains a link that the customer can follow to enter their payment method details which are then stored by Chargebee for later payments.
Note
When multiple Chargebee sites are connected... This operation will be invoked for the Chargebee site that the account has been mapped to.
Note
Using Account Hierarchy in Chargebee If payments for the customer are made by another in Chargebee, ensure that this action is invoked in Salesforce from the account which corresponds to the paying customer.
Update Payment Method
Available under: Account
This action allows a Salesforce user to directly update the payment method on behalf of the customer in Chargebee. The payment method is captured in a PCI DSS compliant or .
Note
When multiple Chargebee sites are connected... This operation will be invoked for the Chargebee site that the account has been mapped to.
Note
Using Account Hierarchy in Chargebee When payments for the customer are made by another in Chargebee, ensure that this action is invoked in Salesforce from the account which corresponds to the paying customer.
Invoice Unbilled Charges
Available under: Account
This operation is used to invoice any unbilled charges that may be present for the Chargebee customer record mapped to the account.
Note
When multiple Chargebee sites are connected... This operation will be invoked for the Chargebee site that the account has been mapped to.
Create Subscription
Available under: Account
This action creates a subscription against the Chargebee customer mapped to the account. Subscriptions can also be created from quotes directly by converting them.
Note
When multiple Chargebee sites are connected... This operation will be invoked for the Chargebee site that the account has been mapped to.
-
If the account has never been synced to Chargebee then the Create/Update Chargebee Customer workflow kicks in automatically.
-
Choose an opportunity
- If any open opportunities exist for the account, you can choose one of them so that it is updated with the product family (plans, addons, and charges) and coupons from the subscription. Once the subscription is created, the opportunity is updated if setting 1 and 2 are configured appropriately. If you don't choose an opportunity, the options selected under this setting 2 for opportunities and subscriptions applies.
-
Choose a Subscription Id for the subscription. When not entered, it is auto-generated by Chargebee.
-
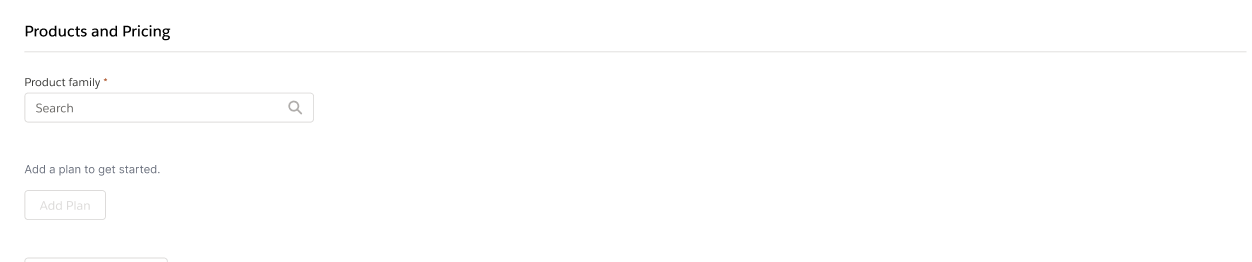
Select a Product Family. The plans, addons, and charges available in the next steps depend on the product family selected.
-
Enter the Plan Details:
- Select a plan using the Plan Name dropdown menu. The plans shown belong to the product family selected in the previous step. Note: The plan selected can be metered, in which case the upcoming invoices for the subscription are closed manually or automatically based on the setting at the customer level and site level in Chargebee. The former takes precedence over the latter.
- The Choose Currency field displays the opportunity currency. To change this, you must edit the Opportunity Currency field for the opportunity.
- Select the billing frequency you want from the Billing Frequency dropdown. If the product has a single billing frequency configured in Chargebee, that frequency is selected and displayed by default in the dropdown menu.
- The Price field displays the plan price for the currency and billing frequency selected. (Note: For tiered, volume and stairstep pricing models, hover over the "i" icon to reveal a tooltip showing the price split among the quantity tiers.) You can change the value provided price overriding has been enabled in Chargebee. The number of decimal places you can provide is configured in Chargebee under Multi-decimal Support.
-
Enter the details for Addons:
- Once a plan has been selected, any mandatory addons are displayed in this section automatically. They cannot be removed and their quantities cannot be changed.
- Recommended addons for the plan also show up automatically. These can be changed or removed.
- Click on Add Addon to select any more addons for the opportunity.
- Select an addon under Addon Name. Note: The plan selected can be metered, in which case the upcoming invoices for the subscription are closed manually or automatically based on the setting at the customer level and site level in Chargebee. The former takes precedence over the latter.
- Choose Frequency dropdown lists the billing frequencies of the addon that are compatible with the billing frequency selected for the plan. The plan billing frequency has to be a multiple of the addon billing frequency for the latter to be compatible with the plan.
- By default, the price of the addon specified for the currency and billing period combination is displayed under Unit Price. If differential pricing has been enabled for the addon for the plan chosen, then that price is shown by default.
- You can change the unit price for the addon provided price overriding has been enabled in Chargebee. The number of decimal places you can provide is configured in Chargebee under Multi-decimal Support.
- If the pricing model is anything other than flat fee, you can input the Quantity as well. The number of decimal places you can provide is configured in Chargebee under Multi-decimal Support.
- If billing cycles for addons is enabled in Chargebee, you can set the number of billing cycles for the addon.
- To remove an addon, click the Remove link seen on the right side of the addon details.
-
Enter the details for Charges:
- Once a plan has been selected, any charges that have been configured to apply automatically along with it are displayed in this section.
- You can change the unit price for the charge provided price overriding has been enabled in Chargebee. The number of decimal places you can provide is configured in Chargebee under Multi-decimal Support.
- If the pricing model is anything other than flat fee, you can input the Quantity as well. The number of decimal places you can provide is configured in Chargebee under Multi-decimal Support.
- Under Charge customers, select the event at which the charge should be applied to the subscription.
- Under Apply charges, select if you want to have the charge applied every time the event occurs or Once.
- Under Number of days of service provided, select the number of days of service period for the charge.
- To remove a charge, click the Remove link seen on the right side of the charge details.
- Use the Select a coupon dropdown and apply any of the coupons available. Multiple coupons can be applied.
- Provide the Billing details:
-
Enter a Start Date for the subscription. The date/time at which the subscription is to start or has started. If not provided, the subscription starts immediately. If set to a value in the past then that date/time should not be more than the duration worth a plan billing period, into the past.
-
Under Billing Cycles Type, select one of the following options:
- Forever: the subscription renews after the end of each term until it is explicitly canceled.
- Fixed: the subscription renews for a fixed number of billing cycles. In this case, provide the following additional details:
- Enter the number of billing cycles that the subscription should run before canceling automatically.
- Select the Apply contract terms to this subscription checkbox to enable contract terms. On selecting the checkbox, you are presented with options to override the default contract terms settings that have been configured for the Chargebee site.
-
Set the Auto Collection Status for the subscription.
-
- Clear Ship to billing address checkbox to enter a shipping address that's different from the billing address. The shipping address in the Account is prefilled and you can edit as needed.
- Invoicing Options: When charges are raised immediately on subscription creation, the following options determine how they're handled:
- Invoice immediately: the charges are immediately invoiced.
- Add to Unbilled Charges: the charges are added to unbilled charges.
Note
Once the subscription is created in Chargebee, it is immediately synced back into Salesforce as a record under the CB Subscription custom object. This sync can take a few minutes. The opportunity – if one is chosen in step 3 above – is also updated.
Generate Checkout URL
Note
Using Account Hierarchy in Chargebee If the customer record linked to the contact is part of a hierarchical account relationship in Chargebee, then using this action will cause erroneous behavior. Always use the Create Subscription action for such cases.
When on the Create Subscription page, you have the alternative of enabling the customer to checkout and pay for the subscription themselves. This is done via the Generate Checkout URL button. Additionally, the checkout URL displays any manual discounts applied to the subscription.
Contract Terms
Contract terms are not created when using Generate Checkout URL. To include contract terms, complete the subscription creation by clicking on Create Subscription button at the end of the form when creating a subscription from an account or opportunity.
- Fill in the Create Subscription form and click the Generate Checkout URL button at the bottom.
- You are prompted with two options:
- Populate checkout link only: This will populate a checkout link in the CB checkout link object on the accounts and opportunities Related tab.
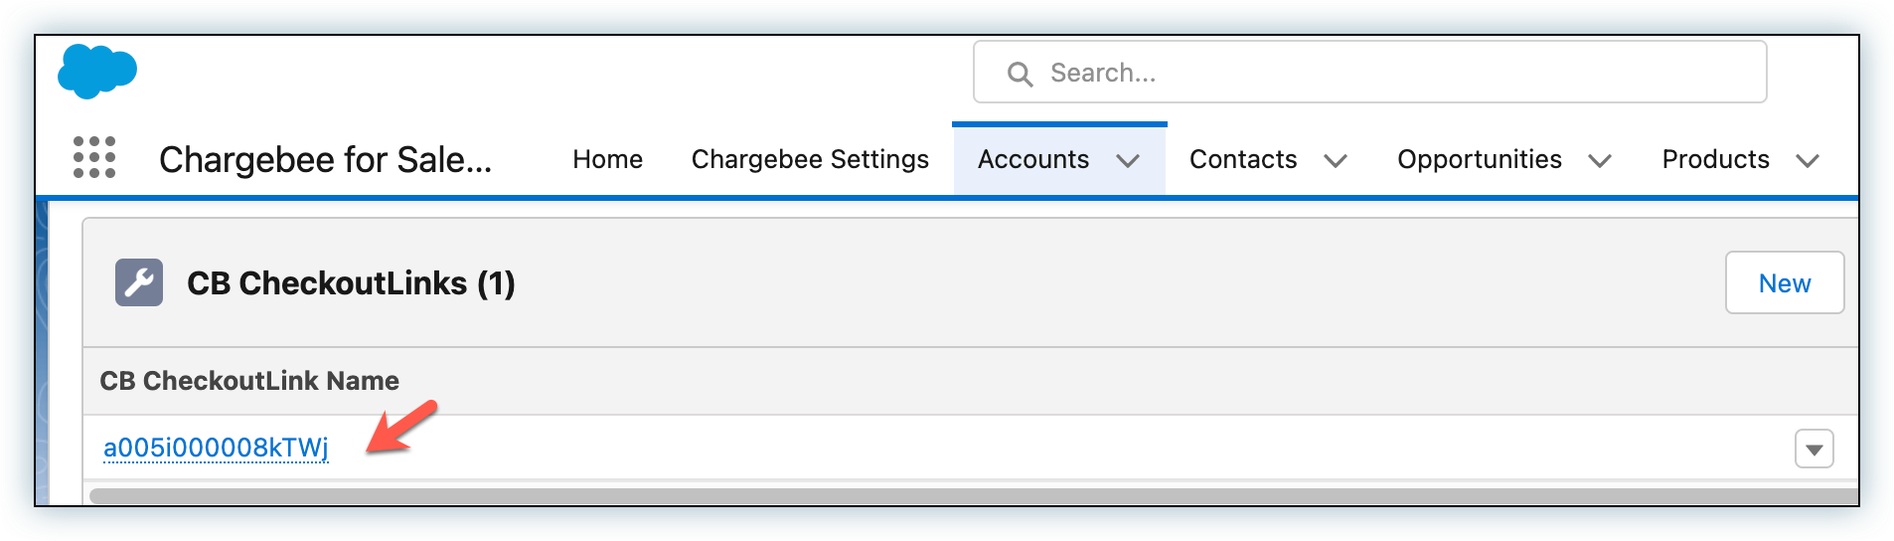
- Populate the checkout link and email it: Selecting this option adds the checkout link to the email template. You can edit the subject and body of the email. Click Send to send the email. The emails sent can be viewed in the Salesforce Activity tab for the opportunity, contact, and account.
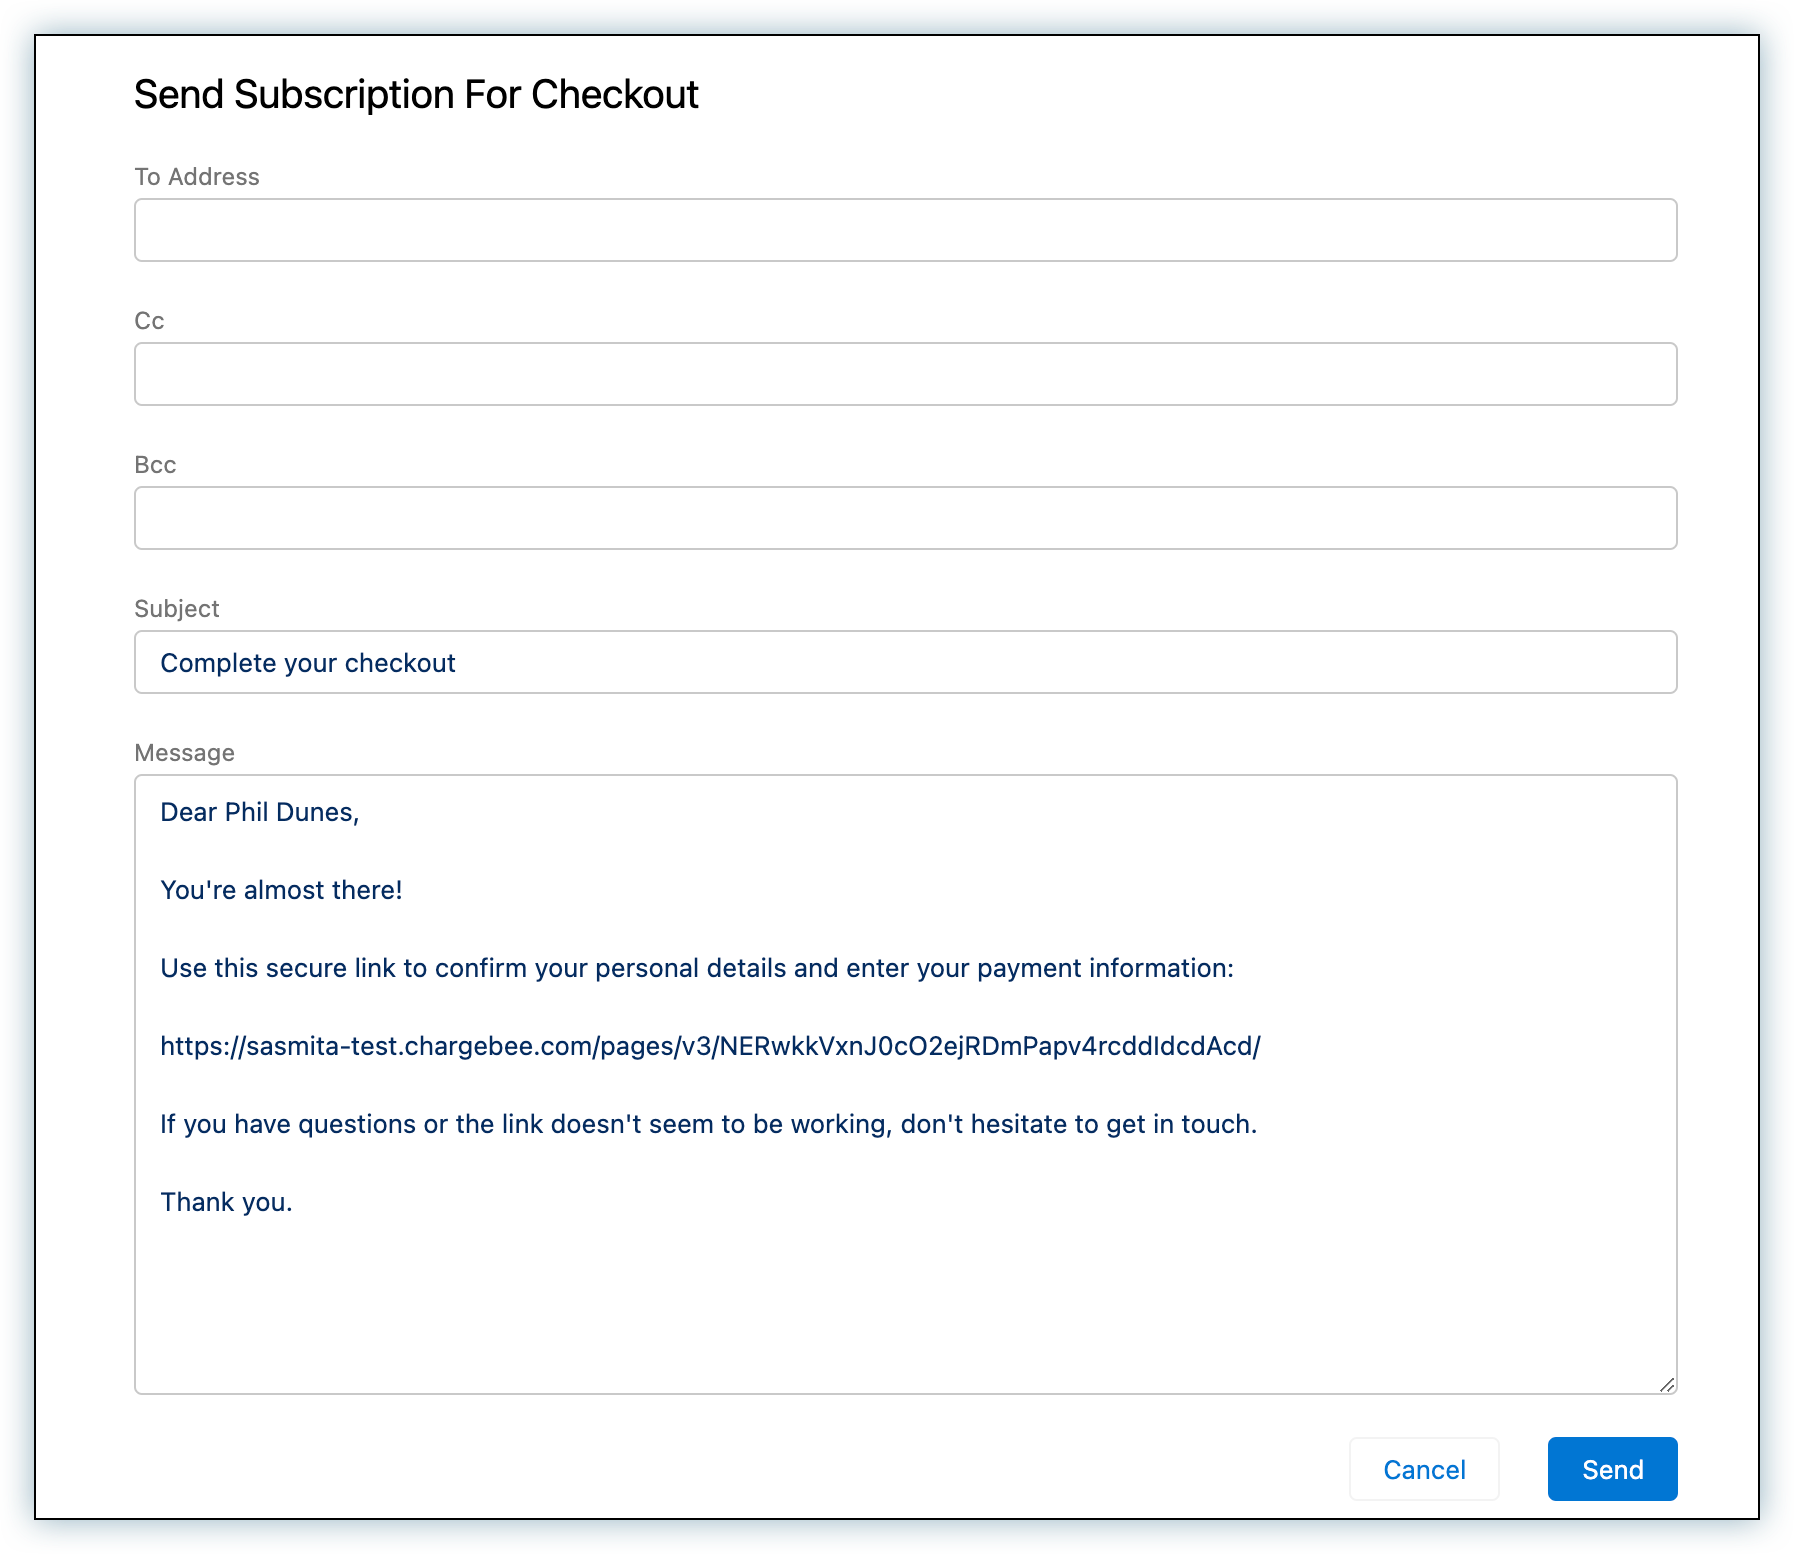
- Populate checkout link only: This will populate a checkout link in the CB checkout link object on the accounts and opportunities Related tab.
- The shipping address specified in the Create Subscription page is prefilled for the customer on the checkout page. When the subscription is created in Chargebee on checkout, the address is attached to it.
The subscription once created, is reflected in Salesforce when the next sync is run.
Note
No offline payments The Generate Checkout URL workflow signs up the customer using . The subscription is created once the payment is made successfully. There is no option for the customer to defer payments and make them offline later. If you wish to keep charges unbilled for the customer then instead of using Generate Checkout URL, select the Add to unbilled charges option on the Create Subscription form instead and click on Create New Subscription.
**
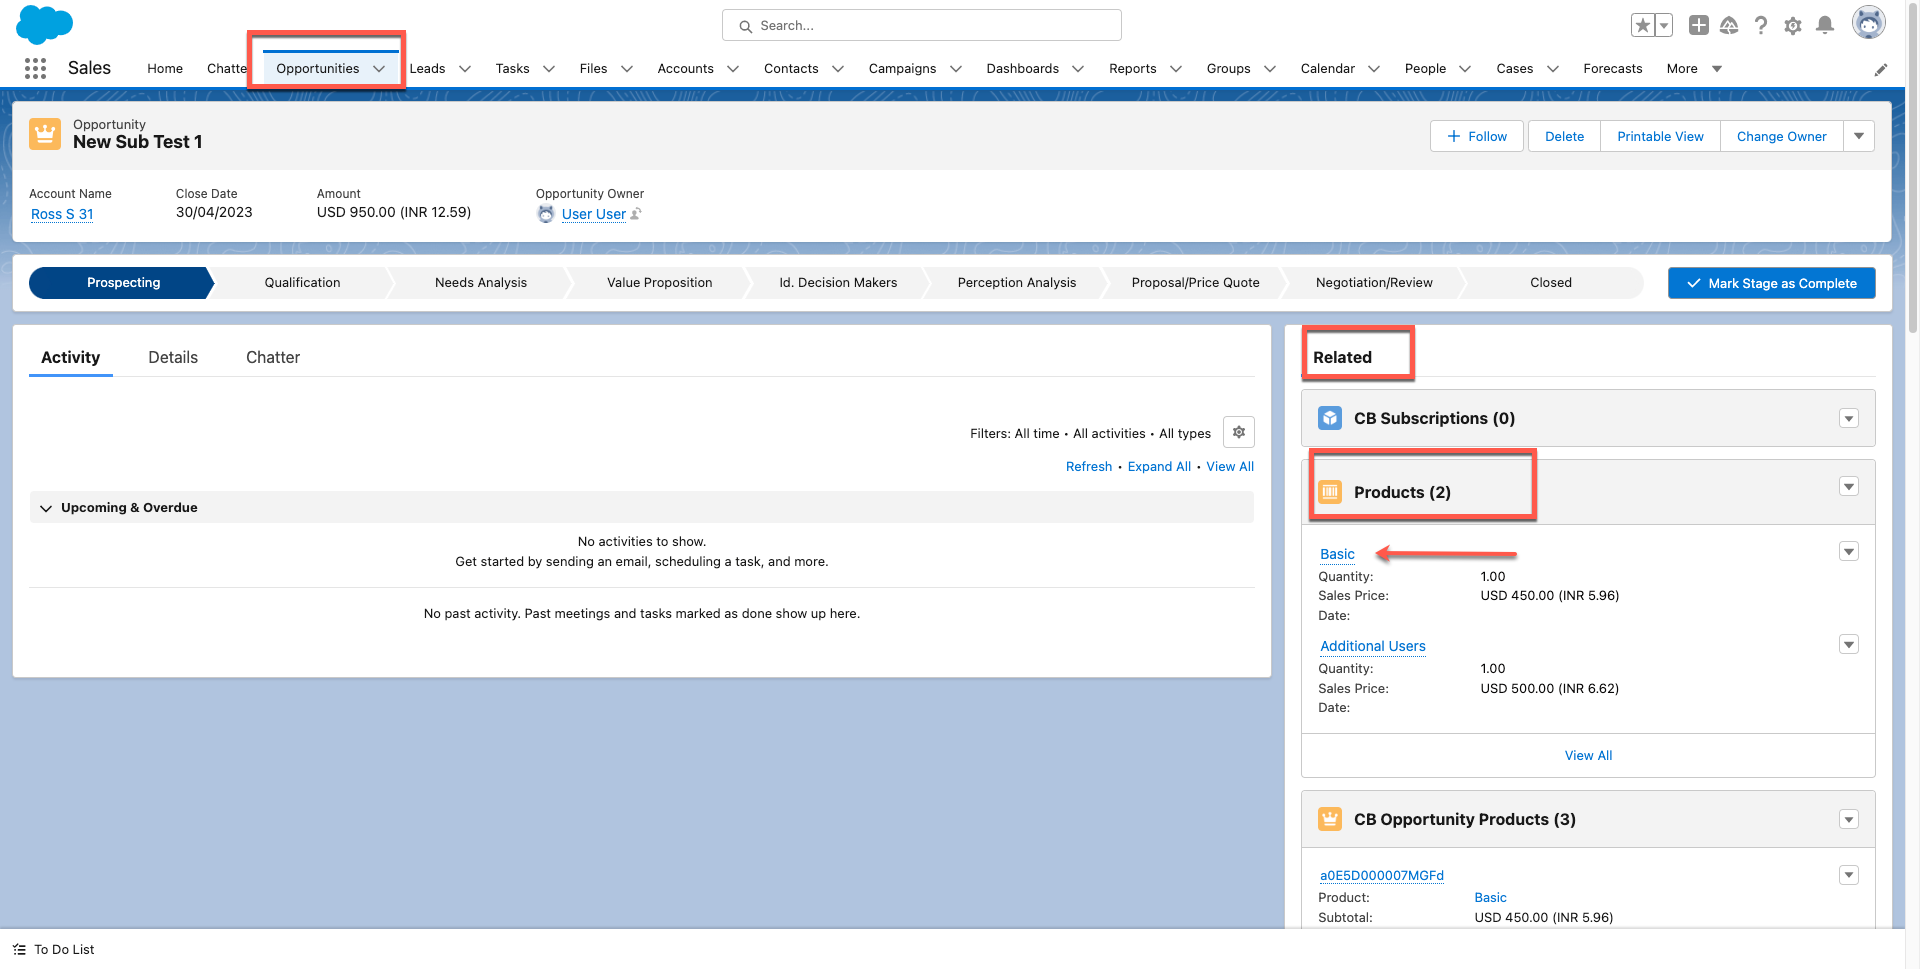
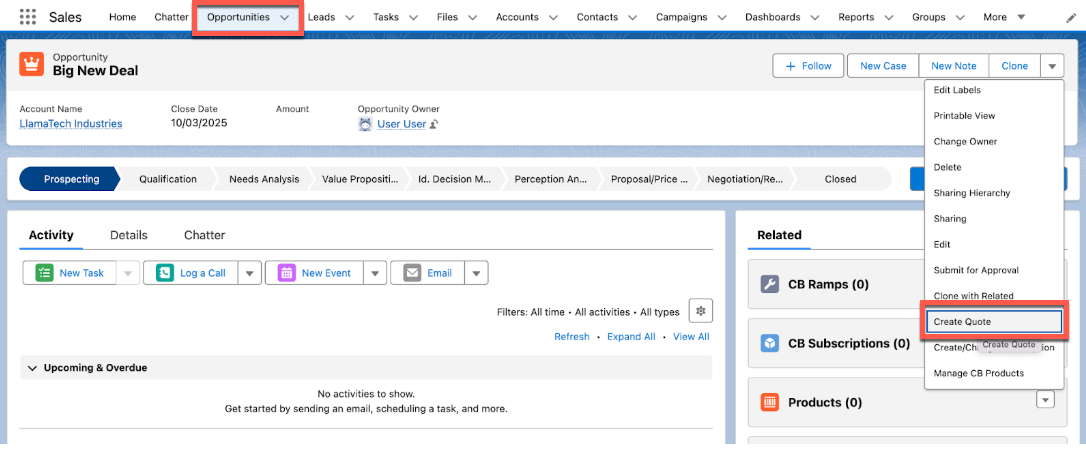
Opportunity Actions
The actions listed in this section are those that can be performed from a Salesforce opportunity.
Manage CB Products
Available under: Opportunity
This action is used to add Chargebee items (plan, addons, and charges) and coupons to the opportunity.
Caution We recommend that you use Manage CB Products instead of Add Products or Edit Products to insert Chargebee products into opportunities as the latter are incompatible with certain Chargebee features such as:
- Mandatory addons
- Advanced pricing models
- Adding coupons
Prerequisites
-
If you have multiple currencies enabled, ensure that the Opportunity Currency field has been set to the right currency. The available options in the next steps depend on the opportunity currency.
-
The Chargebee product catalog is configured with product families, plans, addons, charges with prices set for the currencies and billing frequencies as appropriate.
-
Enable price overriding to allow users to change the price of items in the product catalog when adding or updating them in a subscription.
Opportunity for a new subscription
If the opportunity is for a new subscription, then add products as follows:
- From an opportunity that doesn't have a subscription attached, click on Manage CB Products.
- Select New Subscription from the Manage Products For dropdown.
- Under Family Details, select a Product Family from the dropdown. The plans, addons, and charges available in the next steps depend on the Product Family selected.
Information
Users with large number of plans, add-ons, or charges may need help finding specific items while searching. To make the process of locating information easier, we have implemented the Add Filter option in the Plans, Charges, and Add-Ons. You can filter by Metered, Pricing Model, or Billing Frequency filters to narrow down the search and reflect the desired results
-
Enter the Plan Details:

- Select a plan using the Plan Name dropdown menu. The plans shown belong to the product family selected in the previous step. Note: The plan selected can be metered, in which case the upcoming invoices for the subscription are closed manually or automatically based on the setting at the customer level and site level in Chargebee. The former takes precedence over the latter.
- The Choose Currency field displays the opportunity currency. To change this, you must edit the Opportunity Currency field for the opportunity.
- Select the billing frequency you want from the Billing Frequency dropdown. If the product has a single billing frequency configured in Chargebee, that frequency is selected and displayed by default in the dropdown menu.
- The Price field displays the plan price for the currency and billing frequency selected. You can change the value provided price overriding has been enabled in Chargebee. The number of decimal places you can provide is configured in Chargebee under Multi-decimal Support.
- Note: For tiered, volume and stairstep pricing models, click View tier/Override to see the price split among the quantity tiers. (See screenshot below).
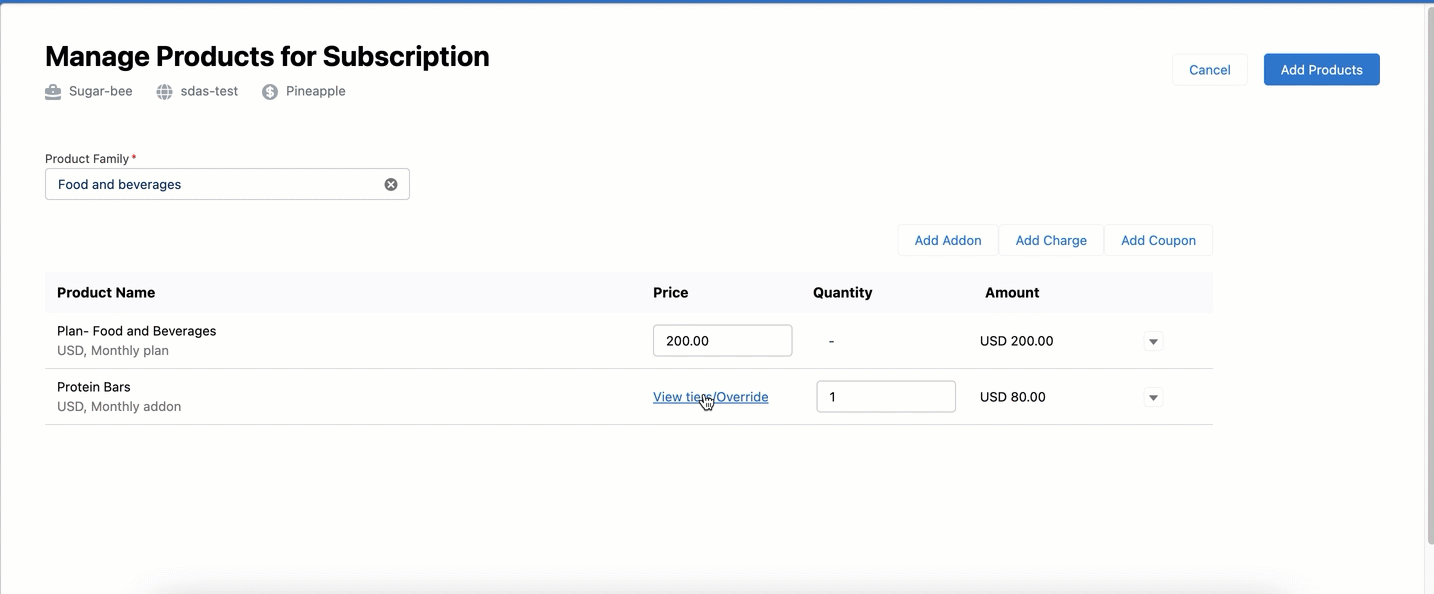
- Note: For tiered, volume and stairstep pricing models, click View tier/Override to see the price split among the quantity tiers. (See screenshot below).
-
Enter the details for Addons:
- Once a plan has been selected, any mandatory addons are displayed in this section automatically. They cannot be removed and their quantities cannot be changed.
- Recommended addons for the plan also show up automatically. These can be changed or removed.
- Click on Add Addon to select any more addons for the opportunity.
- Select an addon under Addon Name. Note: The plan selected can be metered, in which case the upcoming invoices for the subscription are closed manually or automatically based on the setting at the customer level and site level in Chargebee. The former takes precedence over the latter.
- Choose Frequency dropdown lists the billing frequencies of the addon that are compatible with the billing frequency selected for the plan. The plan billing frequency has to be a multiple of the addon billing frequency for the latter to be compatible with the plan.
- By default, the price of the addon specified for the currency and billing period combination is displayed under Unit Price. If differential pricing has been enabled for the addon for the plan chosen, then that price is shown by default.
- You can change the unit price for the addon provided price overriding has been enabled in Chargebee. The number of decimal places you can provide is configured in Chargebee under Multi-decimal Support.
- If the pricing model is anything other than flat fee, you can input the Quantity as well. The number of decimal places you can provide is configured in Chargebee under Multi-decimal Support.
- If billing cycles for addons is enabled in Chargebee, you can set the number of billing cycles for the addon.
- To remove an addon, click the Remove link seen on the right side of the addon details.
-
Enter the details for Charges:
- Once a plan has been selected, any charges that have been configured to apply automatically along with it are displayed in this section.
- You can change the unit price for the charge provided price overriding has been enabled in Chargebee. Pricing model for the charge currency is flat fee or per unit.
- If the pricing model is anything other than flat fee, you can input the Quantity as well. The number of decimal places you can provide is configured in Chargebee under Multi-decimal Support.
- The number of decimal places you can provide is configured in Chargebee under Multi-decimal Support.
- Under Charge customers, select the event at which the charge should be applied to the subscription.
- Under Apply charges, select if you want to have the charge applied every time the event occurs or Once.
- Under Number of days of service provided, select the number of days of service period for the charge.
- To remove a charge, click the Remove link seen on the right side of the charge details.
- Use the Select a coupon dropdown and apply any of the coupons available. Multiple coupons can be applied.
- Click Add Products to update the opportunity products with the details selected.
Opportunity for subscription amendment
You can amend a Chargebee subscription from Salesforce. This is typically done when offering upgrades. It is recommended that you create a new opportunity for this and not reuse the original Closed-Won opportunity that was used to create the subscription. Follow the steps below to do so:
-
Ensure that the new opportunity belongs to the account that has the subscription. The subscriptions associated with an account can be seen in the account's CB Subscription related list.
-
Click Manage CB Products, and select Existing Subscription under Manage Products For. All active, trialing or canceled subscriptions linked to the account are listed.
-
Select one of the subscriptions and click Next. The form is prefilled with the plan, addons, charges, and coupons that are currently part of the subscription. You can add or remove addons, charges, and manual discounts from the subscription.
-
Update the details on the form as required. The instructions for the New subscription** workflow apply here as well.
-
Click Add Products. The opportunity products are updated and the Subscription Id field of the opportunity is updated with the subscription Id.
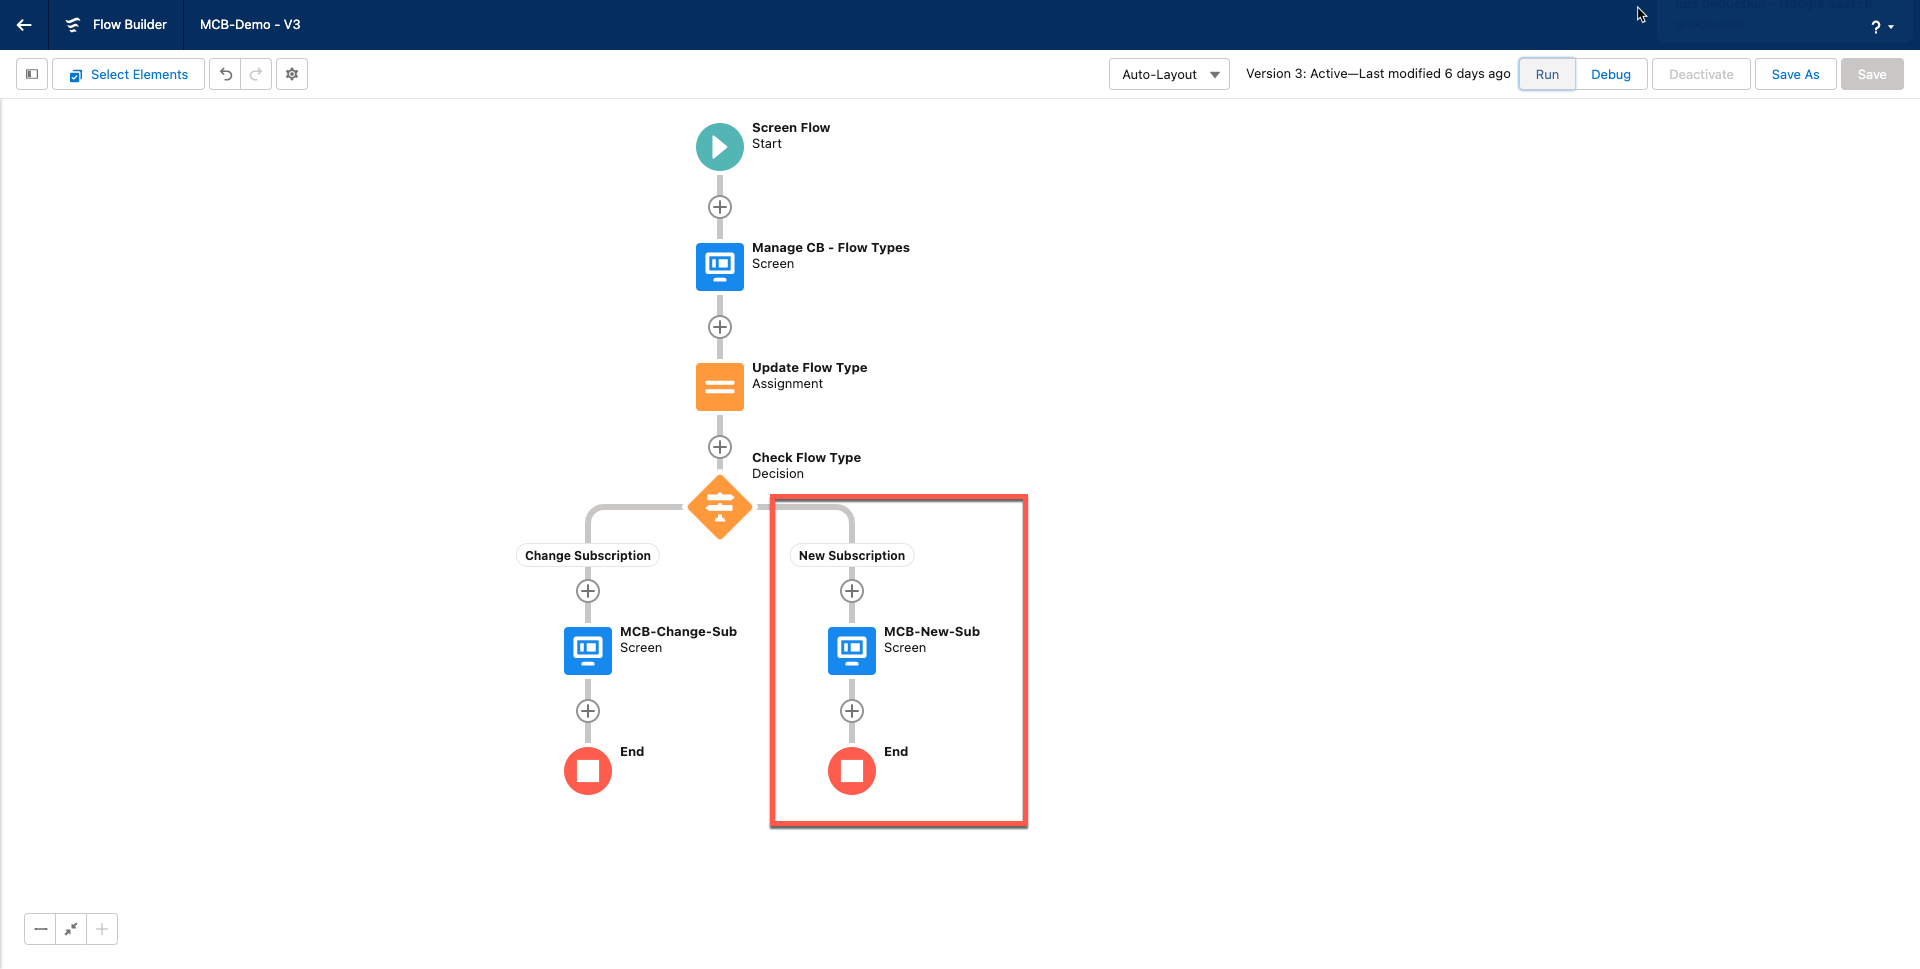
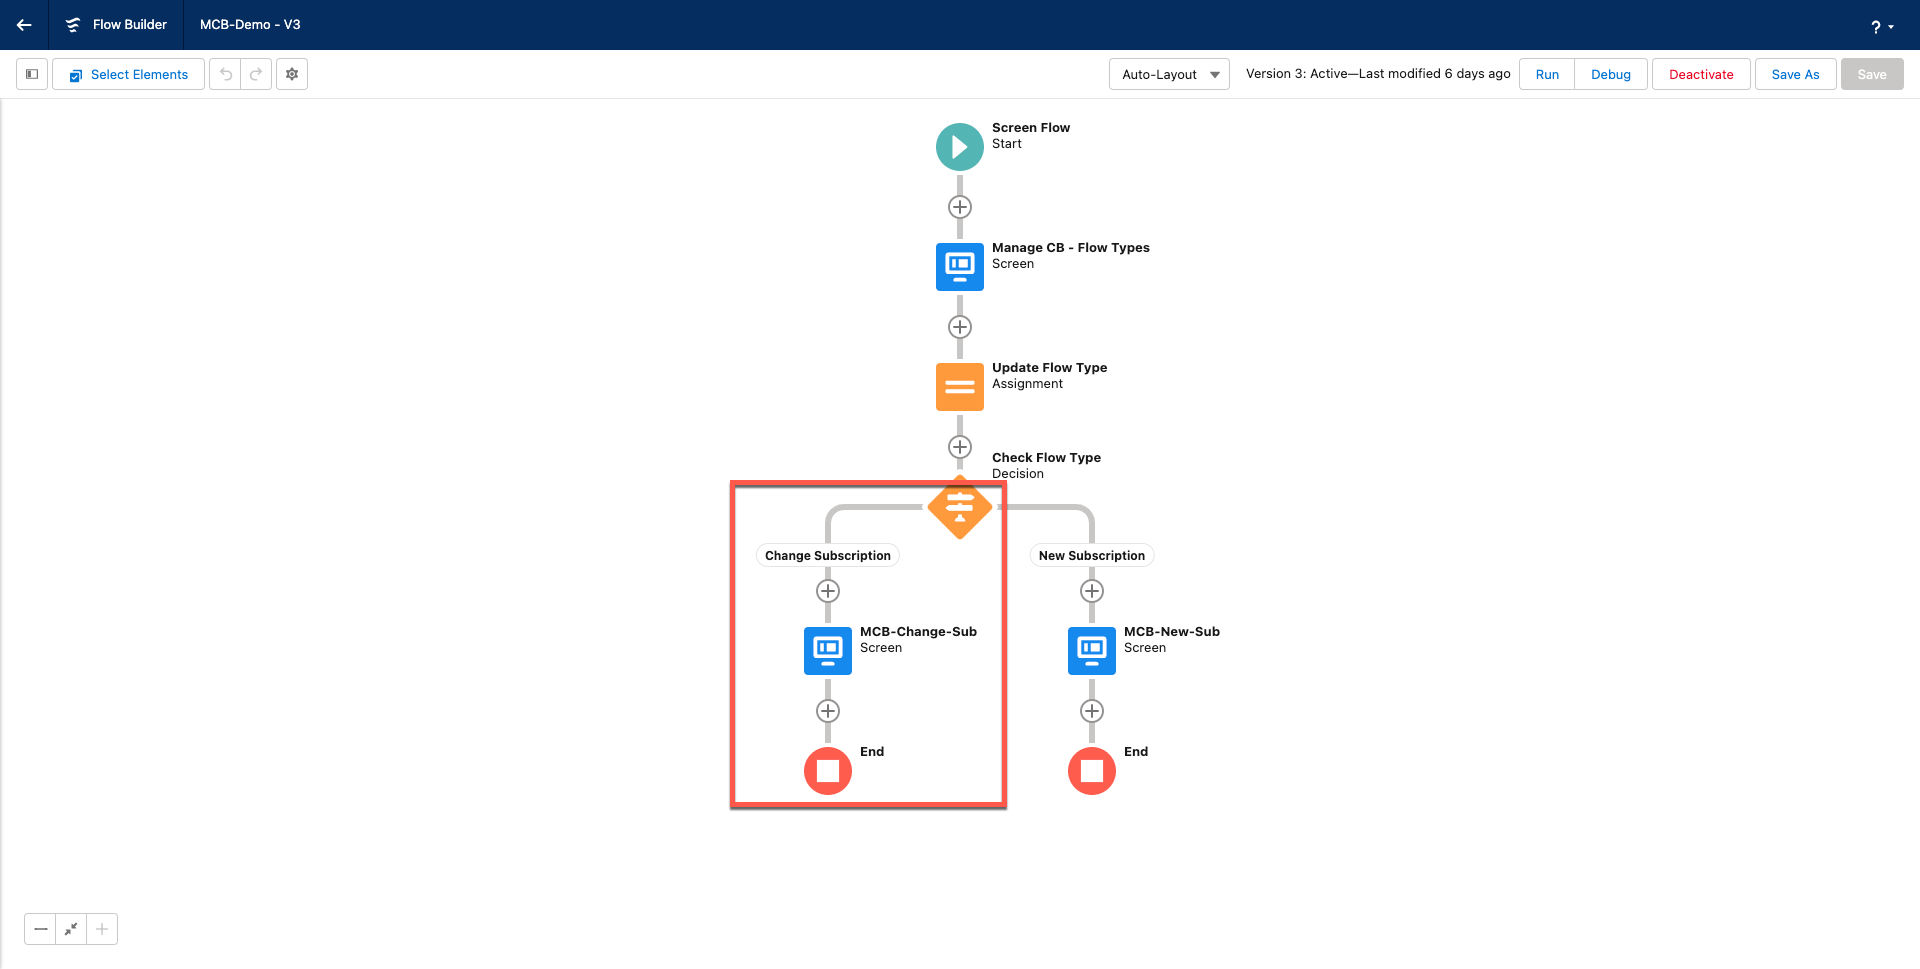
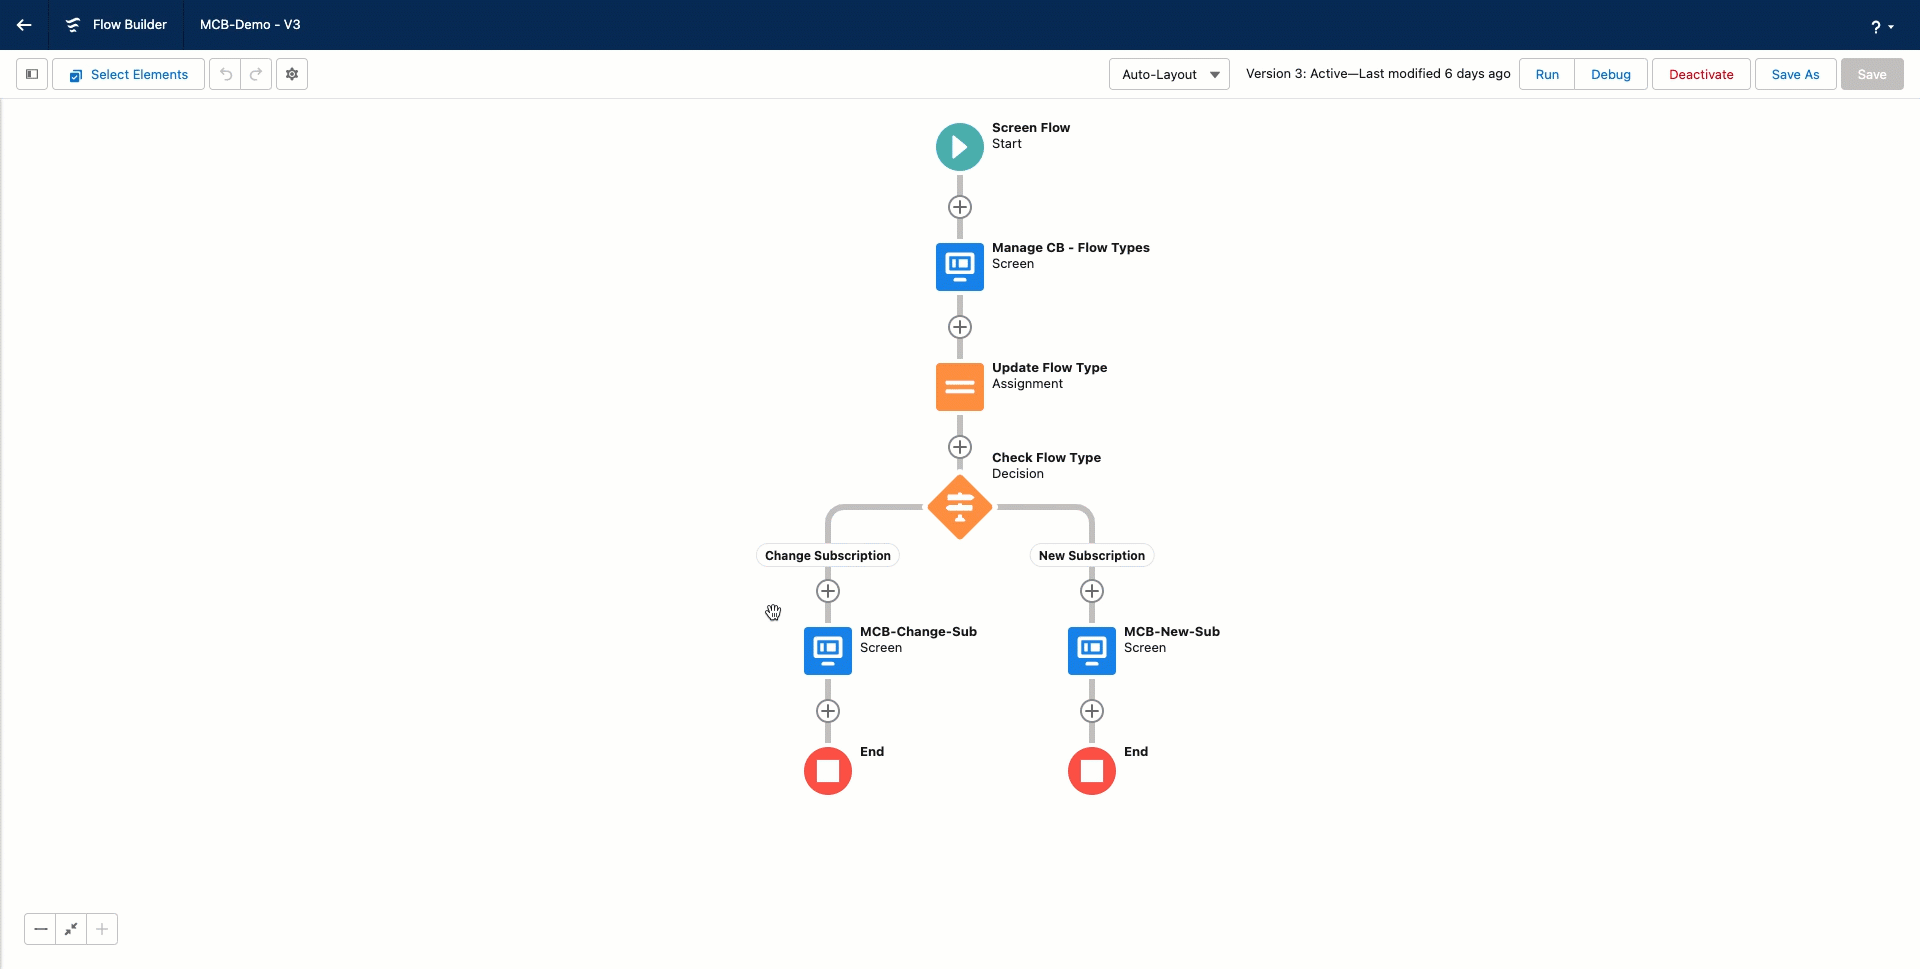
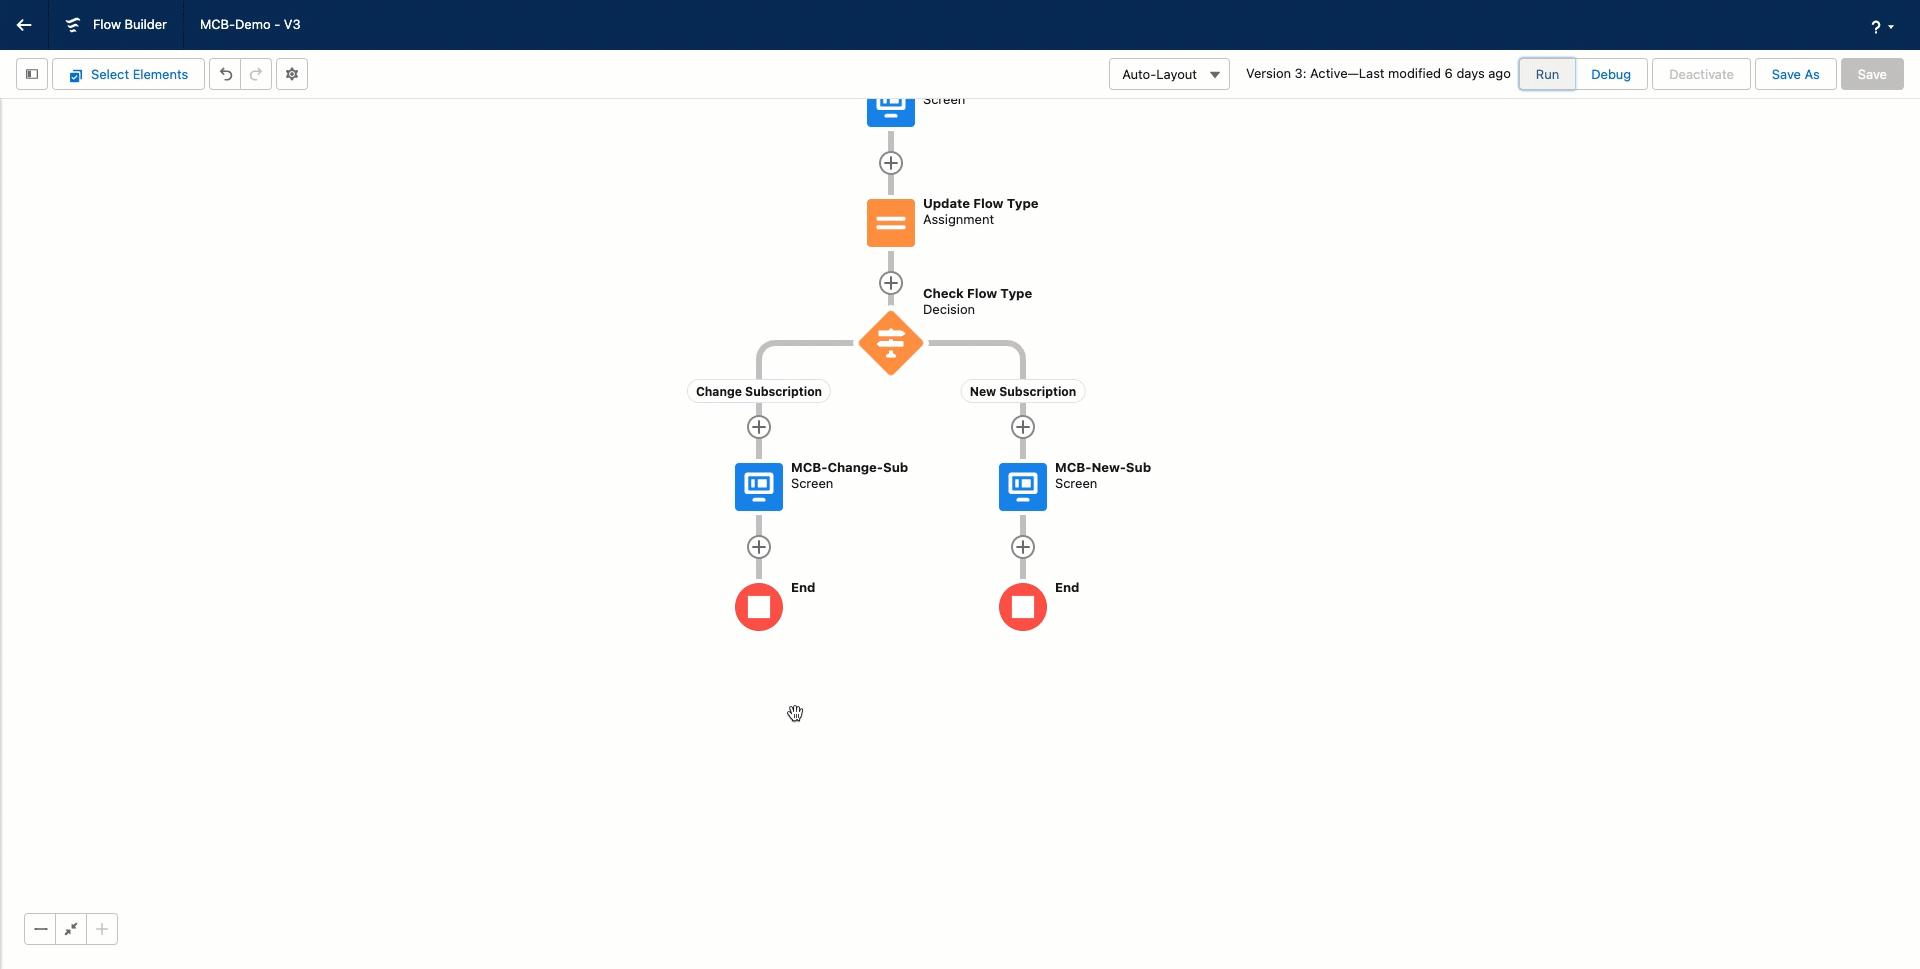
Chargebee Actions Using Salesforce Flows
Salesforce Flows are advanced workflows that provide a visual interface for designing the steps of a business process. They can include screens with input forms, decision points, and actions such as creating or updating records. Flows can be tailored to specific use cases, guiding users through a series of tasks or actions based on their inputs or predetermined criteria.
Flow Builder is a powerful visual tool allowing users to create custom business processes and automate tasks without writing code. It provides a user-friendly interface for creating interactive and dynamic flows that can streamline business processes, collect data, and automate tasks within the Salesforce platform.
Using flows in Salesforce, you can perform the actions listed under Manage CB Product of Chargebee.
-
Create a Subscription
-
Change Subscription
Create a Chargebee Subscription
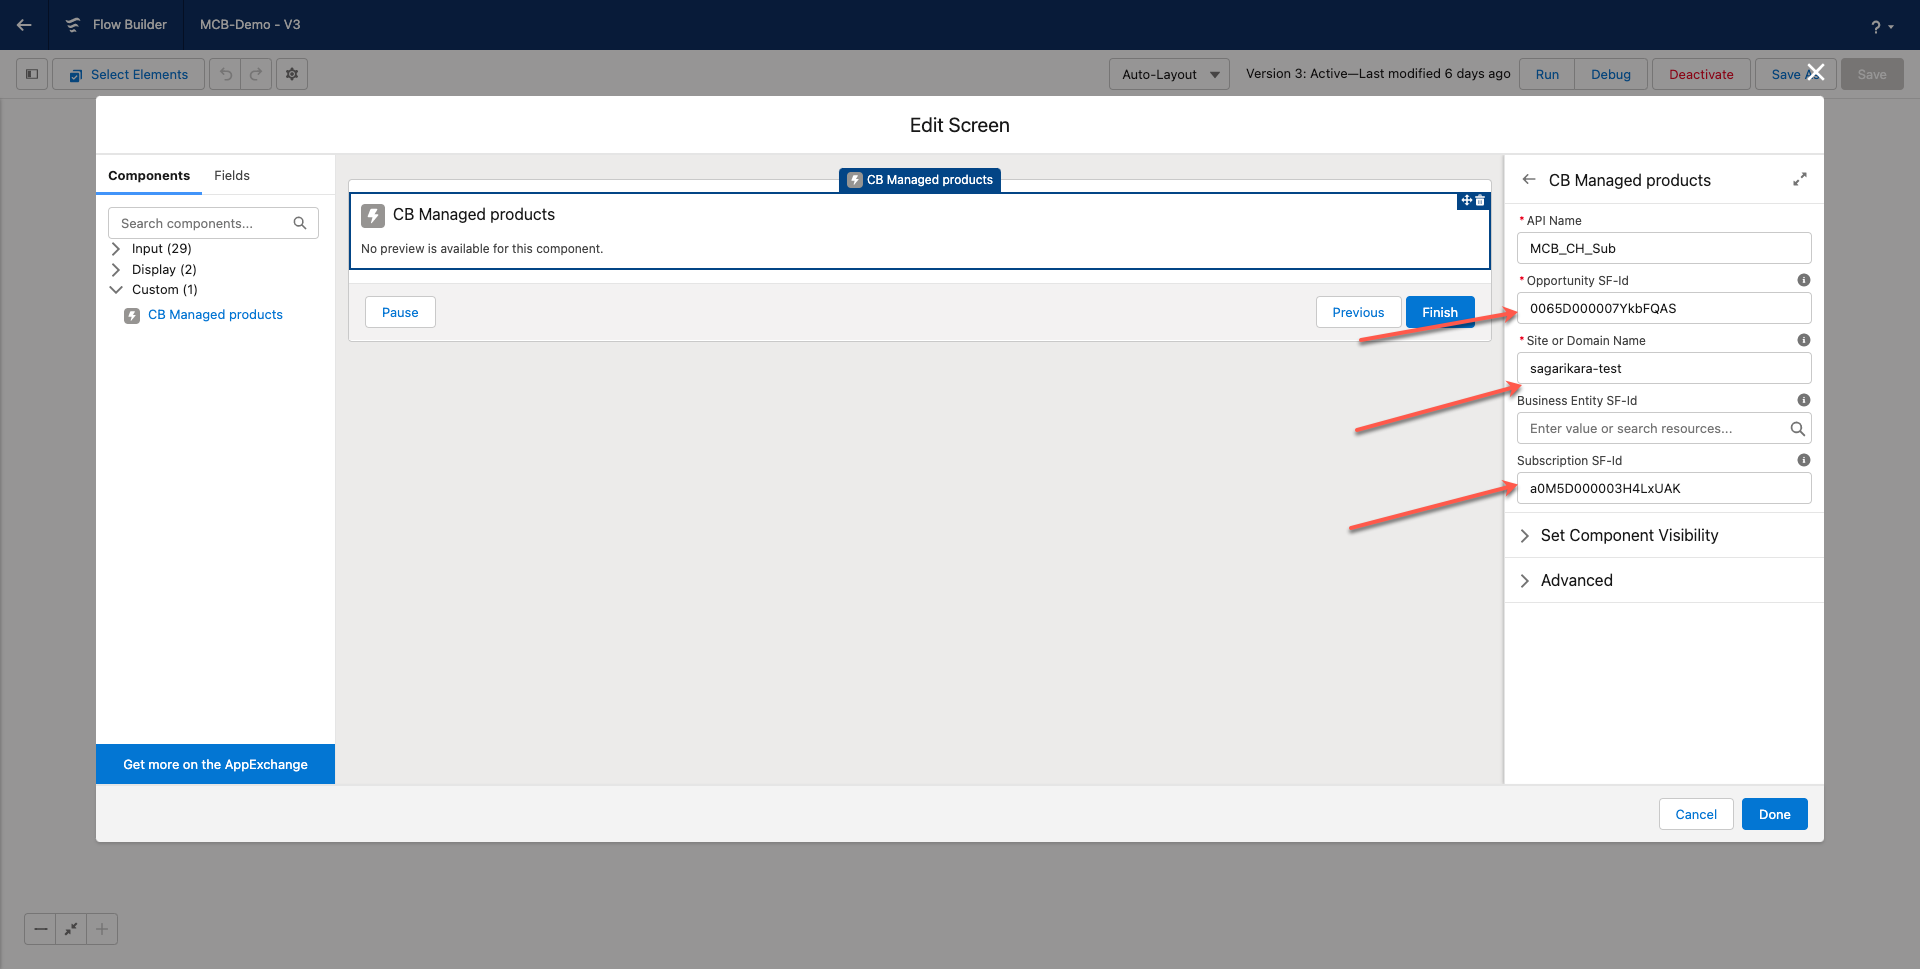
To create a subscription in Chargebee using Flows, follow these steps:
-
Go to Setup > Flows
-
All Flows > New flow
-
Components can be added while creating screens for the flow or you can also add components to the CB Managed Products by clicking Custom > Add attribute details like Opportunity Id, and Site or Domain Name in the right pane. Click Done.
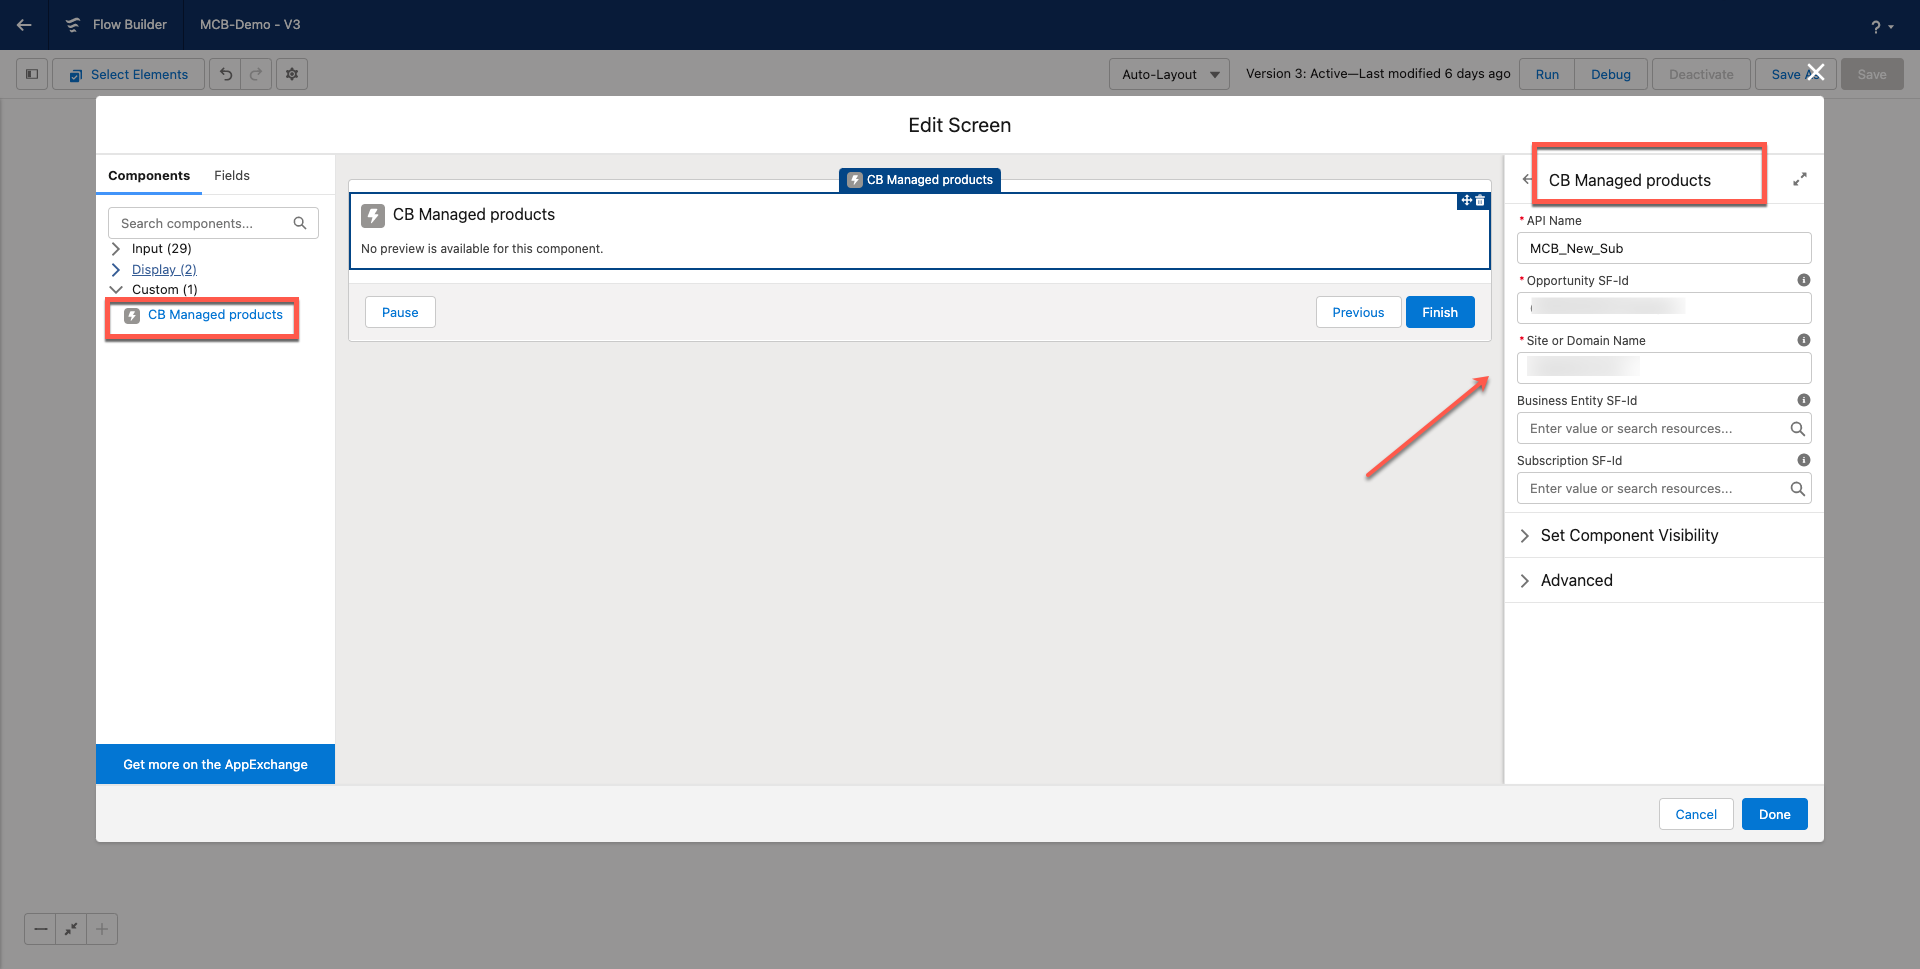
-
Click Run at the top to start the flow. Toggle New Subscription > Choose Product Family > Add Plan > Add Products > Click Finish to complete the flow.
-
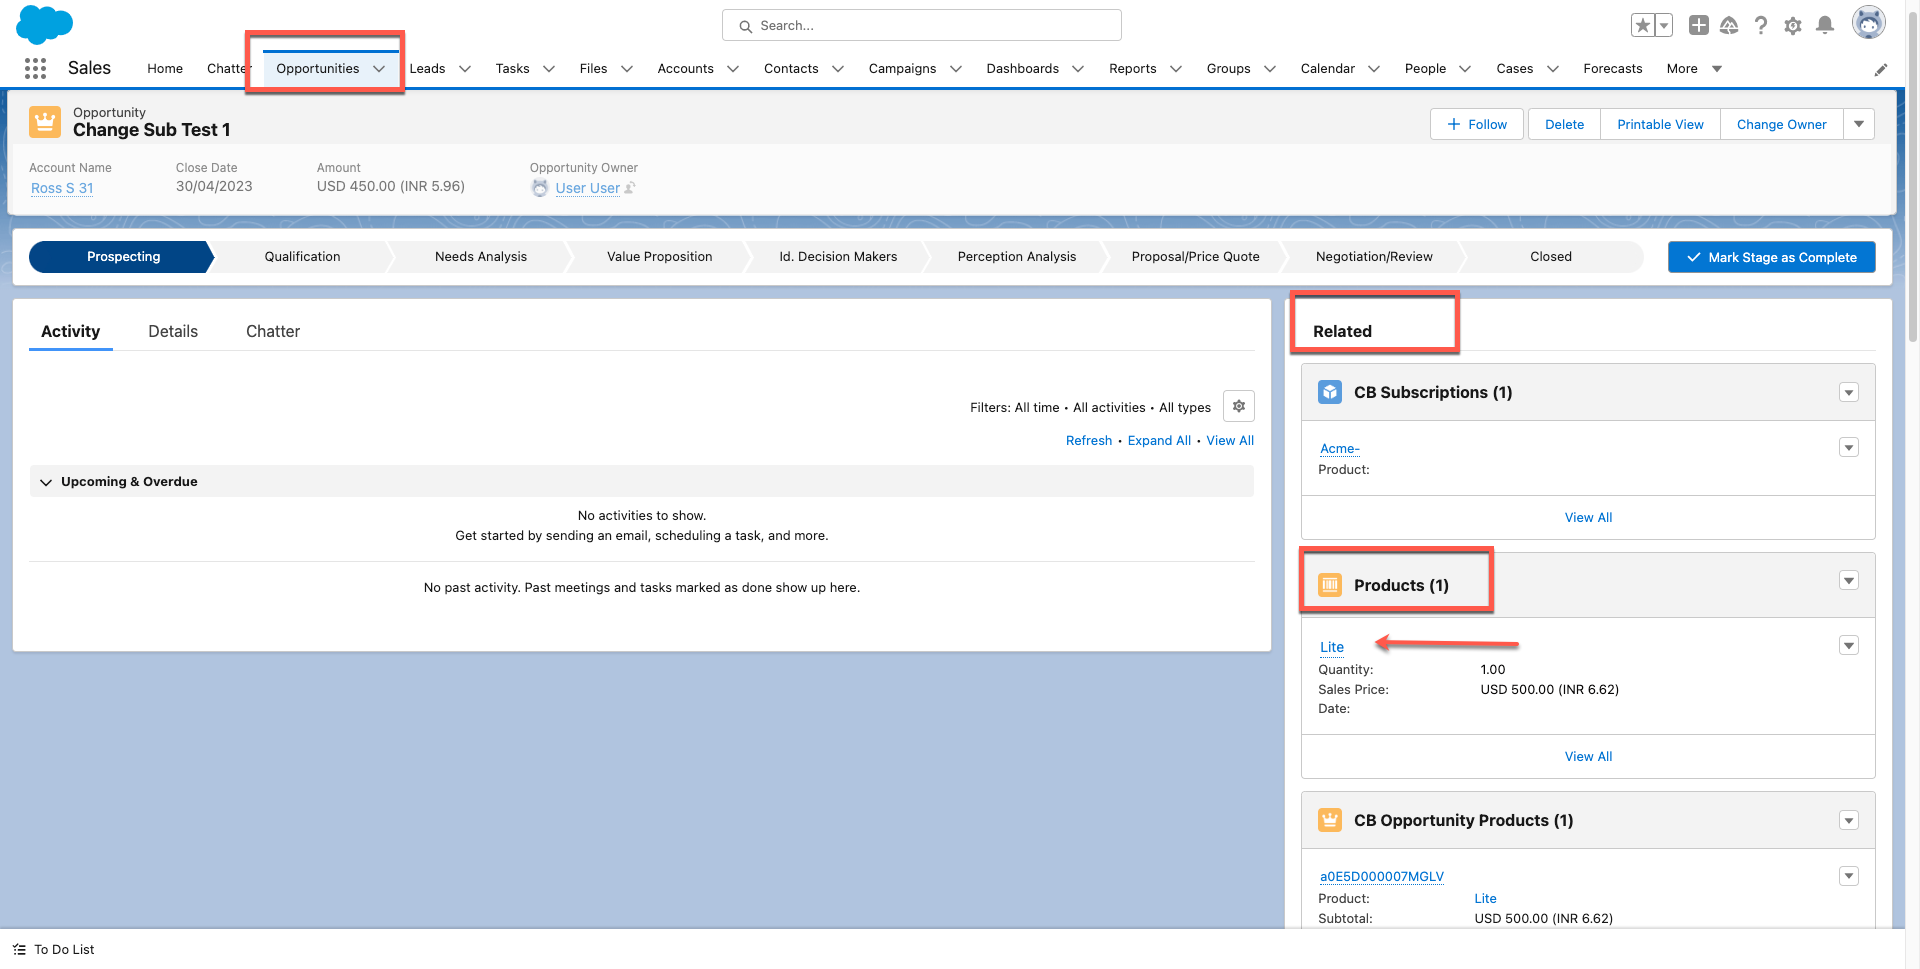
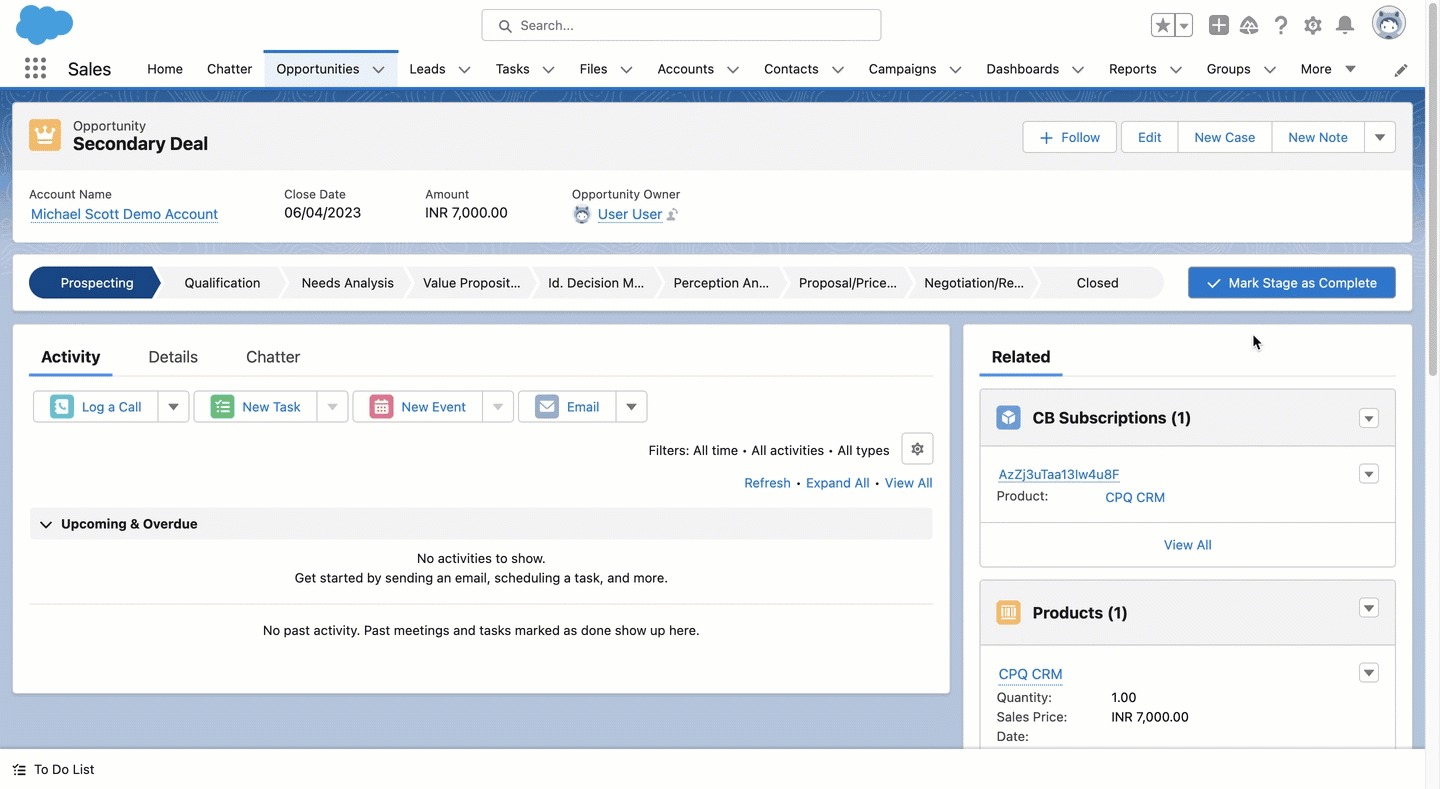
Verify the edited or updated products in the subscription by going to Opportunities > Related > Products section.
Change a Chargebee Subscription
To change a subscription in Chargebee using Flows, follow these steps:
-
Go to Setup > Flows
-
All Flows > New Flow
-
Click Edit Element > Components > Custom.
-
Provide the Opportunity Id, Site or Domain Name, and existing Subscription Id for the Change action.
-
Click Run at the top to start the flow. Toggle Change Subscription > Edit Plan/ Delete Plan or Add Discounts, and more > Click Add Products > Finish to complete the flow.
-
Verify the edited or updated products in the subscription by going to Opportunities > Related > Products section if required.
Create/Change Subscription
Available under: Opportunity
This action allows you to create/change a subscription from an opportunity. You can have this operation trigger automatically for won opportunities by using setting 3 under opportunities for Opportunities and Subscriptions.
Caution To add/edit opportunity products before performing this action, we recommend that you use Manage CB Products instead of Add Products or Edit Products as the latter are incompatible with certain Chargebee features such as:
- Mandatory addons
- Advanced pricing models
- Adding coupons
Note
When multiple Chargebee sites are connected... This operation will be invoked for the Chargebee site that the account has been mapped to.
Note
Once the subscription is created/updated in Chargebee, it is immediately synced back into Salesforce as a record under the CB Subscription custom object. This sync can take a few minutes.
Creating a new subscription
Once you have added the Product Families using the Manage CB Products option follow the steps below to create new subscriptions for your Opportunity:
- Click Create/Change Subscription. Any product catalog items (plans, addons, charges and coupons) that have been added to the opportunity are prefilled in the form that appears.
- Choose a Subscription Id for the subscription. When not entered, it is auto-generated by Chargebee.
- If items have not been added to the opportunity, the next steps tell you how to add them.
- Select a Product Family. The plans, addons, and charges available in the next steps depend on the product family selected.
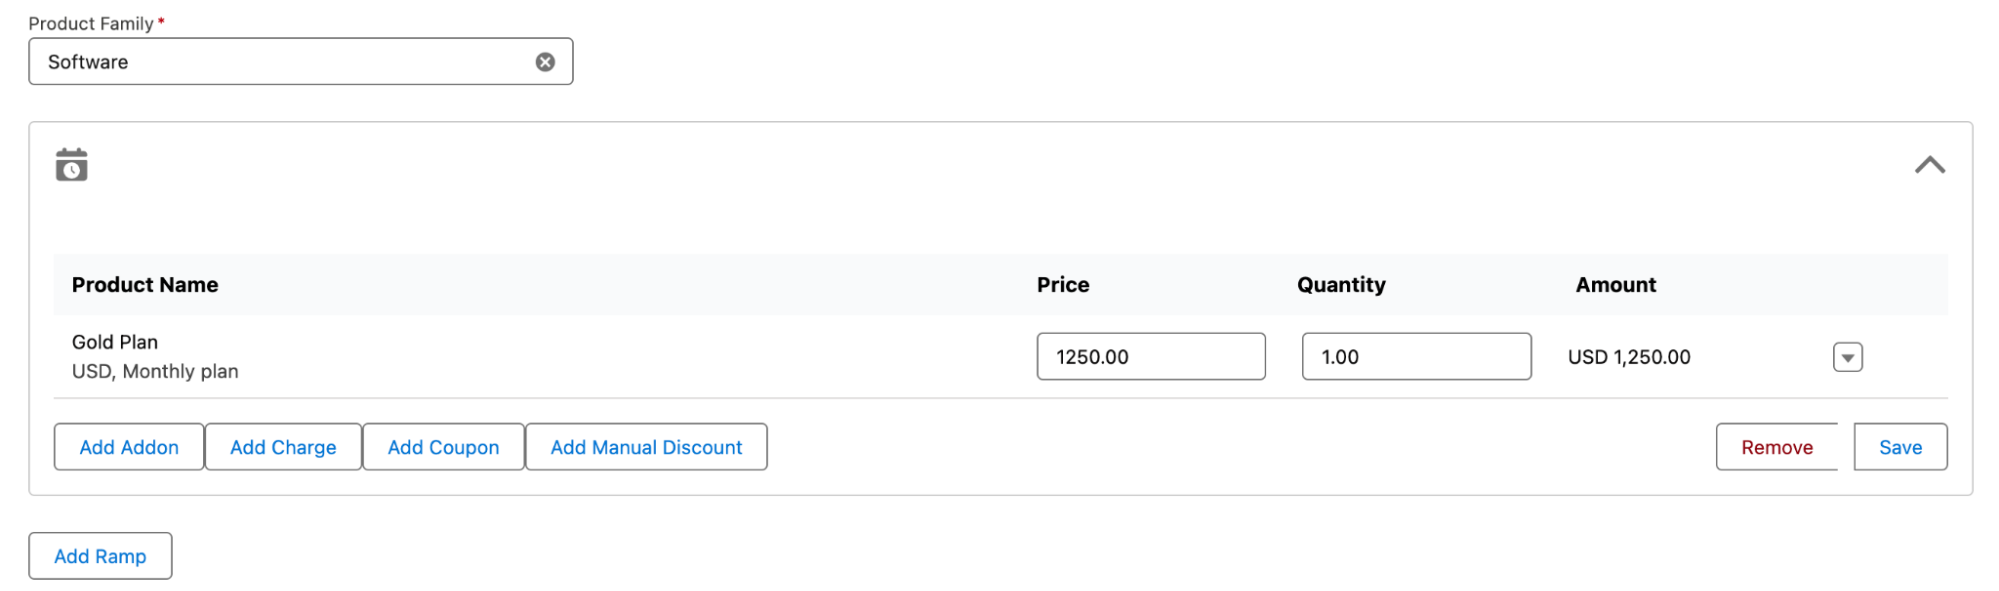
- Enter the Plan Details:
- Select a plan using the Choose Plan dropdown menu. The plans shown belong to the product family selected in the previous step. Note: The plan selected can be metered, in which case the upcoming invoices for the subscription are closed manually or automatically based on the setting at the customer level and site level in Chargebee. The former takes precedence over the latter.
- The Choose Currency field displays the opportunity currency. To change this, you must edit the Opportunity Currency field for the opportunity.
- Select the billing frequency you want from the Billing Frequency dropdown. If the product has a single billing frequency configured in Chargebee, that frequency is selected and displayed by default in the dropdown menu.
- The Price field displays the plan price for the currency and billing frequency selected. (Note: For tiered, volume, and stairstep pricing models, hover over the "i" icon to reveal a tooltip showing the price split among the quantity tiers. (See screenshot below) You can change the value provided price overriding has been enabled in Chargebee. The number of decimal places you can provide is configured in Chargebee under Multi-decimal Support.
- Once the plan is added, you can select the following actions from the dropdown list on the right side of the plan.
- Edit or delete the plan.
- Add manual discount to the plan. You can add or delete multiple manual discounts from the plan.
- Enter the details for Addons:
- Once a plan has been selected, any mandatory addons are displayed in this section automatically. They cannot be removed and their quantities cannot be changed.
- Recommended addons for the plan also show up automatically. These can be changed or removed.
- Click on Add Addon to select any more addons for the opportunity.
- Select an addon under Addon Name. Note: The plan selected can be metered, in which case the upcoming invoices for the subscription are closed manually or automatically based on the setting at the customer level and site level in Chargebee. The former takes precedence over the latter.
- Choose Frequency dropdown lists the billing frequencies of the addon that are compatible with the billing frequency selected for the plan. The plan billing frequency has to be a multiple of the addon billing frequency for the latter to be compatible with the plan.
- By default, the price of the addon specified for the currency and billing period combination is displayed under Unit Price. If differential pricing has been enabled for the addon for the plan chosen, then that price is shown by default.
- You can change the unit price for the addon provided price overriding has been enabled in Chargebee. The number of decimal places you can provide is configured in Chargebee under Multi-decimal Support.
- If the pricing model is anything other than flat fee, you can input the Quantity as well. The number of decimal places you can provide is configured in Chargebee under Multi-decimal Support.
- If billing cycles for addons is enabled in Chargebee, you can set the number of billing cycles for the addon.
- To remove an addon, click the Remove link seen on the right side of the addon details.
- Enter the details for Charges:
- Once a plan has been selected, any charges that have been configured to apply automatically along with it are displayed in this section.
- You can change the unit price for the charge provided price overriding has been enabled in Chargebee.The number of decimal places you can provide is configured in Chargebee under Multi-decimal Support.
- If the pricing model is anything other than flat fee, you can input the Quantity as well. The number of decimal places you can provide is configured in Chargebee under Multi-decimal Support.
- Under Charge customers, select the event at which the charge should be applied to the subscription.
- Under Apply charges, select if you want to have the charge applied every time the event occurs or Once.
- Under Number of days of service provided, select the number of days of service period for the charge.
- To remove a charge, click the Remove link seen on the right side of the charge details.
- Use the Select a coupon dropdown and apply any of the coupons available. Multiple coupons can be applied.
- Add Manual Discount. Your Chargebee site must be configured to allow manual discounts. See, configuring manual discounts.
Use this option to add a manual discount amount or percentage to an invoice line item or the total invoice amount. You can add or delete multiple discounts to an invoice.
To add manual discounts to an invoice, follow these steps:
- Select the Discount Type and enter the discount amount.
- For Apply On, select Invoice Total or Specific line item on invoice to add discounts to the total invoice amount or an invoice line item respectively.
- Select the Duration.
- Click Add.
- Provide the Billing details:
- Enter a Start Date for the subscription. The date/time at which the subscription is to start or has started. If not provided, the subscription starts immediately. If set to a value in the past then that date/time should not be more than the duration worth a plan billing period, into the past.
- Under Billing Cycles Type, select one of the following options.
- Forever: the subscription renews after the end of each term until it is explicitly canceled.
- Fixed: the subscription renews for a fixed number of billing cycles. In this case, provide the following additional details:
- Enter the number of billing cycles that the subscription should run before canceling automatically.
- Select the Apply contract terms to this subscription checkbox to enable contract terms. On selecting the checkbox, you are presented with options to override the default contract terms settings that have been configured for the Chargebee site.
- Set the Auto Collection Status for the subscription.
- Clear Ship to billing address checkbox to enter a shipping address that's different from the billing address. The shipping address in the Account is prefilled and you can edit as needed.
- Invoicing Options: When charges are raised immediately on subscription creation, the following options determine how they're handled:
- Invoice immediately: the charges are immediately invoiced.
- Add to Unbilled Charges: the charges are added to unbilled charges.
- Click Create Subscription.Use the Generate Checkout URL button to retrieve the checkout link to use for your sales workflows.
Terms of Charge
The Terms to Charge allows you to generate multiple invoices at once when creating or updating a subscription from an Opportunity in Salesforce. This is especially helpful if you need to combine billing periods into a single invoice or generate multiple invoices in bulk.
How to Set Up Terms of Charge
- Go to the Opportunity screen in Salesforce.
- Click the Create / Change Subscription button.
- On the Subscription Info screen, fill in the required subscription details.
- Click Next to go to the Payment & Shipping Info tab.

- In the Terms to Charge field, enter the number of Billing Periods you want to generate invoices for. Example, entering 2 will generate invoices for two billing periods.

- Click Create to complete creating the subscription.
- Once the subscription is created, Chargebee will display a confirmation message indicating that advanced invoices have been generated, including the billing periods covered.

Billing Address Company Mapping
You can now map the Billing Address Company field in Chargebee to a custom field on the Salesforce Account object. This enhancement allows more flexibility for organizations that track billing company names using a field other than the Salesforce Account Name.
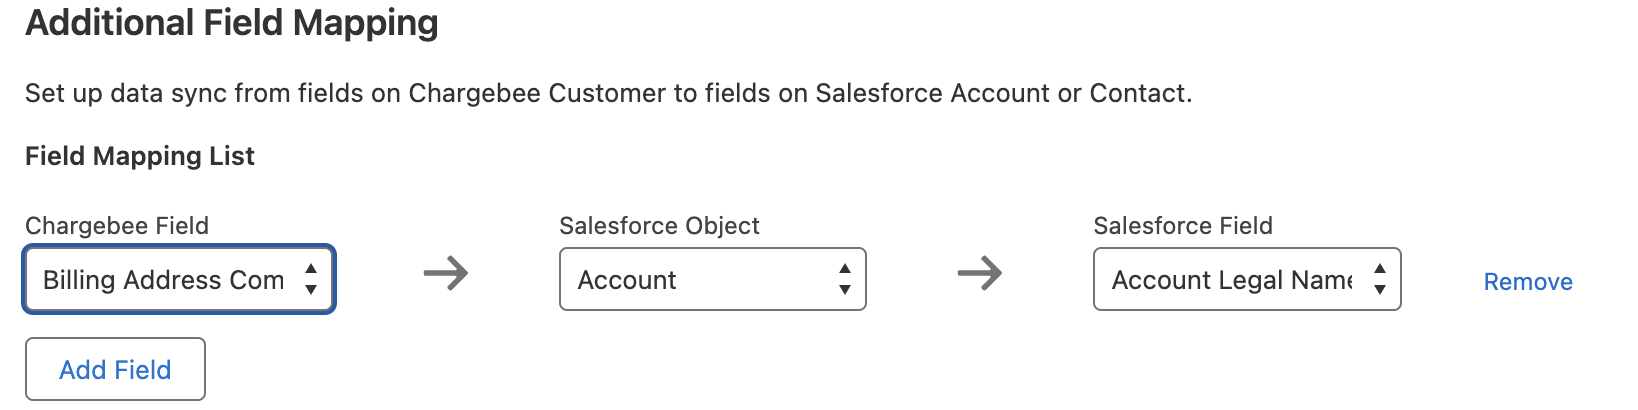
How to Set Up
- Go to Chargebee Settings > Additional Field Mappings in Salesforce.
- Locate the Billing Address Company field under the Chargebee Fields list.
- Select the corresponding Salesforce field you use for billing company names.
- Save the configuration.
Benefits
- Ensures accurate billing by syncing the correct company name.
- Supports Salesforce data models where billing information is stored separately from the Account Name.
- Helps finance teams retrieve the correct data for invoicing and reconciliation.
Amending an existing subscription
You can amend a Chargebee subscription from Salesforce. This is typically done when offering upgrades. It is recommended that you create a new opportunity for this and not reuse the original Closed-Won opportunity that was used to create the subscription. Follow the steps below to do so:
- Navigate to an opportunity that belongs to the appropriate account. The subscription you intend to change must belong to this account.
-
Click Create/Change Subscription.
-
Under the Create/Change Subscription for dropdown, select Existing Subscription. All the active, in-trial, and canceled subscriptions that belong to the Account are listed for selection. This list includes subscriptions that haven't synced to Salesforce yet from Chargebee.
-
Select the subscription you want to change and click Next. A page titled Change Subscription loads with all the subscription details prefilled.
-
Make changes to the form. The instructions provided for creating a new subscription also apply here.
-
Optionally, you can provide the Billing details to modify them:
-
Enter the No. Of Billing Cycles that the subscription should run before canceling automatically. This need only be provided if you want to change the original value.
-
Update the PO Number as needed.
-
-
Under Apply Changes, select one of the following options:
-
Immediately: Apply the changes effective immediately. Optionally, also select Apply prorated credits and charges to give prorated credits for the existing items in the subscription and raise prorated charges for the new items. Prorated charges are not applicable when the billing period of the subscription is changed, such as when moving from a monthly to a yearly plan or vice versa.
-
On next renewal: Apply the changes on the next renewal of the subscription.
-
On a specific date: Apply the changes to take effect only on the date specified. You must enable this option for your Chargebee site.
-
Invoicing Options: When charges are raised immediately on subscription change, the following options determine how they're handled:
-
Invoice immediately: The charges are immediately invoiced.
-
Add to unbilled charges: The charges are added to unbilled charges.
-
-
Click Update to confirm the changes to the subscription.
Once the subscription is updated in Chargebee, it is immediately synced back into Salesforce. This sync can take a few minutes. Unlike when creating a subscription, a Chargebee Checkout link cannot be sent to the customer via Salesforce for changing subscriptions.
Automate subscription creation/update/renewal from closed opportunity
Available under: Opportunity
You can configure the integration to automatically create/update/renew subscription in Chargebee when an opportunity is closed.
Create a subscription when an opportunity is closed
Warning
Before attempting this operation, update the customer's payment method. If you choose the invoice immediately option with auto-collection turned on, the operation will fail without an updated payment method.
-
Enable the Allow Chargebee to automatically create/upgrade/renew subscription when an opportunity is won toggle.
-
Create an opportunity for a new subscription in Salesforce.
-
Update the stage of an opportunity to closed-won.
-
Select the Update Chargebee checkbox for the opportunity. (Update Chargebee is a custom field introduced by Chargebee on the opportunity object.)
After the last step, the integration triggers the following operations immediately:
-
A new subscription is created with the plan, addons, and charges that correspond to the opportunity products.
-
The billing and shipping addresses in the account are automatically added to the subscription.
Update a subscription when an opportunity is closed
Note
This operation only proceeds when the subscription status is active, non-renewing, or in-trial.
-
Enable the Allow Chargebee to automatically create/upgrade/renew subscription when an opportunity is won toggle.
-
Create an opportunity for an existing subscription.
-
Update the stage of an opportunity to closed-won.
-
Select the Update Chargebee checkbox for the opportunity. (Update Chargebee is a custom field introduced by Chargebee on the opportunity object.)
After the last step, the integration immediately updates the associated subscription, replacing its plan, addons, and charges by those reflected in the opportunity products of the opportunity.
Update a subscription when a renewal opportunity is closed
This section explains how to trigger an automatic update of a Chargebee subscription when its renewal opportunity in Salesforce is closed-won.
Note
You can perform this operation only if:
-
The plan has a finite number of billing cycles (not set to "forever").
-
The subscription status is active or non-renewing.
-
The subscription doesn't have an auto-renewing contract term.
-
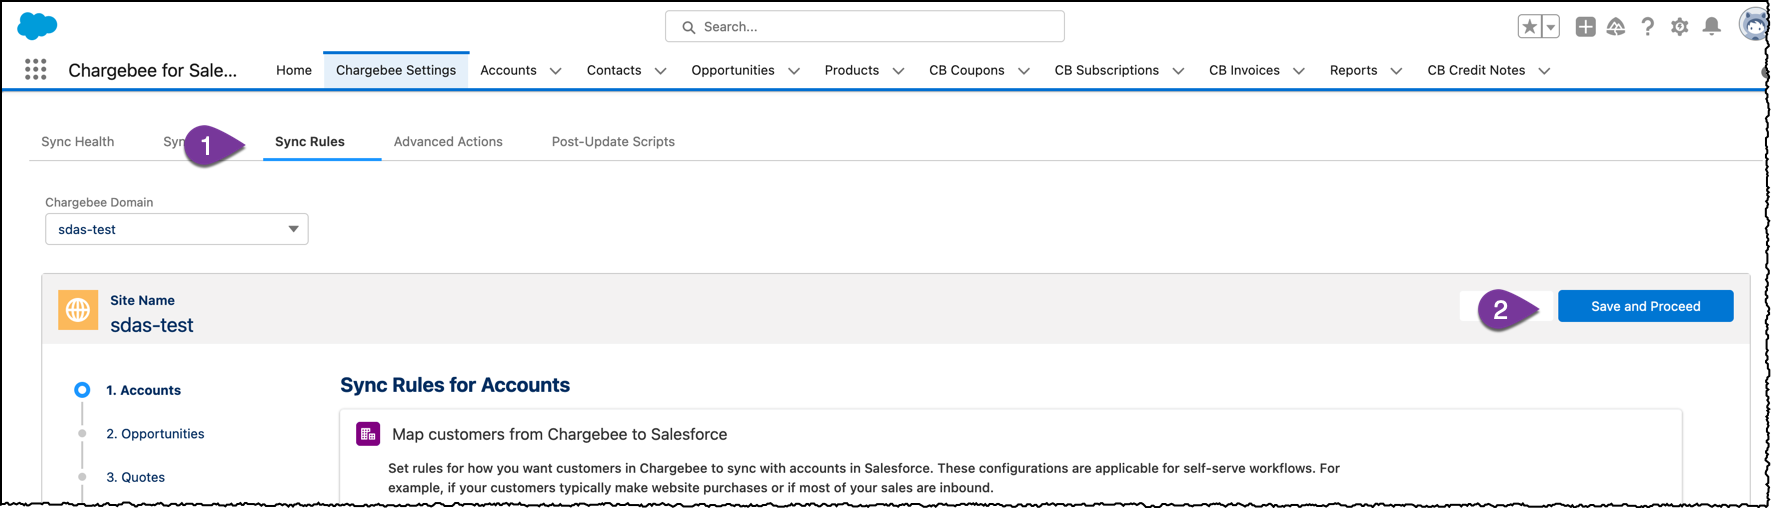
In the App Launcher, navigate to Chargebee for Salesforce > Chargebee Settings page > Sync Rules tab.
-
Click Save and Proceed to access the Sync Rules for Opportunities section.
-
Configure the subscription update trigger
-
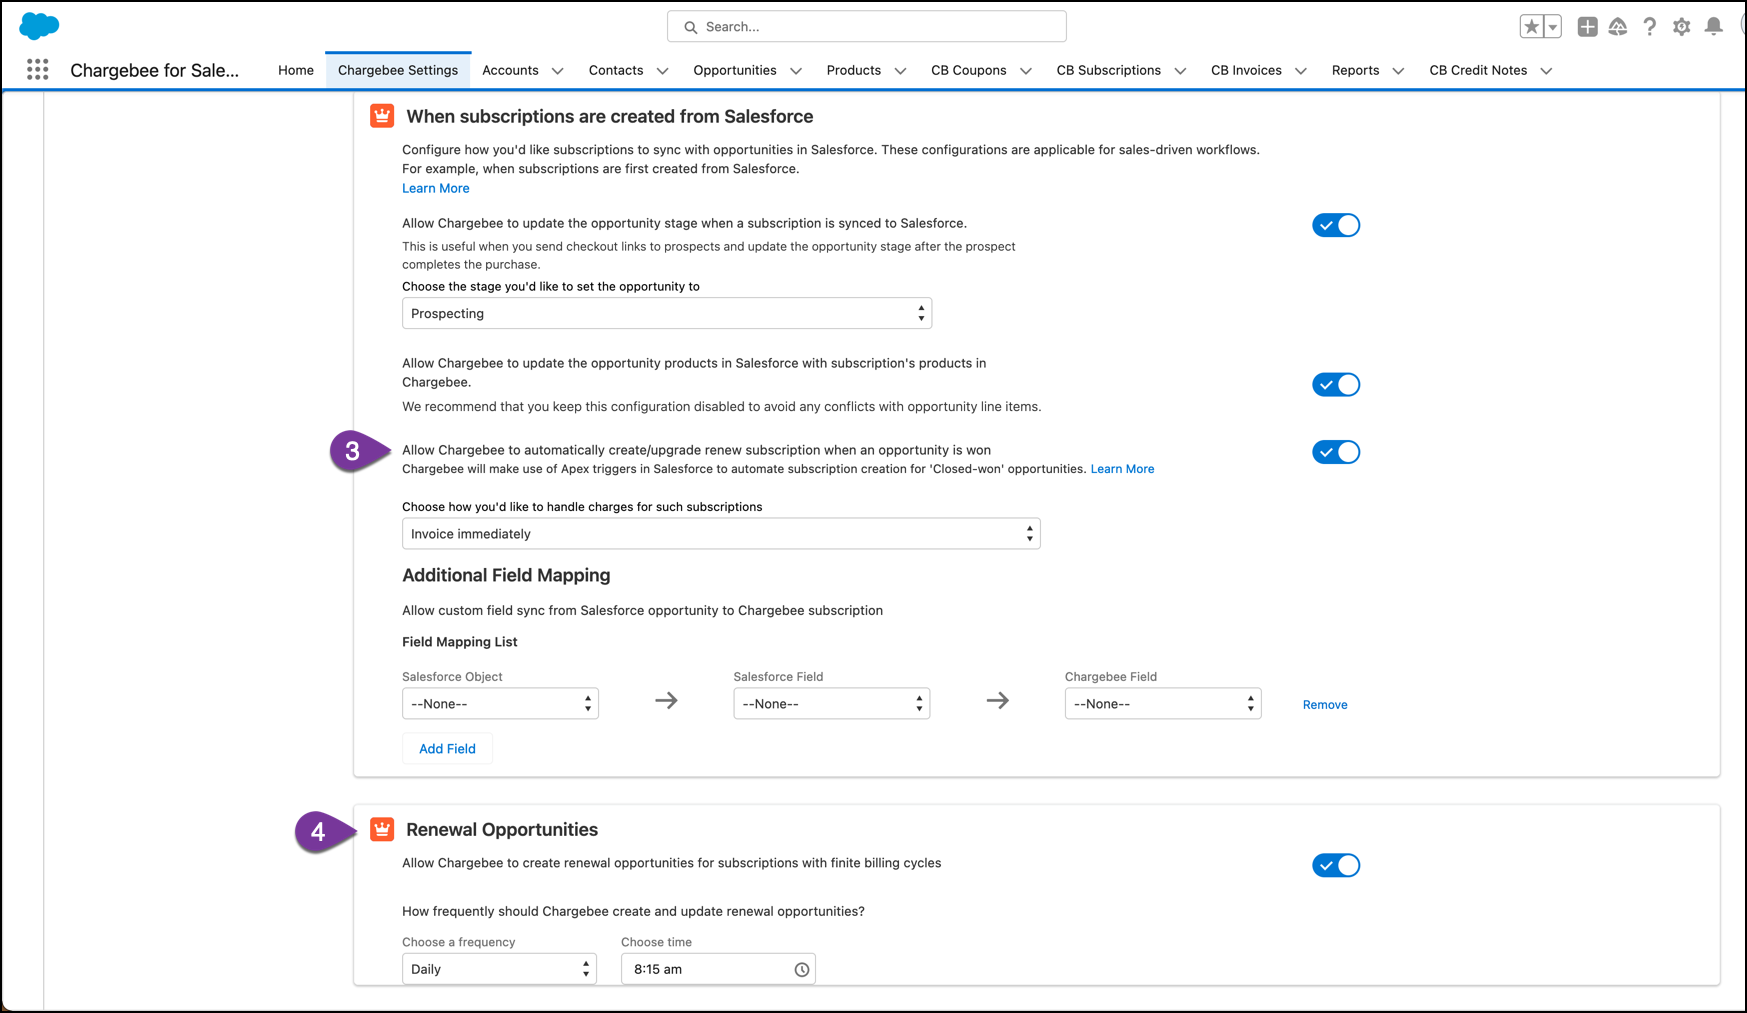
In the When subscriptions are created from Salesforce section, turn on the Allow Chargebee to automatically create/upgrade/renew subscription when an opportunity is won toggle.
-
Decide how you want to handle charges for the changes under Choose how you'd like to handle charges for such subscriptions.
-
-
Set up the renewal opportunity job.
-
Turn on the Allow Chargebee to create renewal opportunities for subscriptions with finite billing cycles toggle.
-
In the section How frequently should Chargebee create and update renewal opportunities?, set your preferred frequency, day (if selecting Weekly), and time.
-
Click Save and Proceed.
-
-
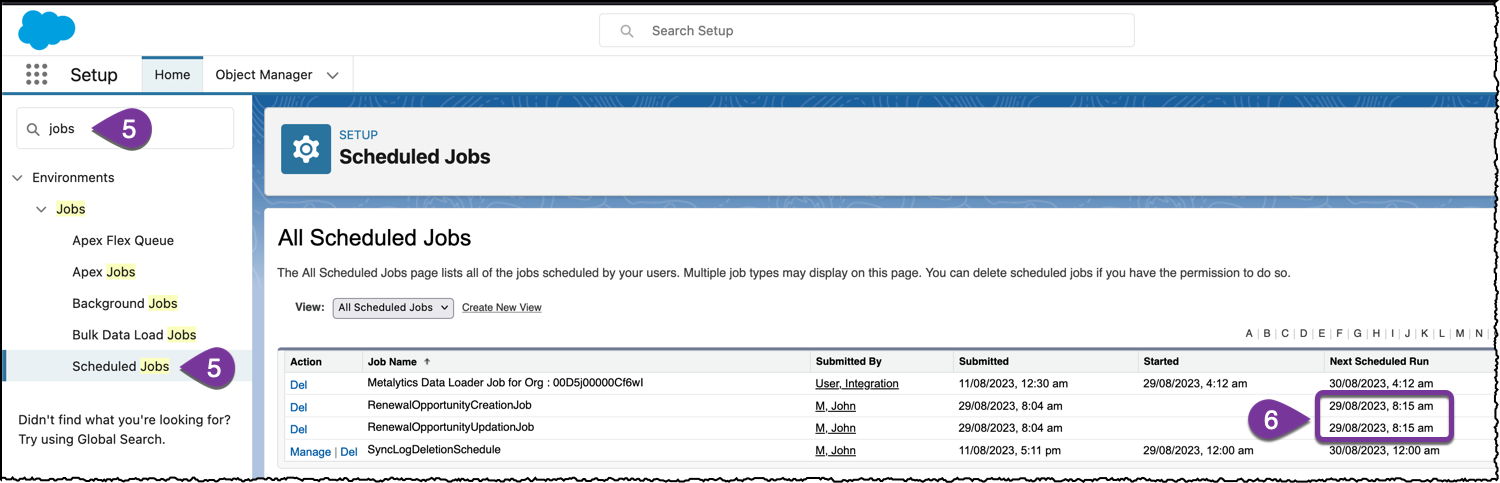
Navigate to Setup > Scheduled Jobs.
-
Verify that the renewal opportunity jobs are set up to trigger at the appropriate time.
-
Wait for the system to generate renewal opportunities based on the schedule you set in the first step.
-
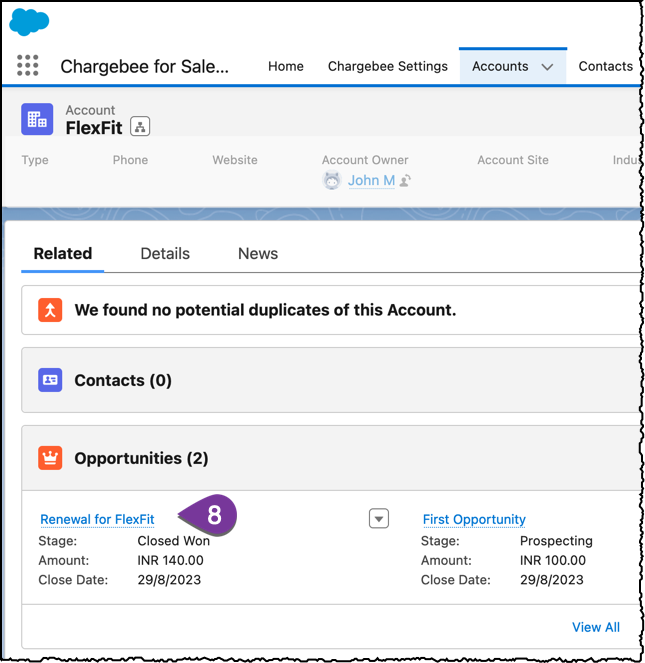
Navigate to the account where you want to renew a subscription using its renewal opportunity.
-
Access the desired renewal opportunity. If multiple opportunities are available, select the one that matches the correct Subscription ID.
-
If you think you'll close this opportunity after the current billing cycle, or after updating the subscription in another way, set the Renewal Opportunity Behavior to Lock opportunity and related line items. This ensures any changes you make won't be overwritten by Chargebee, even if the subscription gets updated before you close the opportunity.
-
Adjust the opportunity products as needed using Manage CB Products and then save your changes.
-
Update the stage of an opportunity to closed-won.
-
Select the Update Chargebee checkbox for the opportunity. (Update Chargebee is a custom field introduced by Chargebee on the opportunity object.)
After the last step, the automation triggers the following operations immediately:
-
The associated subscription is updated, replacing its plan, addons, and charges by those reflected in the opportunity products of the opportunity.
-
The corresponding CB Subscription record in Salesforce is also updated.
-
The remaining billing cycles of the subscription are incremented by the number of billing cycles defined for the plan in the opportunity products. See an example below.
Example
Suppose an opportunity closes with 2 billing cycles left on the subscription. If the plan within the opportunity products specifies 5 billing cycles, the subscription will have a total of 7 (2 + 5) billing cycles remaining after the operation is complete.
Create Quote for a New Subscription
Available under: Opportunity
This action creates a new subscription quote for a customer in Chargebee. The opportunity must be linked to an account.
Note
When multiple Chargebee sites are connected This operation will be invoked for the Chargebee site that the account has been mapped to.
- Select a Product Family. The plans, addons, and charges available in the next steps depend on the product family selected.
- Enter the Plan Details:
- Select a plan using the Choose Plan dropdown menu. The plans shown belong to the product family selected in the previous step. Note: The plan selected can be metered, in which case the upcoming invoices for the subscription are closed manually or automatically based on the setting at the customer level and site level in Chargebee. The former takes precedence over the latter.
- The Choose Currency field displays the opportunity currency. To change this, you must edit the Opportunity Currency field for the opportunity.
- Select the billing frequency you want from the Billing Frequency dropdown. If the product has a single billing frequency configured in Chargebee, that frequency is selected and displayed by default in the dropdown menu.
- The Price field displays the plan price for the currency and billing frequency selected. ( Note: For tiered, volume, and stairstep pricing models, hover over the "i" icon to reveal a tooltip showing the price split among the quantity tiers.) You can change the value provided price overriding has been enabled in Chargebee. The number of decimal places you can provide is configured in Chargebee under Multi-decimal Support.
- Once the plan is added, you can select the following actions from the dropdown list on the right side of the plan.
- Edit or delete the plan.
- Add manual discount to the plan. You can add or delete multiple manual discounts from the plan.
- Enter the details for Addons:
- Once a plan has been selected, any mandatory addons are displayed in this section automatically. They cannot be removed and their quantities cannot be changed.
- Recommended addons for the plan also show up automatically. These can be changed or removed.
- Click Add Addon to select any more addons for the quote.
- Select an addon under Addon Name. Note: The plan selected can be metered, in which case the upcoming invoices for the subscription are closed manually or automatically based on the setting at the customer level and site level in Chargebee. The former takes precedence over the latter.
- Choose Frequency dropdown lists the billing frequencies of the addon that are compatible with the billing frequency selected for the plan. The plan billing frequency has to be a multiple of the addon billing frequency for the latter to be compatible with the plan.
- By default, the price of the addon specified for the currency and billing period combination is displayed under Unit Price. If differential pricing has been enabled for the addon for the plan chosen, then that price is shown by default.
- You can change the unit price for the addon provided price overriding has been enabled in Chargebee.The number of decimal places you can provide is configured in Chargebee under Multi-decimal Support.
- If the pricing model is anything other than flat fee, you can input the Quantity as well. The number of decimal places you can provide is configured in Chargebee under Multi-decimal Support.
- If billing cycles for addons is enabled in Chargebee, you can set the number of billing cycles for the addon.
- To remove an addon, click the Remove link seen on the right side of the addon details.
- Enter the details for Charges:
- Once a plan has been selected, any charges that have been configured to apply automatically along with it are displayed in this section.
- You can change the unit price for the charge provided price overriding has been enabled in Chargebee. The number of decimal places you can provide is configured in Chargebee under Multi-decimal Support.
- If the pricing model is anything other than flat fee, you can input the Quantity as well. The number of decimal places you can provide is configured in Chargebee under Multi-decimal Support.
- Under Charge customers, select the event at which the charge should be applied to the subscription.
- Under Apply charges, select if you want to have the charge applied every time the event occurs or Once.
- Under Number of days of service provided, select the number of days of service period for the charge.
- To remove a charge, click the Remove link seen on the right side of the charge details.
- Use the Select a coupon dropdown and apply any of the coupons available. Multiple coupons can be applied.
- Add Manual Discounts. Your Chargebee site must be configured to allow manual discounts. See, configuring manual discounts.
Use this option to add a manual discount amount or percentage to an invoice line item or the total invoice amount. You can add or delete multiple discounts to an invoice.
To add manual discounts to an invoice, follow these steps:
- Select the Discount Type and enter the discount amount.
- For Apply On, select Invoice Total or Specific line item on invoice to add discounts to the total invoice amount or an invoice line item respectively.
- Select the Duration. The duration determines how long the added discount is applicable.
- Click Add.
- Provide further Quote Details:
- Select a Billing Cycles Type:
- Forever: the subscription renews after the end of each term until it is explicitly canceled.
- Fixed: the subscription renews for a fixed number of billing cycles. In this case, provide the following additional details:
- Enter the number of billing cycles that the subscription should run before canceling automatically.
- A checkbox named Apply contract terms to this subscription appears towards the end of the form. Select it to enable contract terms. On selecting the checkbox, you are presented with options to override the default contract terms settings that have been configured for the Chargebee site.
- Set an Expiry Date for the quote. The quote is automatically marked
closedupon expiry and can no longer be converted. - Specify a subscription Start Date to initiate the subscription on a particular date in the future. If this is not configured, the subscription starts when the quote is invoiced.
- Add any Notes that you want to be displayed on the quote PDF for the customer's reference. You can even have a note configured in your Chargebee site to be applied to all quotes automatically. These notes are imprinted on the quote PDF and can also be seen in the Notes & Attachment related list for the quote.
- Select Display detailed charges on the quote PDF if you want the quote PDF to include a detailed breakdown of charges applicable in each billing cycle through the lifetime of a subscription.
- Select a Billing Cycles Type:
- Clear Ship to billing address checkbox to enter a shipping address that's different from the billing address. The shipping address in the Account is prefilled and you can edit as needed.
Once created, the quote is visible under the CB Quotes related list for the opportunity.
Note
Quote line items
- The Quote Line Items related list for CB Quote lists all the products of the quote that will be invoiced first when the quote is converted.
- The CB Quote Products related list contains all the products that are part of the quote regardless of when they will be invoiced.
Create Quote for Subscription Amendment
Available under: Opportunity
This action creates a quote to make changes to a subscription. This is typically done when offering upgrades and for reactivating canceled subscriptions. The opportunity must be linked to the account that the subscription belongs to. Use a new opportunity for this purpose and not the original Closed-Won opportunity that created the subscription. Follow the steps below for this:
-
From the opportunity, click Create Quote.
-
In the Create Quote for dropdown, select Existing Subscription. The subscriptions(including canceled) associated with the account that has the same currency as that of the opportunity are listed. This list includes subscriptions that haven't synced to Salesforce yet from Chargebee.
-
Select the subscription you want to create the quote for and click Next.
-
You will now be presented with the same page as that for creating a quote for a new subscription. The only difference is that the page is prefilled with the data from the subscription. You can add or remove addons, charges, coupons, and manual discounts from the subscription. The Apply Changes option will allow you to change the Subscription immediately, or set a a future date for the Subscription change to take effect on.
-
Make changes as needed and click Create Quote.
Create a Quote for Renewal
Available under: Opportunity
Chargebee Quoting now supports Renewal Quoting, allowing you to set changes that take effect at the end of a contract term and renew the subscription for a new period.
Prerequisites
- Ensure that the subscription being renewed has fixed billing cycles.
Steps to Create a Renewal Quote
-
Create an Opportunity
- Navigate to Opportunities in Salesforce.
- Click New to create a new opportunity.
-
Create a Chargebee Quote
- Click the Create Quote button in Salesforce (provided by the Chargebee managed package).
- Click the Create Quote button in Salesforce (provided by the Chargebee managed package).
-
Select Quote Type
- On the Quote Type screen, choose Existing Subscription.
-
Set Renewal Timing
- Under Apply Changes At, select At Contract End. This ensures that the terms defined in the quote take effect at the renewal date, starting a new subscription term.
Create Quote for One-Time Charge
Available under: Opportunity
This action creates quotes for one-time charges. It allows you to collect payments from your customers for products that are non-recurring. For example, a non-recurring addon or a coupon that is not part of your standard product catalog.
To create a quote for one-time charges:
-
Go to the opportunity for which you want to create a quote.
-
Click Create Quote. If the Create Quote button is not available, customize the opportunity page layout to add the button.
-
In the Create Quote for dropdown list, select One Time Charge and click Next.
-
On the add charge page, select the required charge or coupon.
-
In the Quote Essentials section, add all required details.
-
Click Send.

Managing a Subscription with Ramps
To create a Subscription with Ramps you must first use the Manage CB Products UI, then through manual intervention, or automation the Subscription with Ramps can be pushed into Chargebee.
Adding Ramps to Opportunity Products To add ramps to Opportunity Products in Salesforce, follow these steps:
-
Sign in to Salesforce and navigate to an existing Opportunity, or create a new one.
-
Click the Manage CB Products button on the Opportunity page.
-
The Manage CB Products page will exhibit a slightly different appearance with the ramp enabled. The Start Date is moved to the top of the page, while the product selection details have been relocated downwards.

-
Choose a Start date for the subscription.
-
Under the Billing cycles dropdown, choose one of the following options:
-
Forever: The subscription renews after each term until explicitly canceled.
-
Fixed: The subscription renews for a fixed number of billing cycles and then cancels.
-
-
To create contract terms on the subscription, select the Apply contract terms to this subscription checkbox.
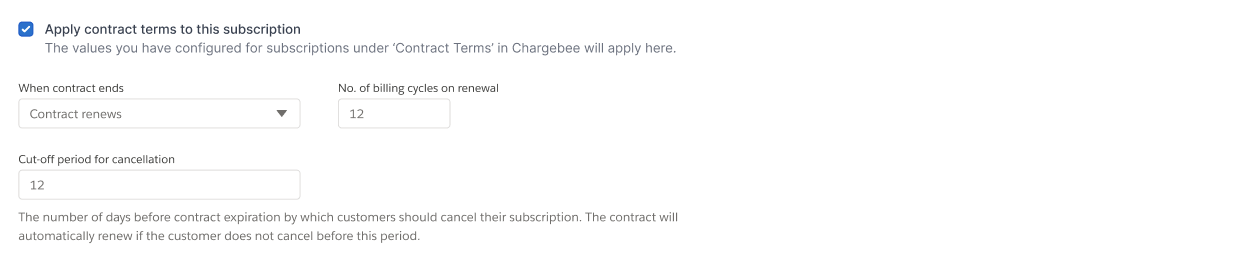
Under When contract ends, select one of the following options: Contract renews: A new contract and subscription are created for a specific number of billing cycles.The number of billing cycles on Renewal (Applicable only when Contract Renews is set) Subscription renews without a contract: The subscription remains active without contract terms. Contract and Subscription end: This stops the subscription and the contract upon renewal. Cut-off period for cancellations: The number of days before contract expiration, by which customers should cancel their subscription. Cancellation is not allowed within the cut-off period.
-
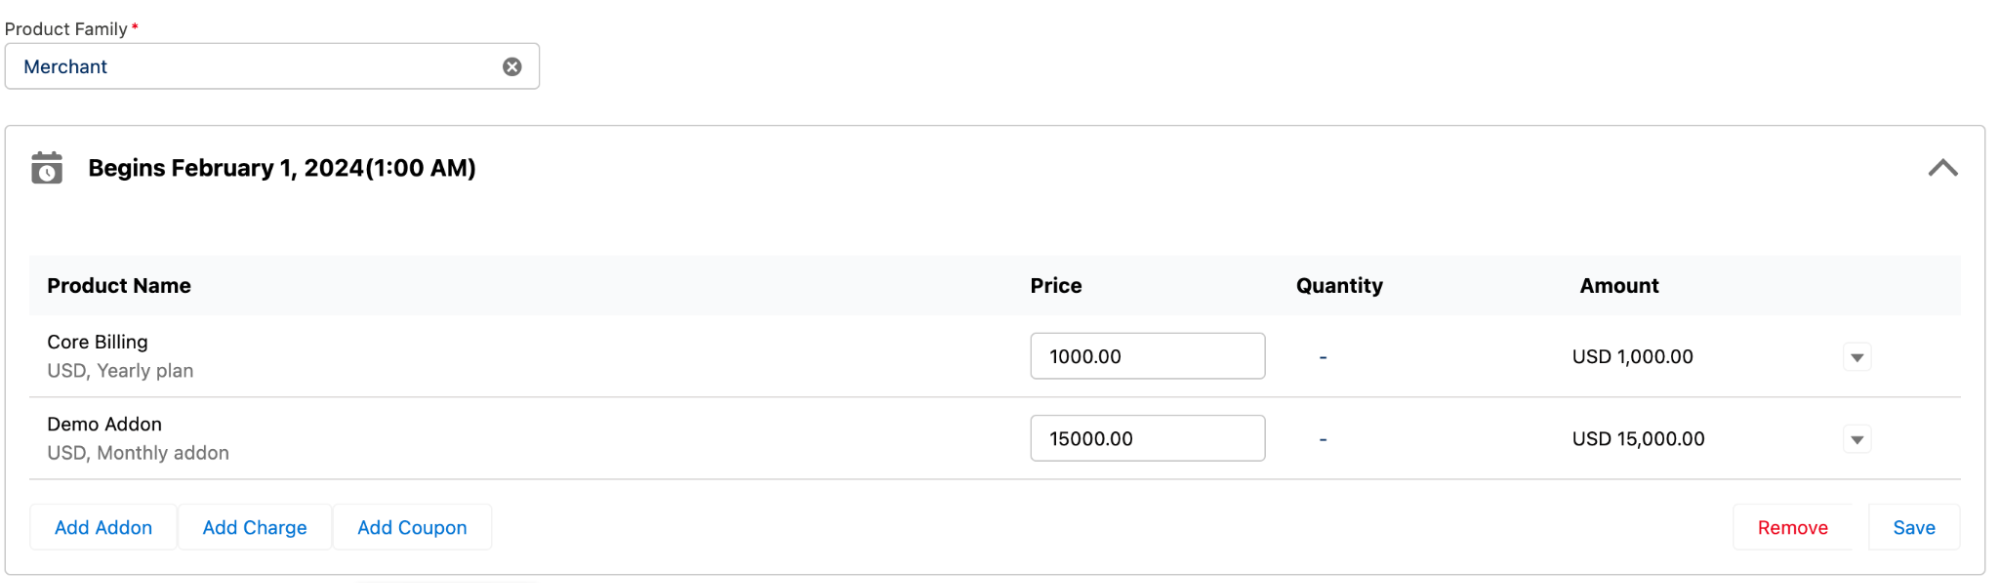
Scroll to the second half of the page for ramp creation.
-
Select the Product Family for the Plans and Addons requiring ramps.
-
Click Add Plan and choose the desired plan. Add Addons, Charges, Coupons, and Manual Discounts as required. Click Save.
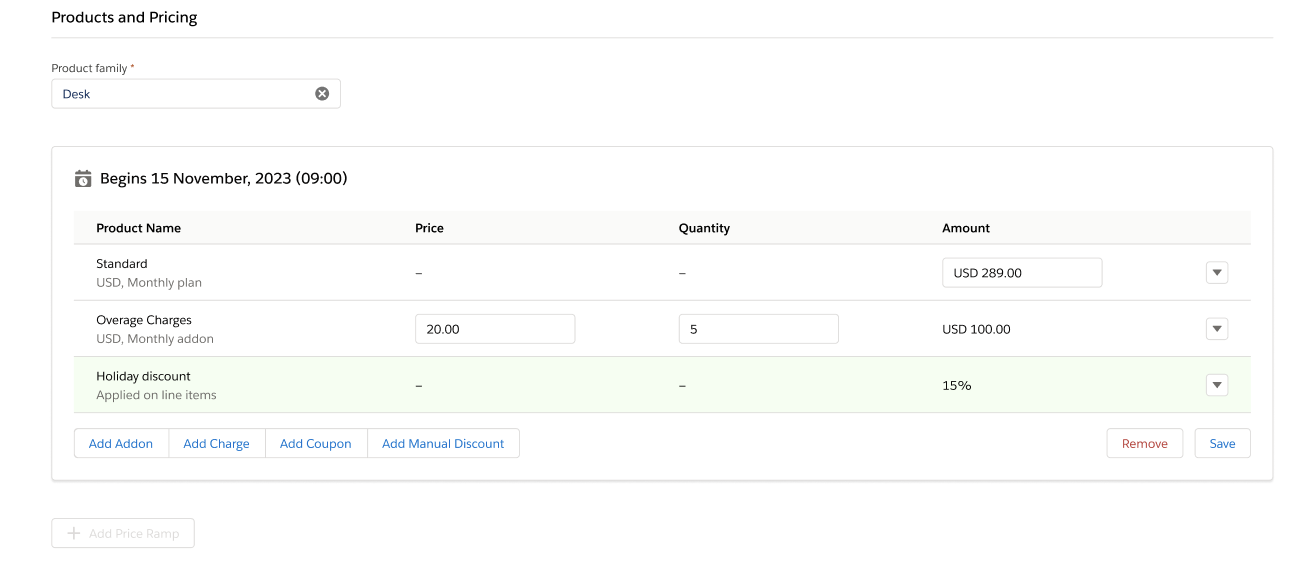
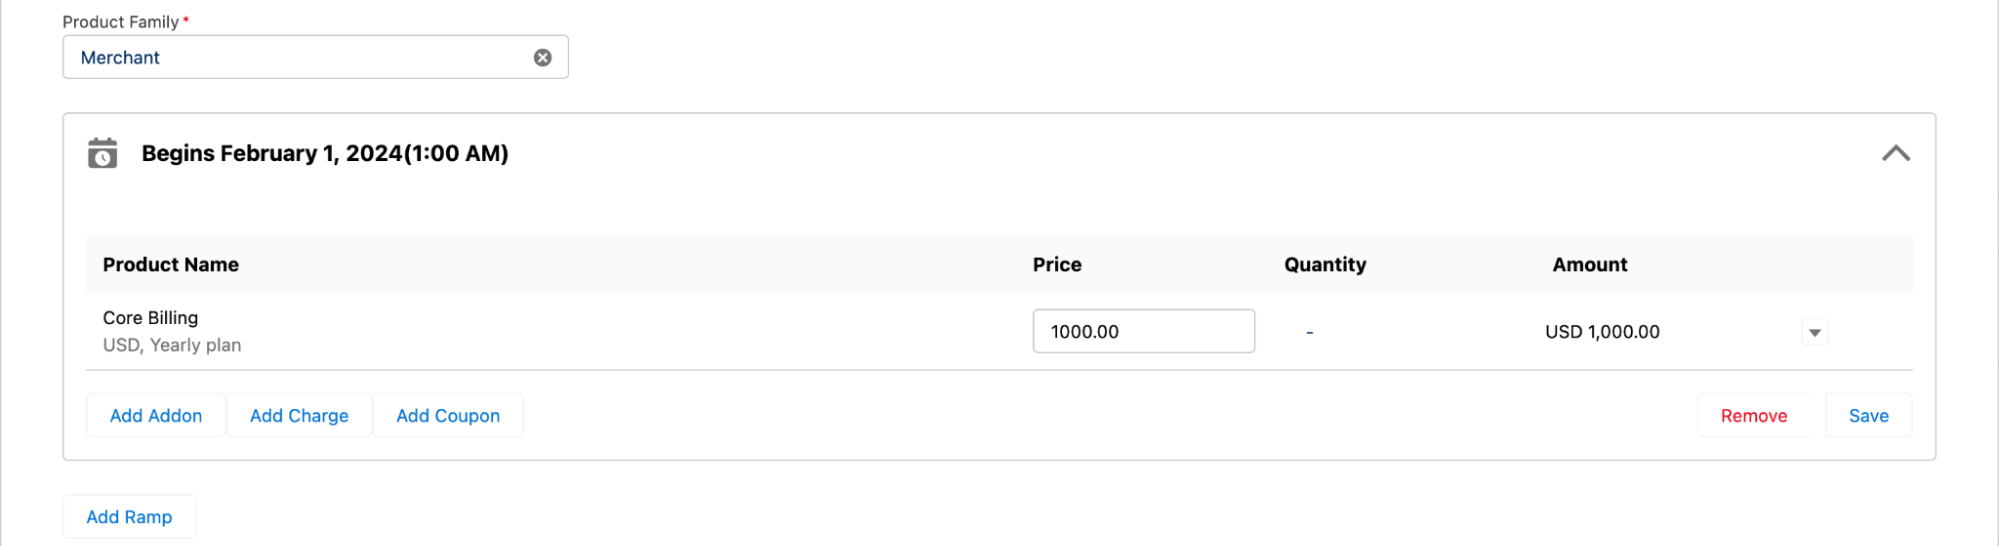
-
If you do not wish to add more ramps, click Add Products.
-
To continue adding ramps, click Add Price Ramp. A modal appears, allowing you to add further Plans, Addons, Charges, and Discounts.
-
Select when this Ramp Period should apply:
- On Subscription Renewal
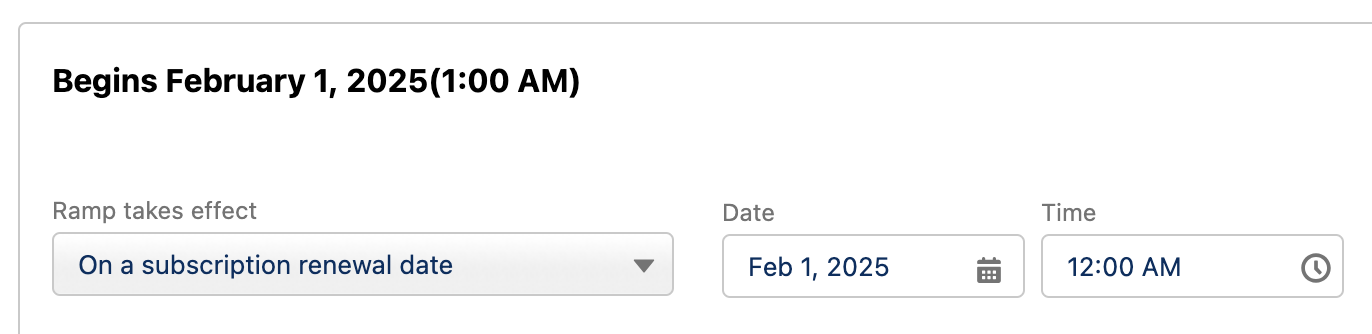
- On Specific Date
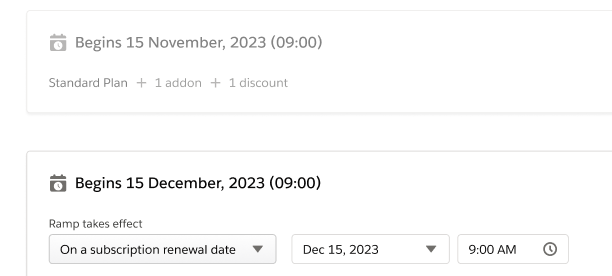
- On Subscription Renewal
-
Add any plans, addons, or coupons (both manual and coupon-based). Once you've set up the first ramp, click Save.
-
To create the next ramp schedule, click Add Ramp and repeat steps 12 through 14 for each ramp you wish to build, up to 12 times for a given subscription.
-
Once the addition of ramps is complete, click Add Products.

Creating a Subscription with Ramps You can create Subscriptions with Ramps in Salesforce using two methods: UI-based or Automation. Follow the steps below for each method:
UI Based Method When using the UI based Subscription Ramp creation, it is not required to use the Manage CB Product step, you can add Ramps and Create the subscription in a single workflow.
-
Open the Create / Change Subscription screen in Salesforce
-
Select a Product Family, add your products and apply any discounts. Click Save to proceed.
-
Click the Add Ramp button. A pop-up will appear for configuring the first ramp, Set the ramp details and click Save.
-
To add more ramps, click Add Ramp and repeat the steps above for each ramp. Once all ramps are configured, continue with the usual steps to create the subscription.
Automation Method Follow the steps in Adding Ramps to Opportunities to configure ramp details.
-
Populate the CB Ramp and CB Ramp Line Item objects with the required data.
-
Check the Update Chargebee checkbox to trigger subscription creation in Chargebee. Refer to the Chargebee Salesforce documentation here for detailed instructions.
-
Next, select the Create/Update Ramps checkbox to push the ramp details to Chargebee.
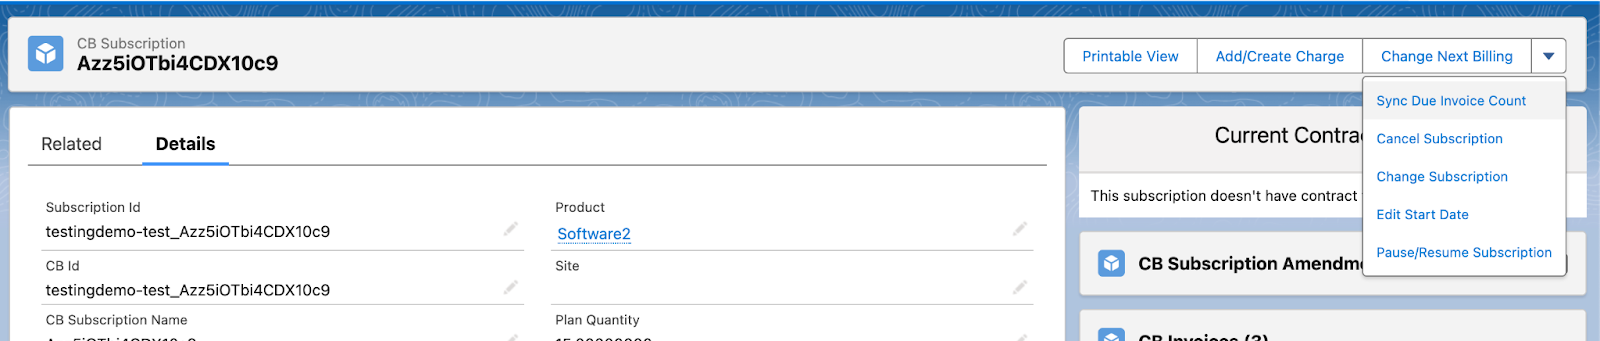
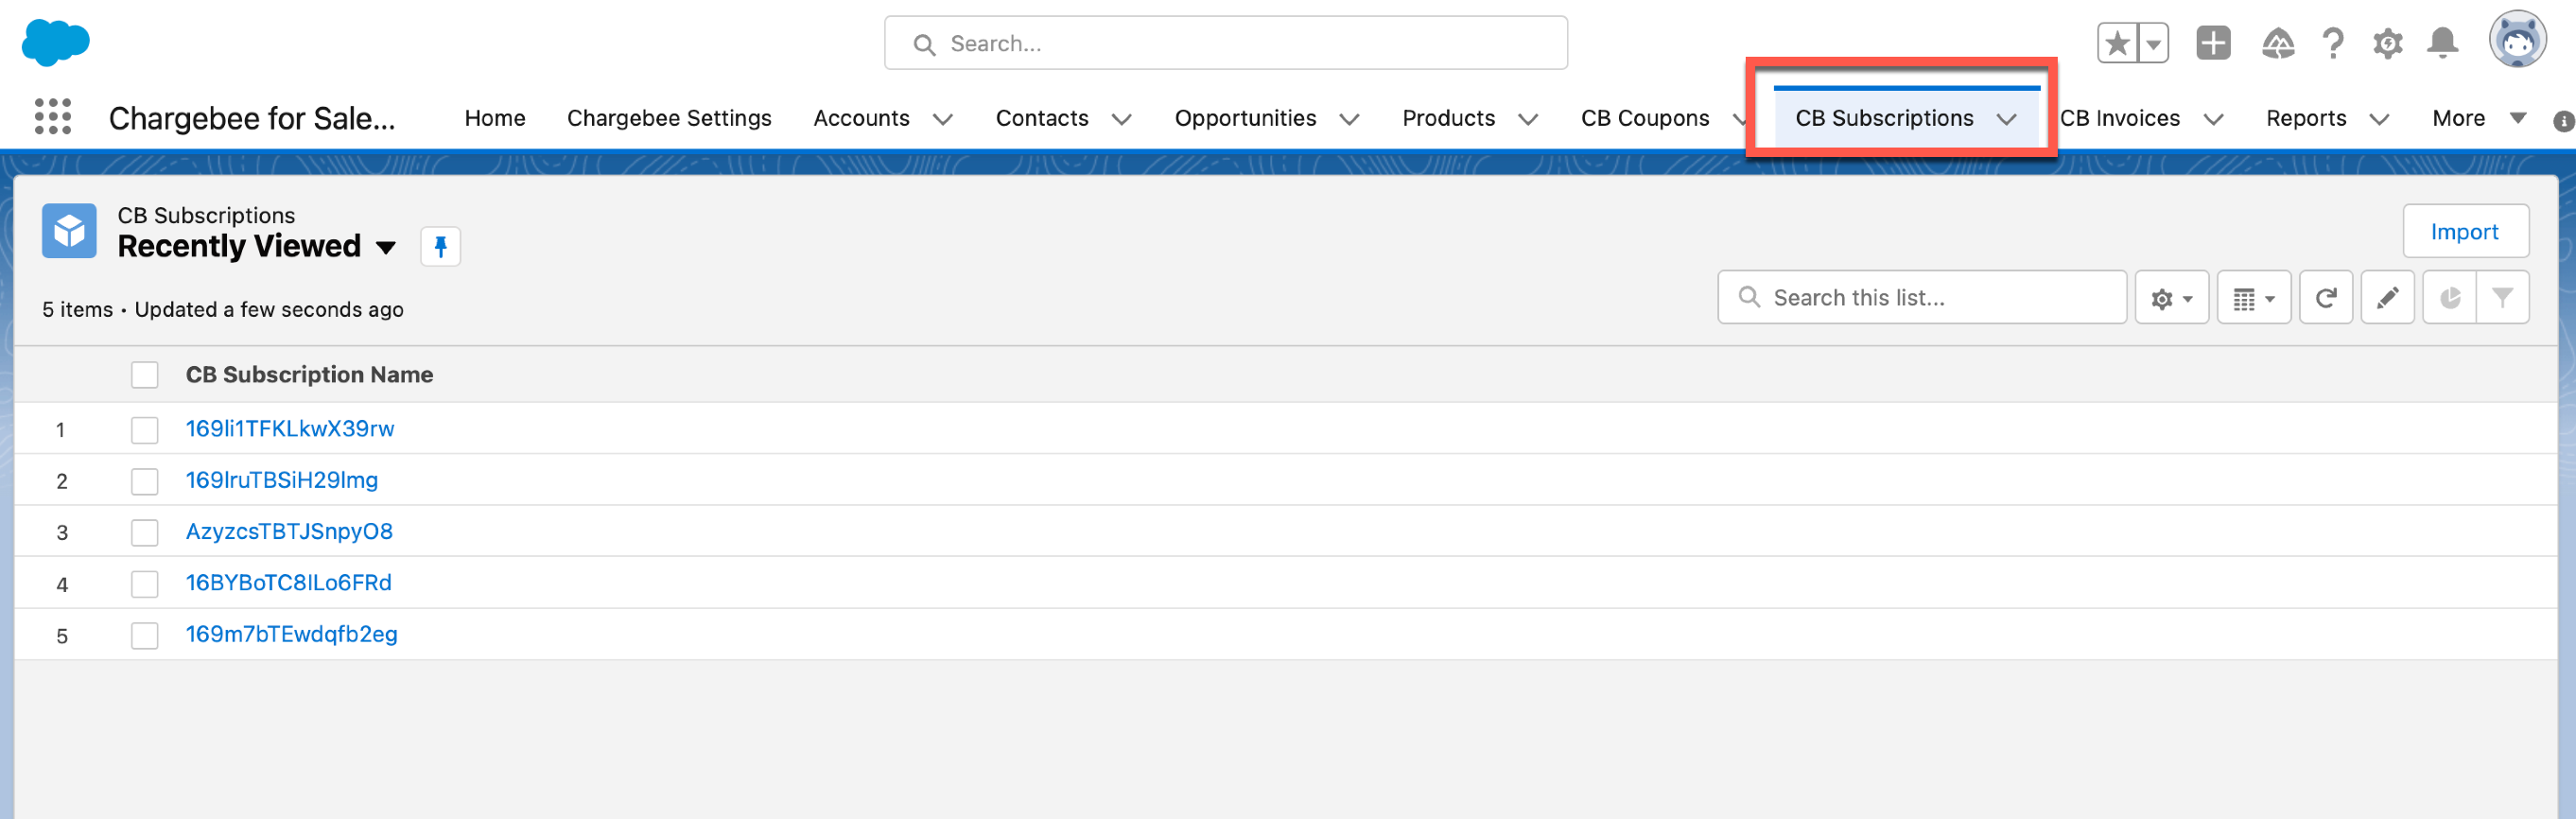
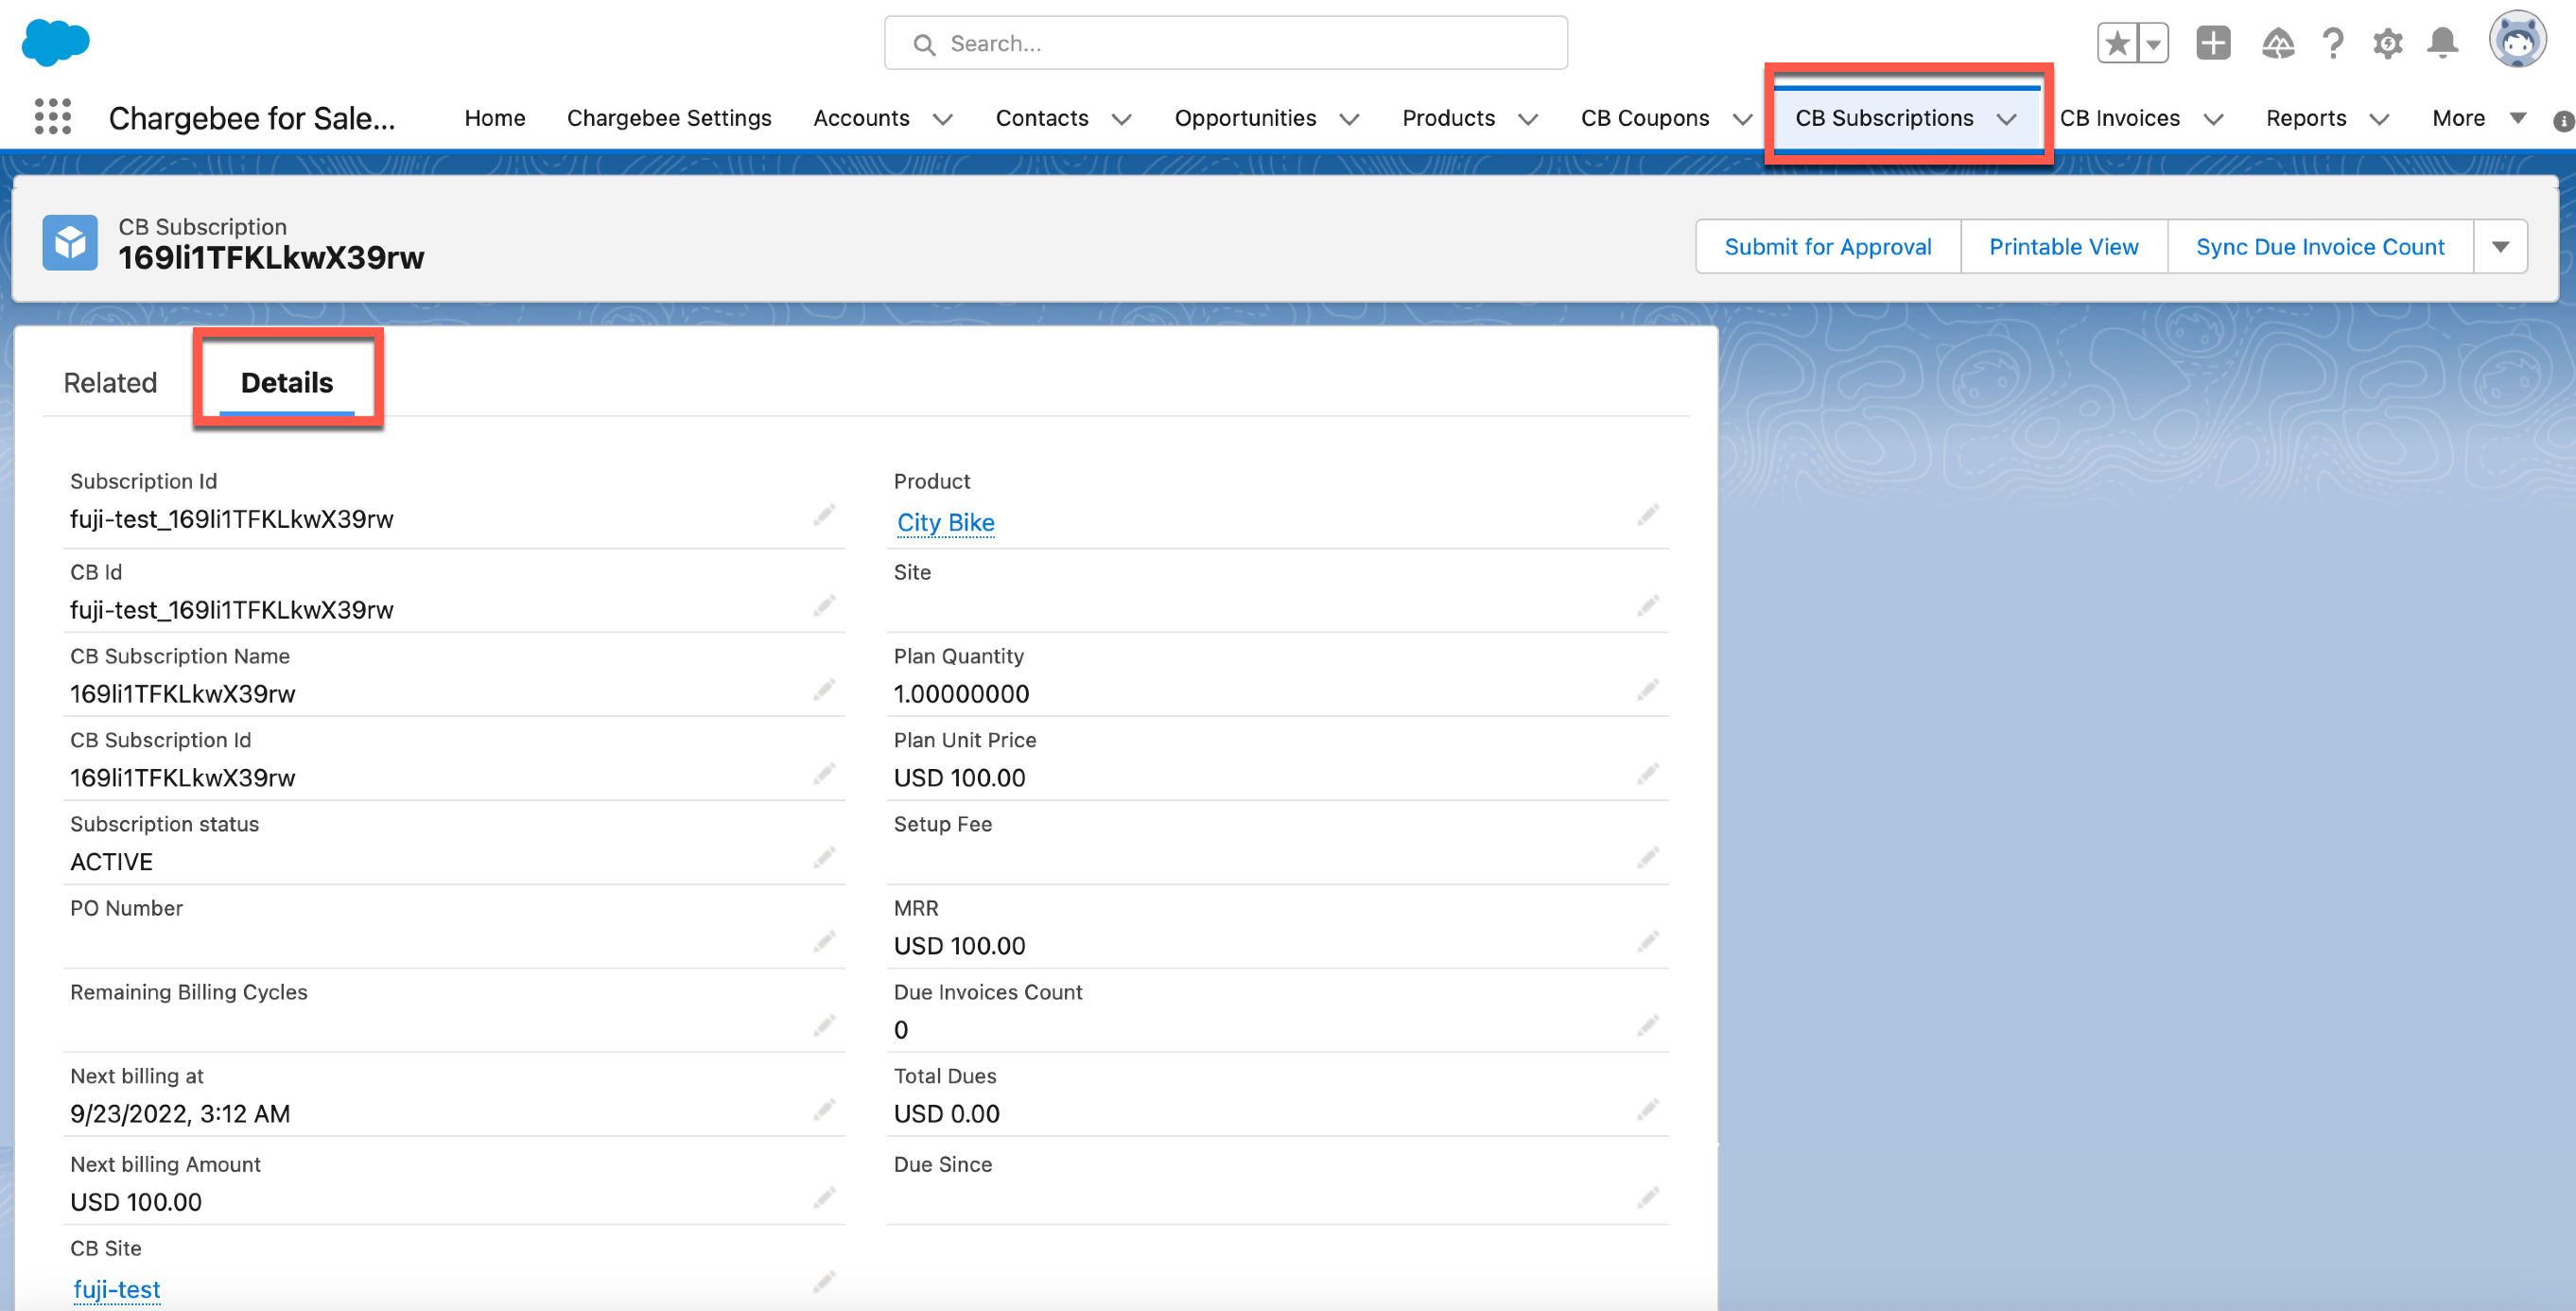
CB Subscription Actions
The actions listed in this section are those that can be performed from the CB Subscription custom object in Salesforce.
Change Subscription
Available under: CB Subscription
This operation makes changes to a subscription in Chargebee through Salesforce and then syncs it back to Salesforce. You can make any combination of the following changes to a Chargebee subscription using this action:
- Upgrade/downgrade the plan
- Add/remove addons
- Change the price
- Add coupon discounts
- View Ramps
- Add / Remove Ramps
- Change the PO Number
- Change the number of billing cycles
- Price Variants
- Navigate to the subscription page and click Change Subscription.
- Update the plan, addon, charge, and coupon details as suggested in the section for Create Subscription.
- Optionally, you can provide the Billing details to modify them:
- Enter the No. Of Billing Cycles that the subscription should run before canceling automatically. This need only be provided if you want to change the original value.
- Update the PO Number as needed.
- Under Apply Changes, select one of the available options:
- Immediately: Apply the changes effective immediately. Optionally, also select Apply prorated charges to give prorated credits for the existing items in the subscription and raise prorated charges for the new items. Prorated charges are not applicable when the billing period of the subscription is changed, such as when moving from a monthly to a yearly plan or vice versa.
- On next Renewal: Apply the changes on the next renewal of the subscription.
- Invoicing Options: When charges are raised immediately on subscription change, the following options determine how they're handled:
- Invoice immediately: the charges are immediately invoiced.
- Add to Unbilled Charges: the charges are added to unbilled charges.
- Click Update to confirm the changes to the subscription.
- Once the subscription is updated in Chargebee, it is immediately synced back into Salesforce. This sync can take a few minutes. Unlike when creating a subscription, a Chargebee Checkout link cannot be sent to the customer via Salesforce for changing subscriptions.

Cancel Subscription
Available under: CB Subscription
This action cancels the subscription. Follow the steps below to cancel a subscription from Salesforce:
- Navigate to the subscription.
- Click Cancel Subscription.
- Select an option under When do you want to cancel the subscription?
- Cancel immediately: on selecting this option, you must select an option under How do you want to handle credits for the unused period?
- Issue full credits: Create a credit note for all charges that were incurred for the current subscription term.
- Don't issue credits: Do not give any credits to the customer.
- Issue prorated credits: Create a credit note with prorated credits for the unused period.
- Cancel on a specific date: pick a date to cancel.
- Cancel at end of term: cancel the subscription at the end of the current term.
- Cancel immediately: on selecting this option, you must select an option under How do you want to handle credits for the unused period?
- Click Cancel Now or Schedule Cancellation as applicable.
Upon canceling a subscription, the change is only reflected in Salesforce on the next sync. You cannot delete a subscription from Salesforce.
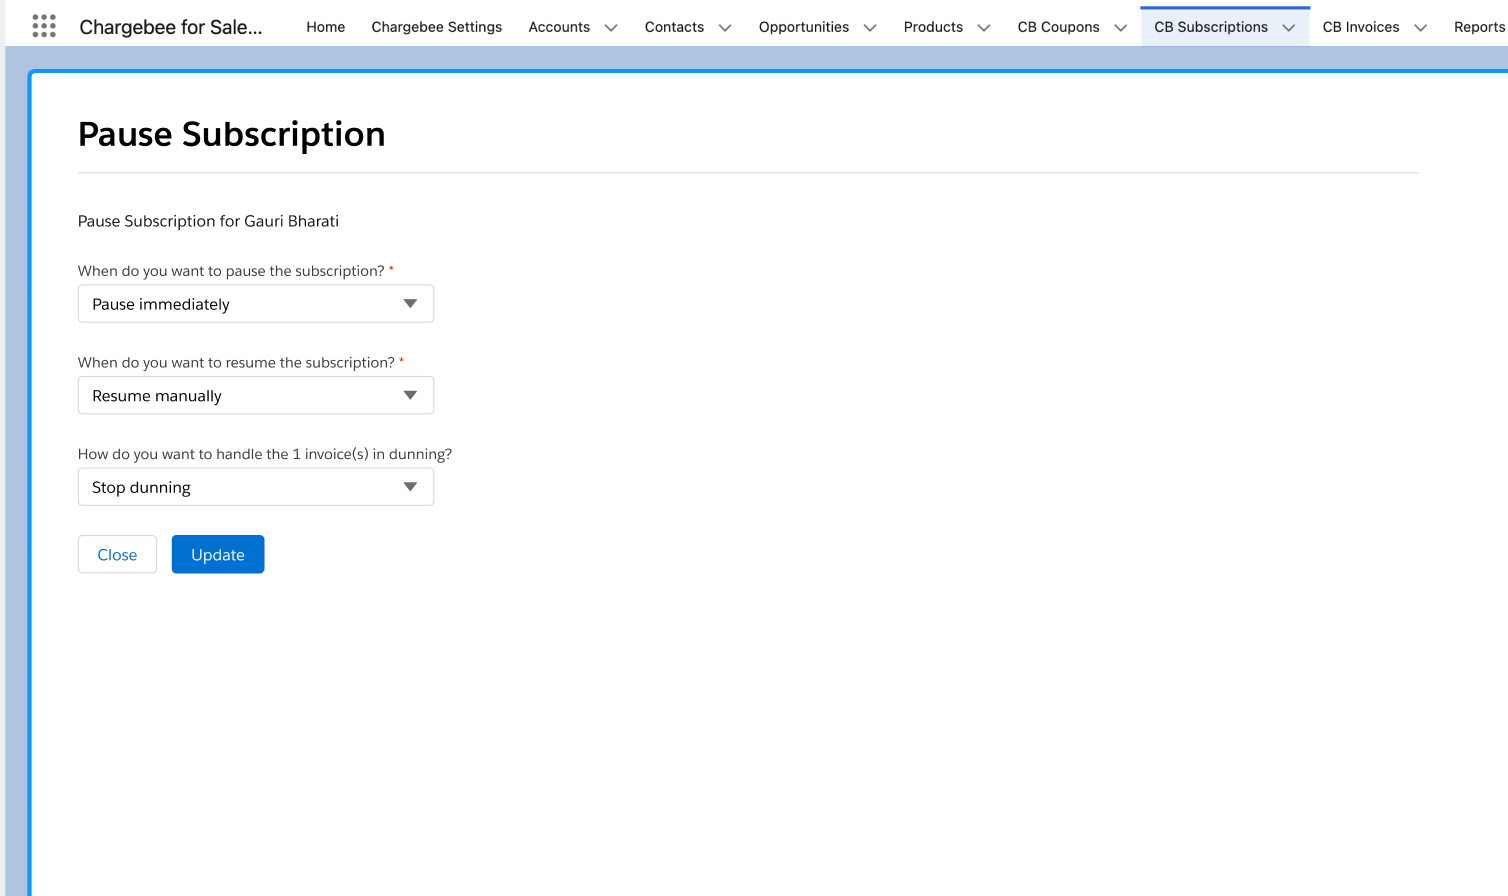
Pause Subscription
Available under: CB Subscription
This action pauses the subscription. The Pause subscription option is context-aware. As an example, if the subscription is currently Active, this option will default prompt the user to Pause the subscription. Once the subscription is in a paused state, it can then be resumed using the same action Follow the steps below to pause a subscription from Salesforce. Follow the steps below to pause a subscription from Salesforce.
-
Log in to your Salesforce account, and navigate to the Subscription Details page.
-
Click Pause/Resume Subscription in the drop-down.

-
From the Pause Subscription Details page, you can choose the following option when pausing a subscription.
- Pause Immediately: Selecting this option will pause the subscription with immediate effect. The subscription will be temporarily suspended until you decide to resume it.
- Pause at the End of a Term: Opting for this option will allow the subscription to continue as usual until the end of the current term. Once the current term expires, the subscription will automatically be paused.
- Pause on a Specified Date: This option enables you to schedule a specific date on which the subscription should be paused. Simply choose the desired date from the date picker, and the subscription will be paused on that day.
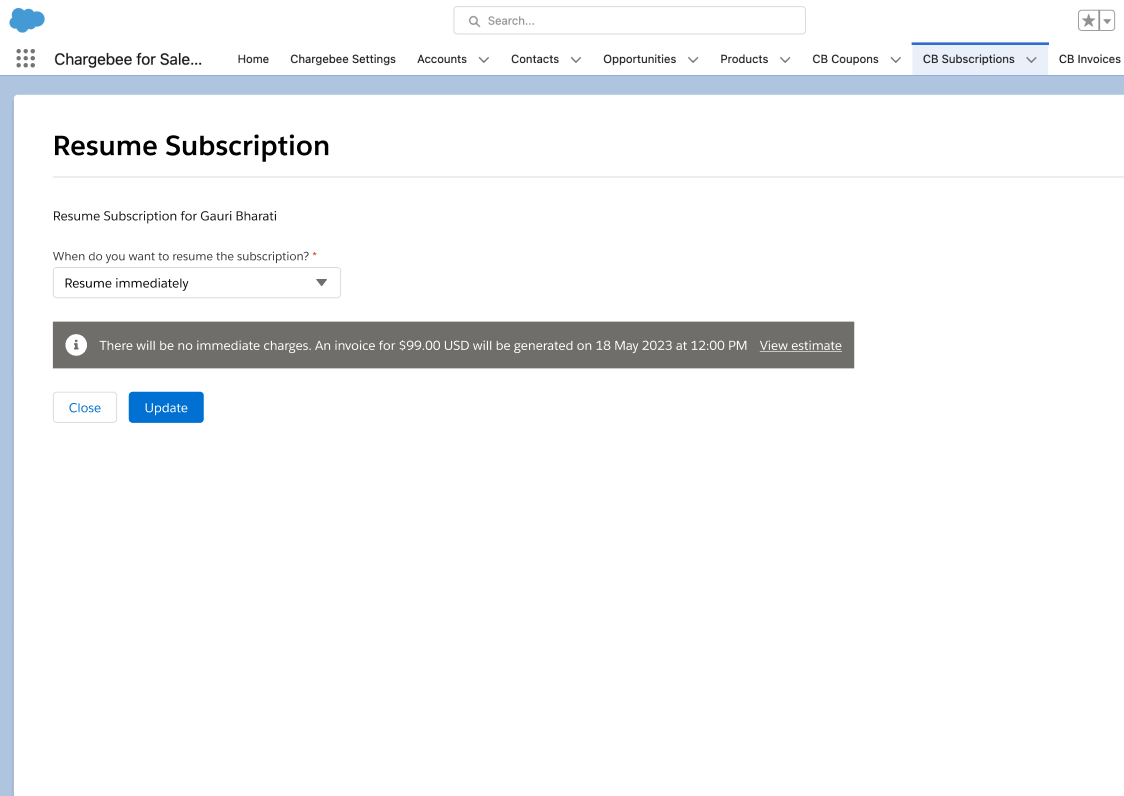
Resume Subscription
Available under: CB Subscription
This action resumes the subscription. The Resume subscription option is context-aware. As an example, if the subscription is currently Paused, this option will default prompt the user to Resume their subscription. Once the subscription is in a resumed state, it can then be paused using the same action Follow the steps below to resume a subscription from Salesforce.
-
Log in to your Salesforce account, and navigate to the Subscription Details page.
-
Click Pause/Resume Subscription in the drop-down.
-
From the Resume Subscription Details page, you can choose the following option when pausing a subscription.
- Resume Immediately: Selecting this option will resume the subscription with immediate effect.
- Resume on a Specified Date: This option enables you to schedule a specific date on which the subscription should be resumed. Simply choose the desired date from the date picker, and the subscription will be resumed on that day.
Change Next Billing
Available under: CB Subscription
This action changes the time/date the next renewal of the subscription happens.
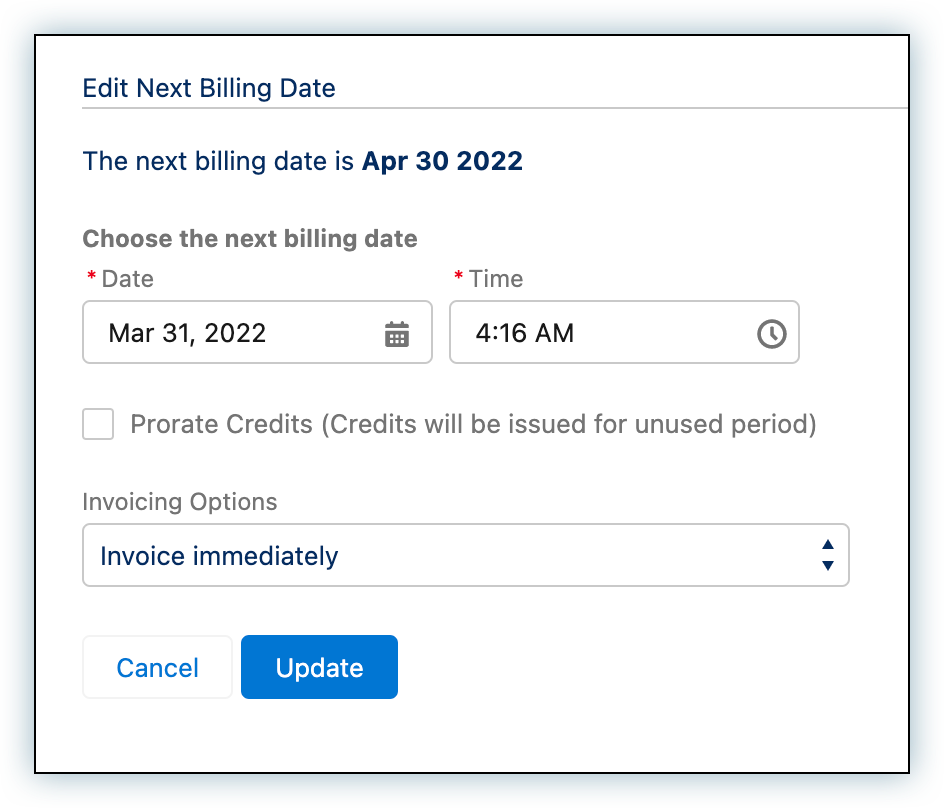
Proration
Choosing to prorate will raise prorated charges or credits against the customer record depending on whether the renewal date is postponed or preponed respectively. If prorate is unchecked then no charges or credits are raised for changing the next billing date.
Further, on choosing to prorate, if charges are raised, they may be invoiced immediately or added to unbilled charges, depending on what's chosen under Invoicing Options.
See also
Change next billing date help page.
Add/Create Charge
Available under: CB Subscription
Charges and quick charges are non-recurring amounts that can be added to CB Subscriptions in Salesforce (subscription records in Chargebee). Charges must be predefined in Chargebee's product catalog whereas quick charges are ad-hoc and not predefined in Chargebee.
See also
Add/Create Charge for an account.
Add a Charge
Follow the steps below to add a charge to a subscription:
- From a CB Subscription, click the Add/Create Charge button.
- Click on the Add Charge tab.
- Under Charge Name, select the charge.
- You can change the Per Unit Price for the charge provided price overriding is enabled in Chargebee. The number of decimal places you can provide is configured in Chargebee under Multi-decimal Support.
- Enter the Quantity if applicable. The number of decimal places you can provide is configured in Chargebee under Multi-decimal Support.
- Select the Service Period for this charge.
- Click Confirm and the charge is added to the subscription immediately. Any coupons applied to the subscription, along with credits, and excess payments available against the customer are automatically applied.
Add a Quick Charge
Follow the steps below to a quick charge to a subscription:
- From a CB Subscription, click on the Add/Create Charge button.
- Click on the Create Quick Charge tab.
- Enter the Amount.
- Select the Service Period for the quick charge.
- Invoicing Options: Select from among the following options to determine how invoicing of the quick charge is handled:
- Invoice immediately: the quick charge is invoiced immediately.
- Add to Unbilled Charges: the quick charge is added to unbilled charges.
- Enter a Description for the quick charge.
- Click Confirm and the quick charge is created for the subscription. Any coupons applied to the subscription, along with credits, and excess payments available against the customer are automatically applied.
Sync Due Invoice Count
Available under: CB Subscription
The Sync Due Invoice Count updates the Due Invoice Count field to the current value.
The Due Invoices Count field in the CB Subscription object shows the total number of invoices that are yet unpaid against the subscription. This field, however, is not updated on any given sync unless the subscription itself has undergone a change since the last sync. So occasionally, invoices may get paid without the field getting updated automatically. Sync Due Invoice Count helps by fetching the current value of the Due Invoice Count field from Chargebee.
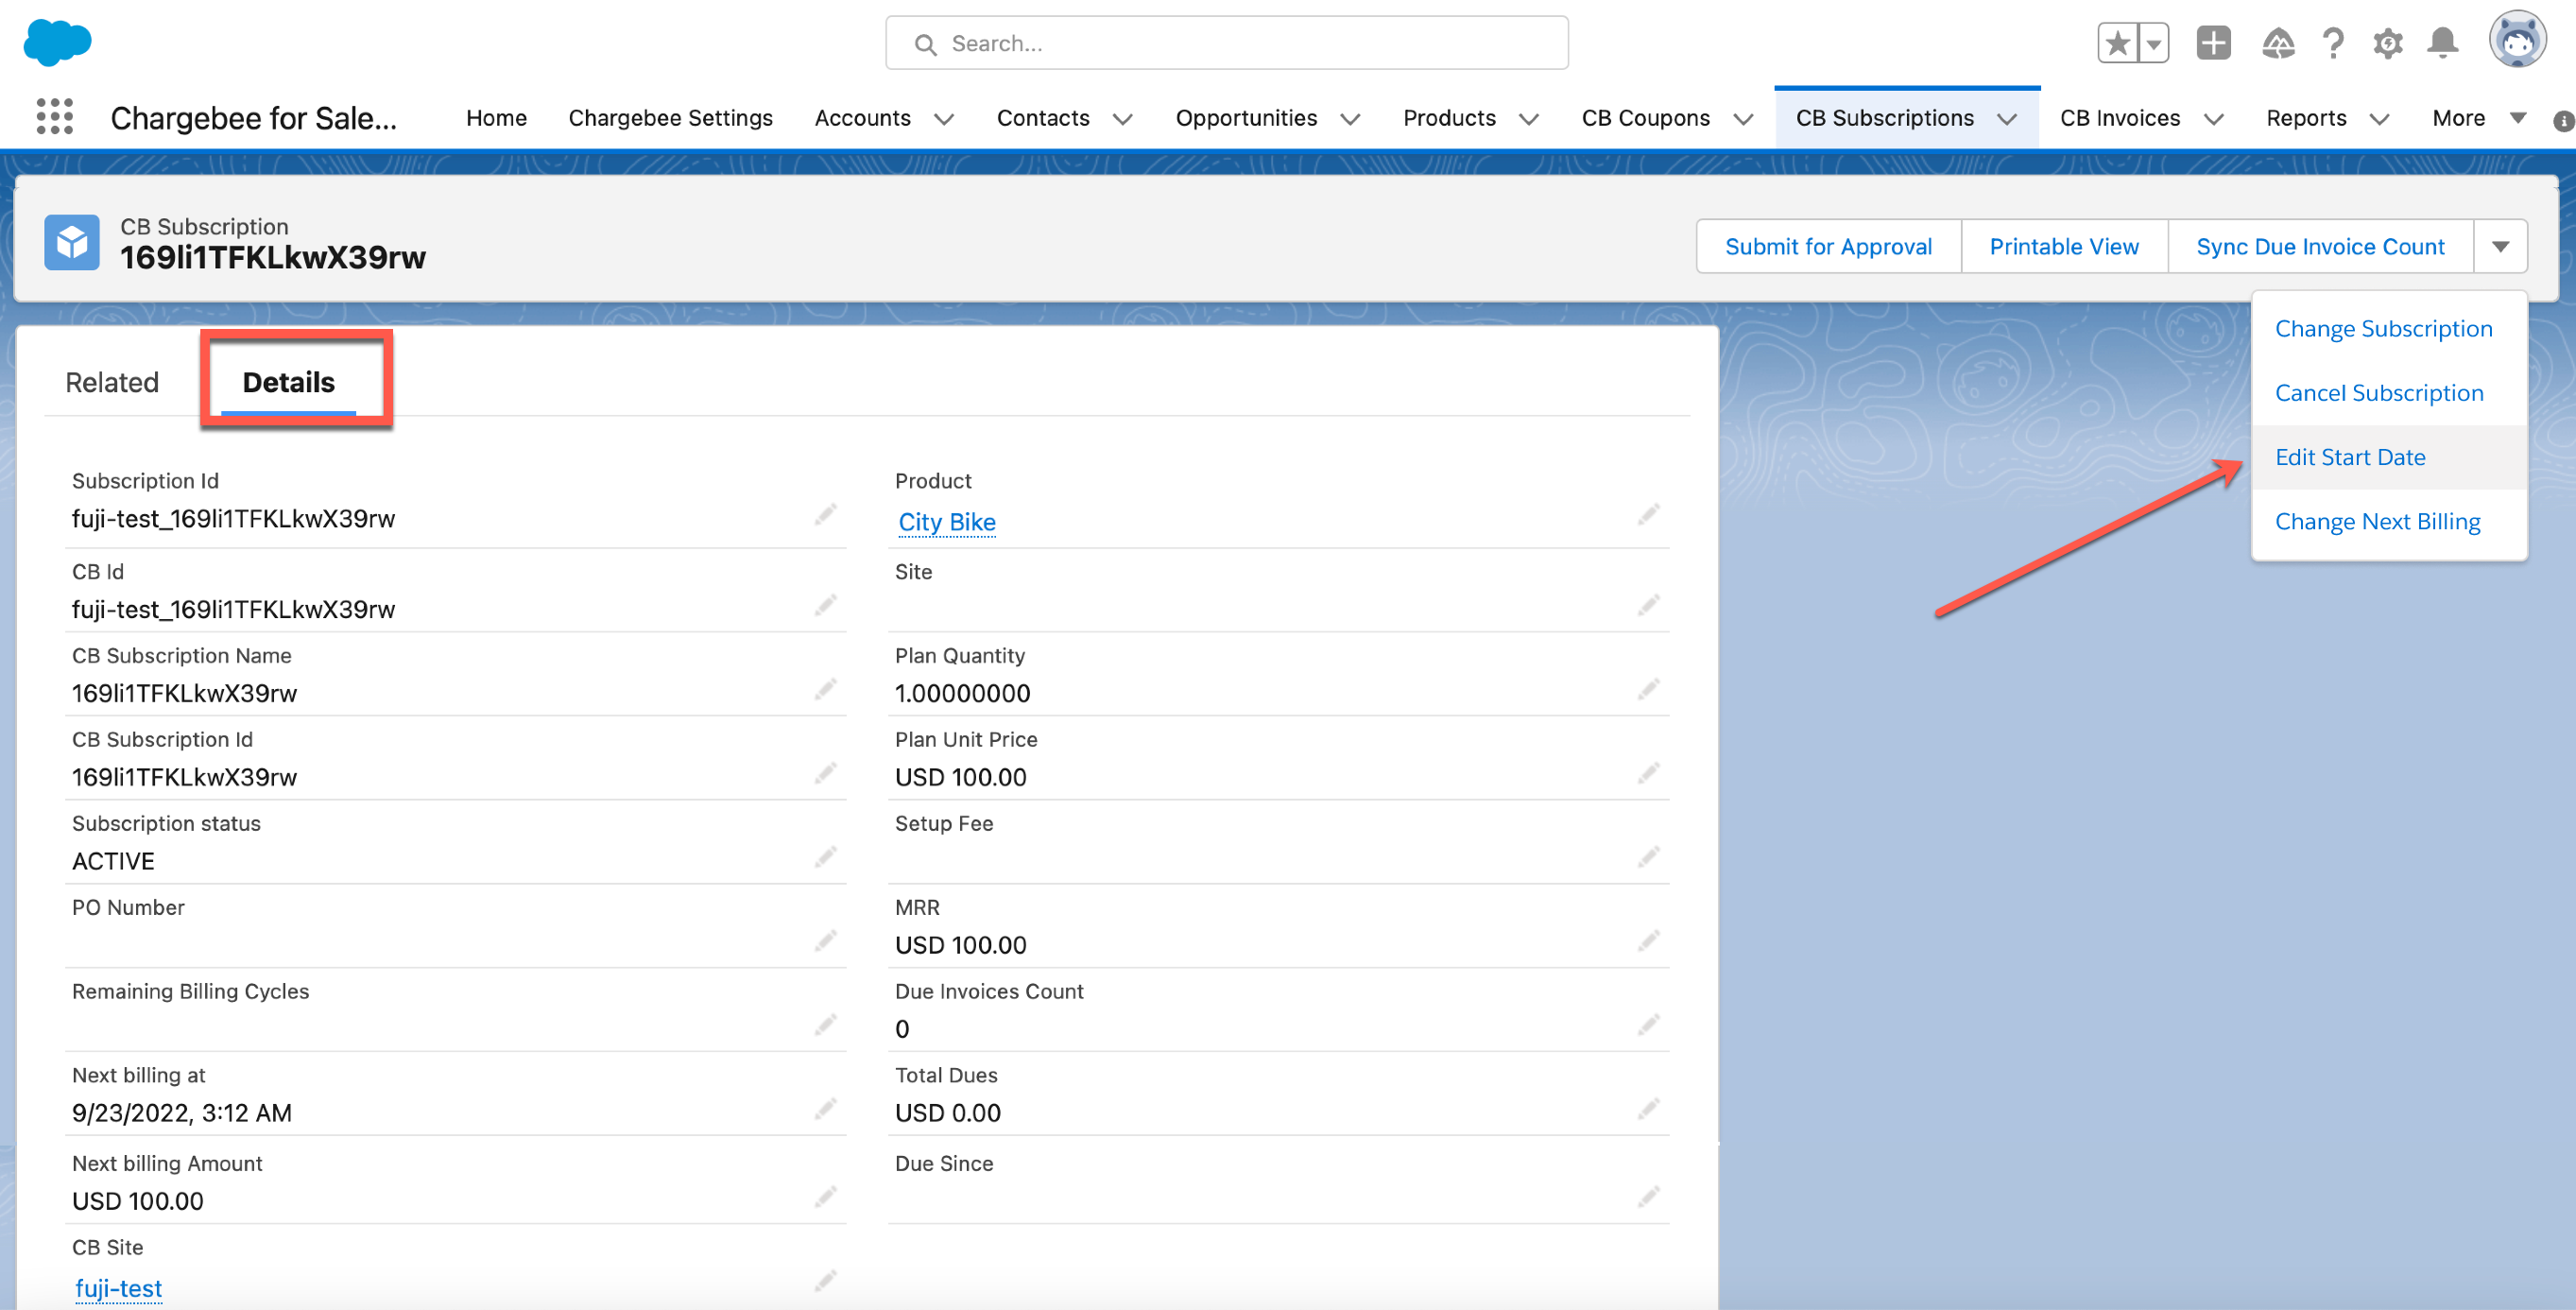
Modify Subscription Start Date
Available under: CB Subscription As a business owner, having the ability to modify subscription details is crucial for maintaining customer satisfaction and ensuring smooth operations.
This feature is particularly useful in cases where customers may need to adjust the start date of their subscription due to unpredictable circumstances.
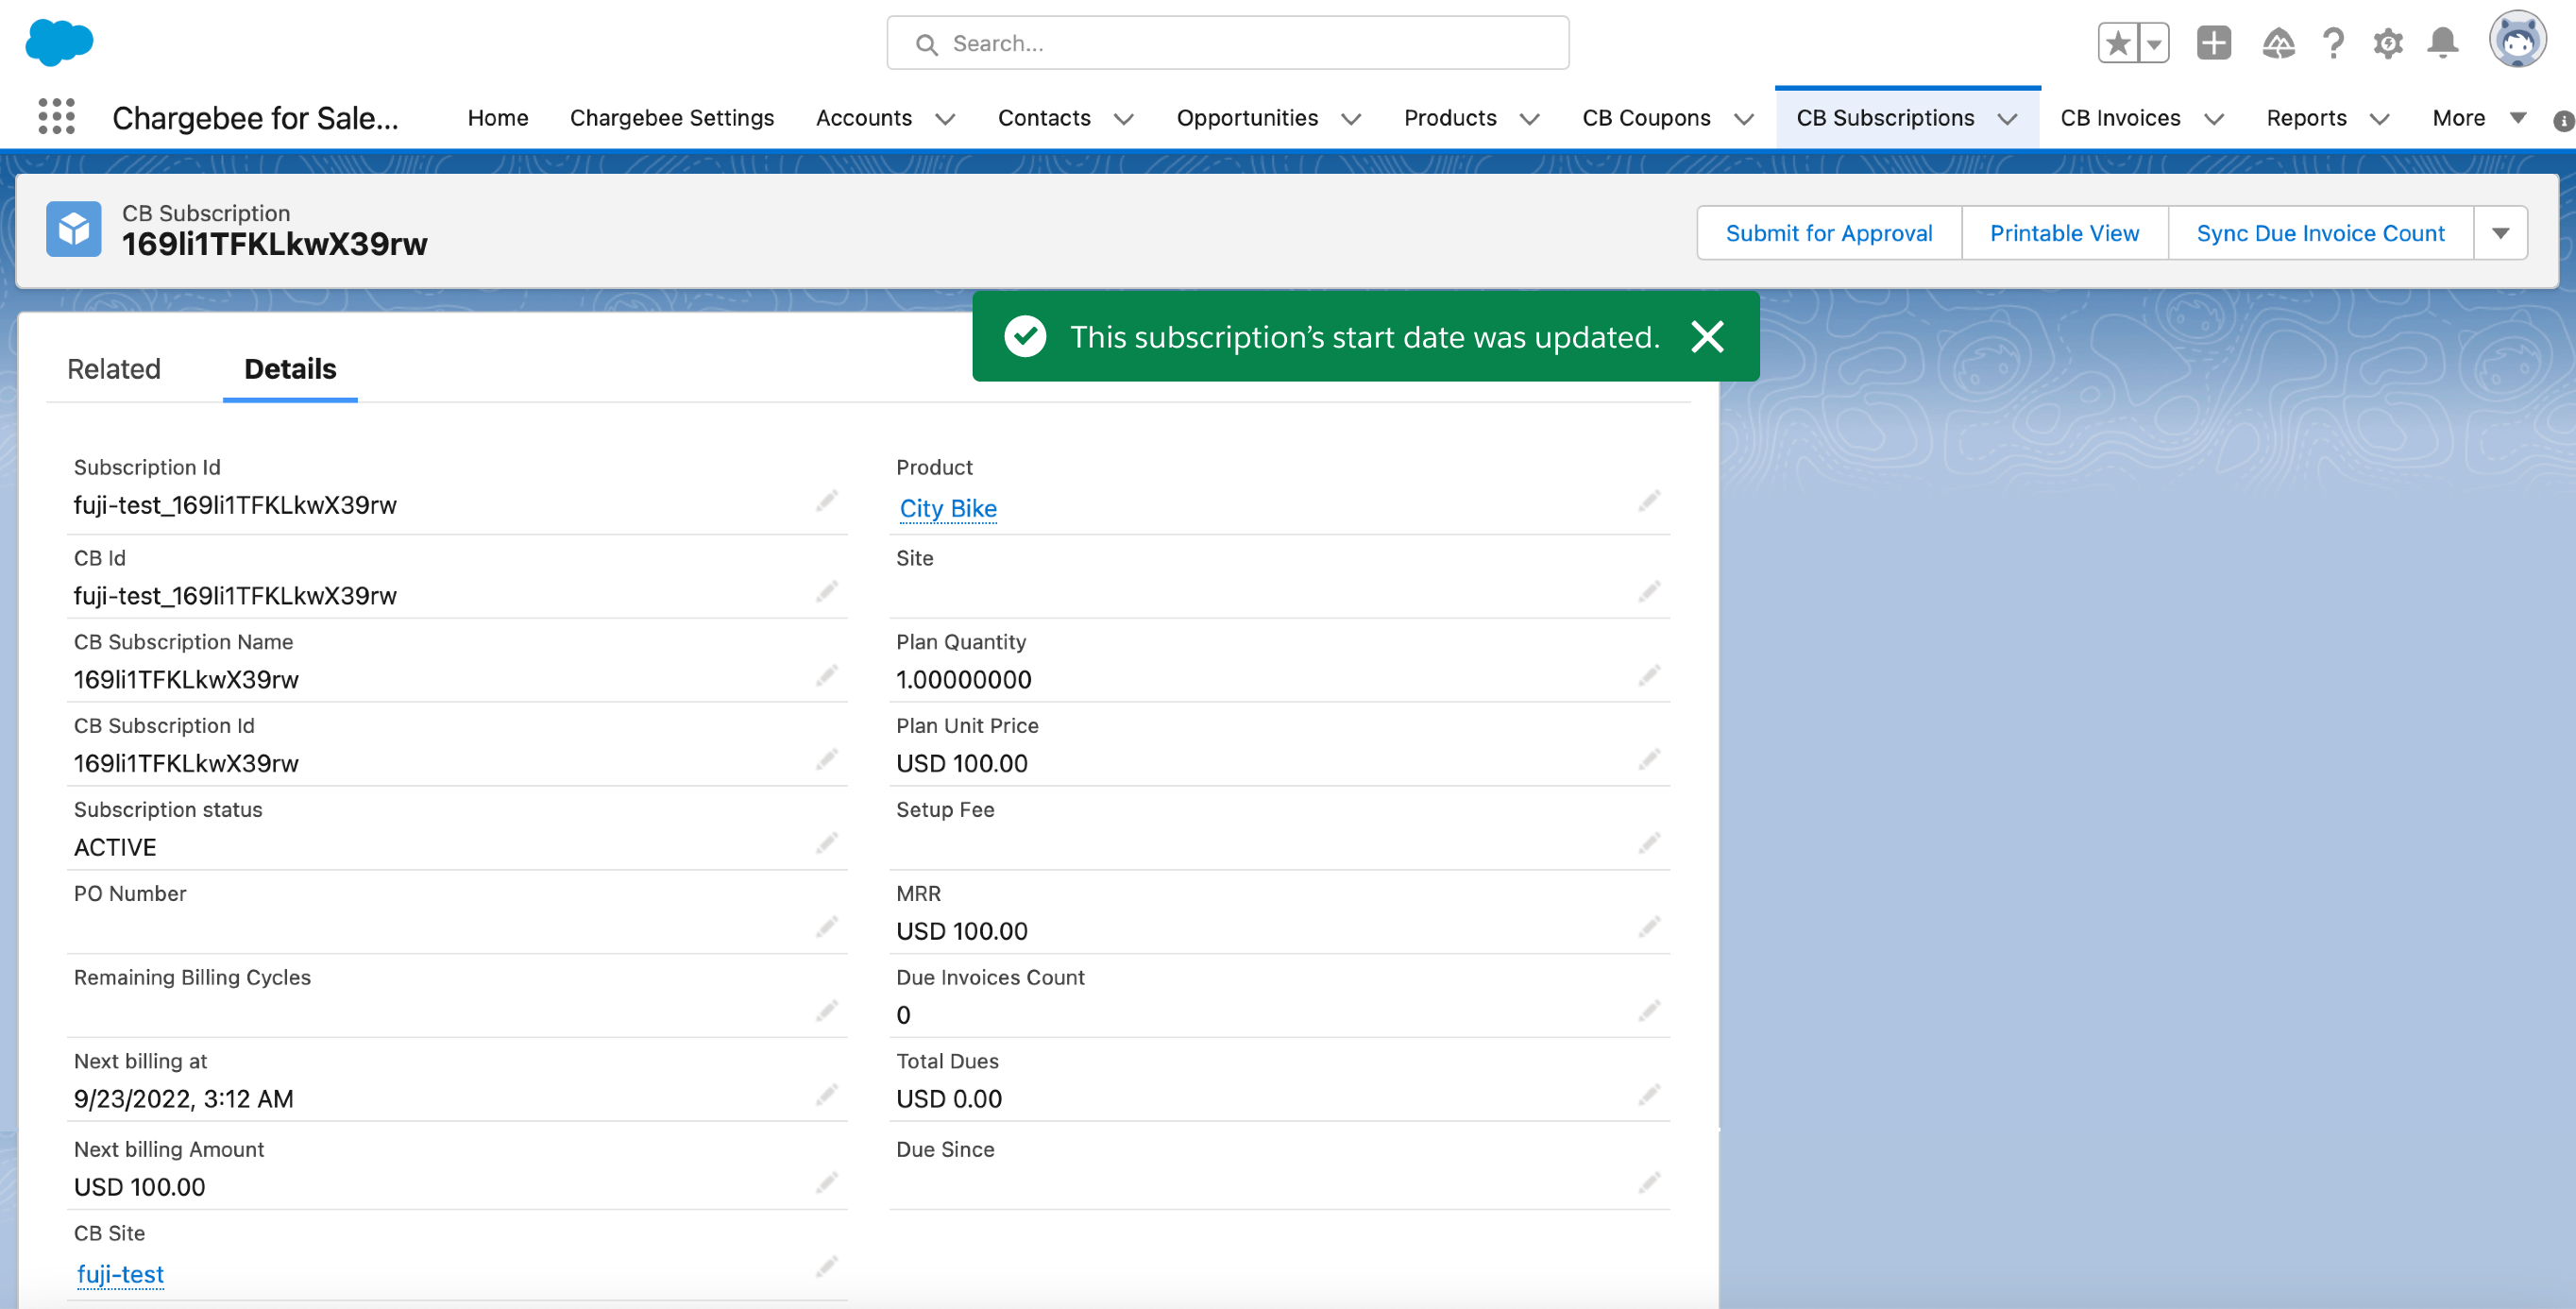
Chargebee makes it easy to modify subscriptions within Salesforce. Using the Edit Start Date feature, you can modify the start date of a subscription even after the subscription is created as long as the subscription has not started. To modify the subscription Start Date, follow these steps:
-
Log in to your Salesforce account > navigate to the Subscription List page.
-
Select the subscription for which you want to modify the Start Date and navigate to the Details Tab.
-
Click the action toolbar at the top > Edit Start Date.
-
In the Edit Subscription Start Date page > select the new start date. You can choose to start a subscription immediately or choose any date in the future.
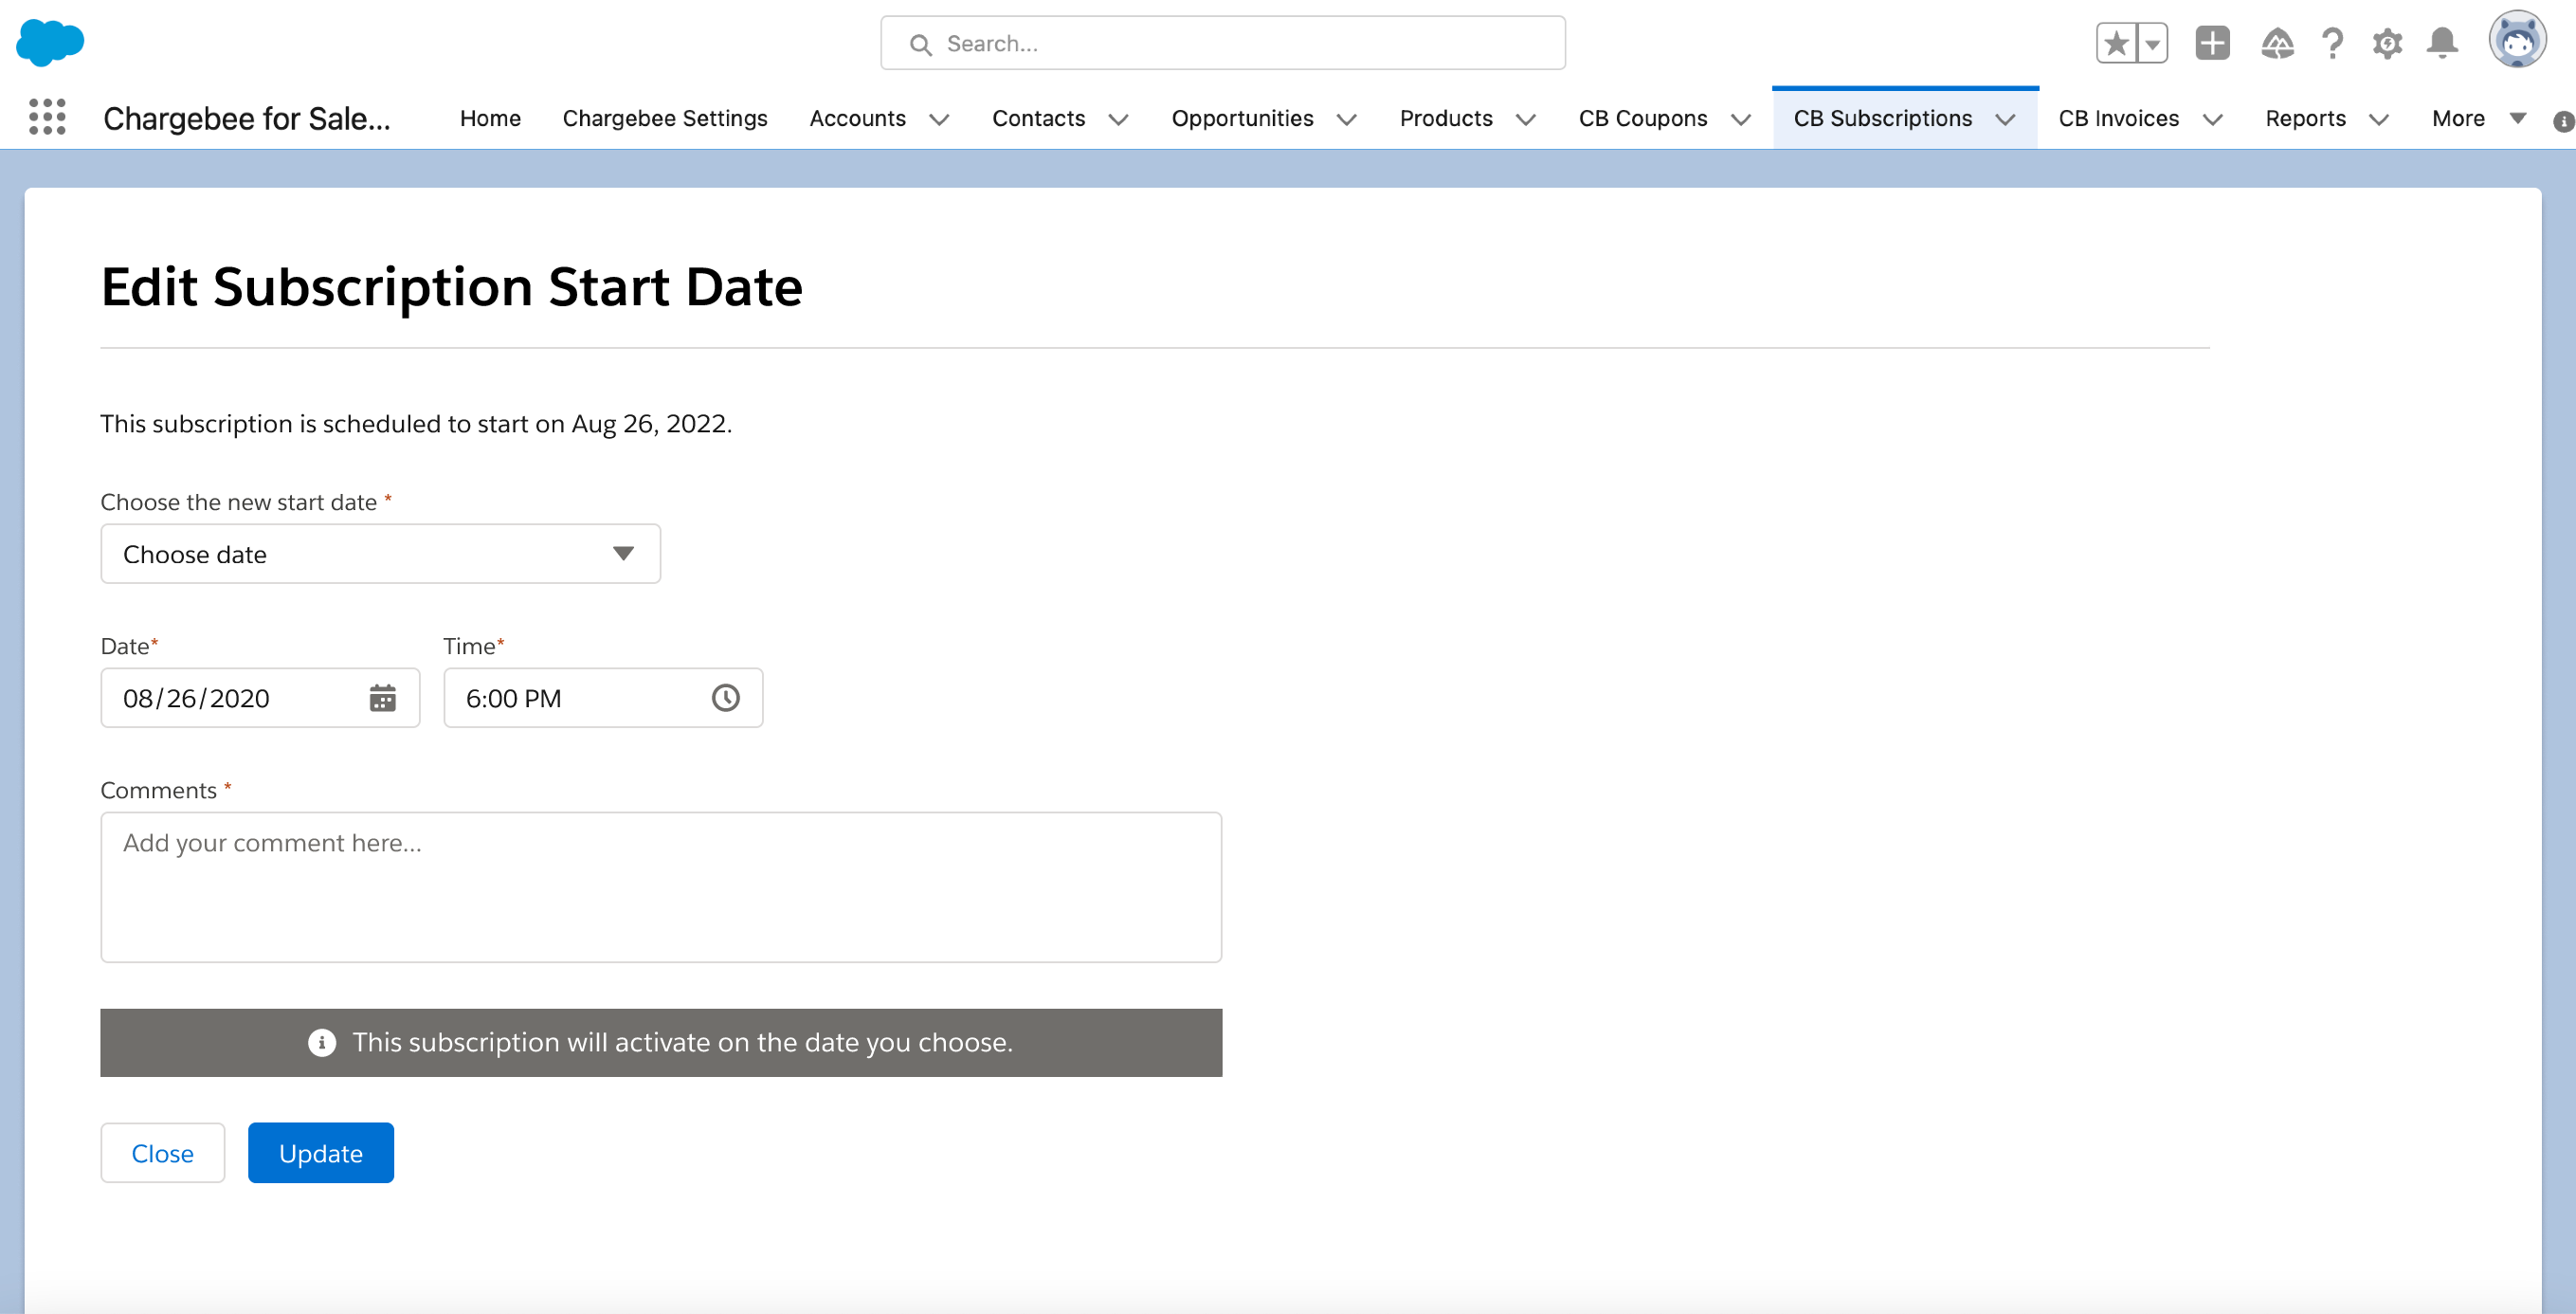
-
Add comments and click Update.
Warning
You can either choose to start a subscription immediately or choose a date in the future. You cannot choose a date in the past.
Modify Subscription Cancellation
Available under: CB Subscription
This action allows for modifying a scheduled subscription cancellation.
Note
To use this functionality, add the cbCancelSubscriptionCard Lighting component to the CB Subscription page layout.
-
Login to your Salesforce org and navigate to the CB Subscription record with a scheduled cancellation.
-
In the Scheduled Cancellation Lightning card, click Edit Scheduled Cancellation.
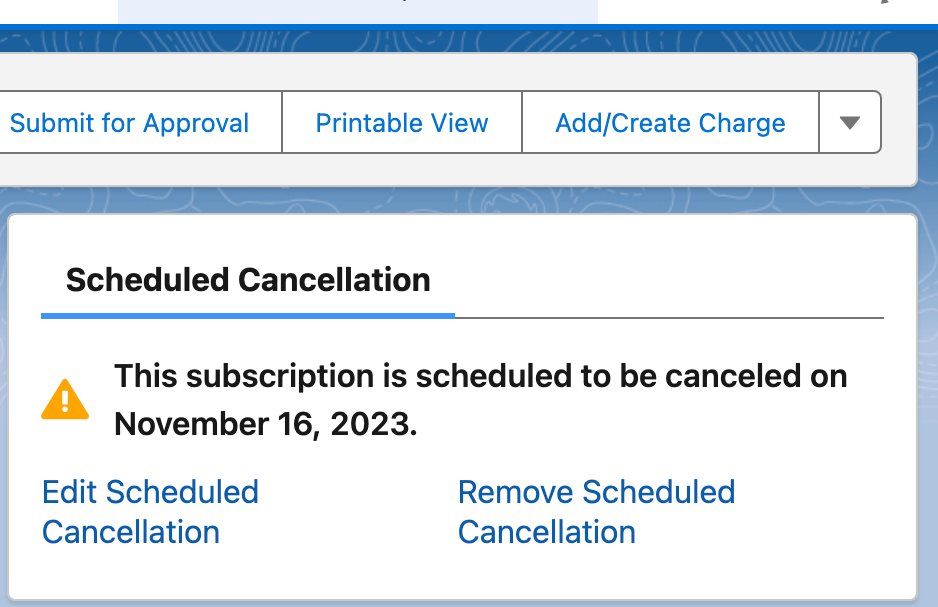
-
Choose the new Date and Time for the subscription cancellation.
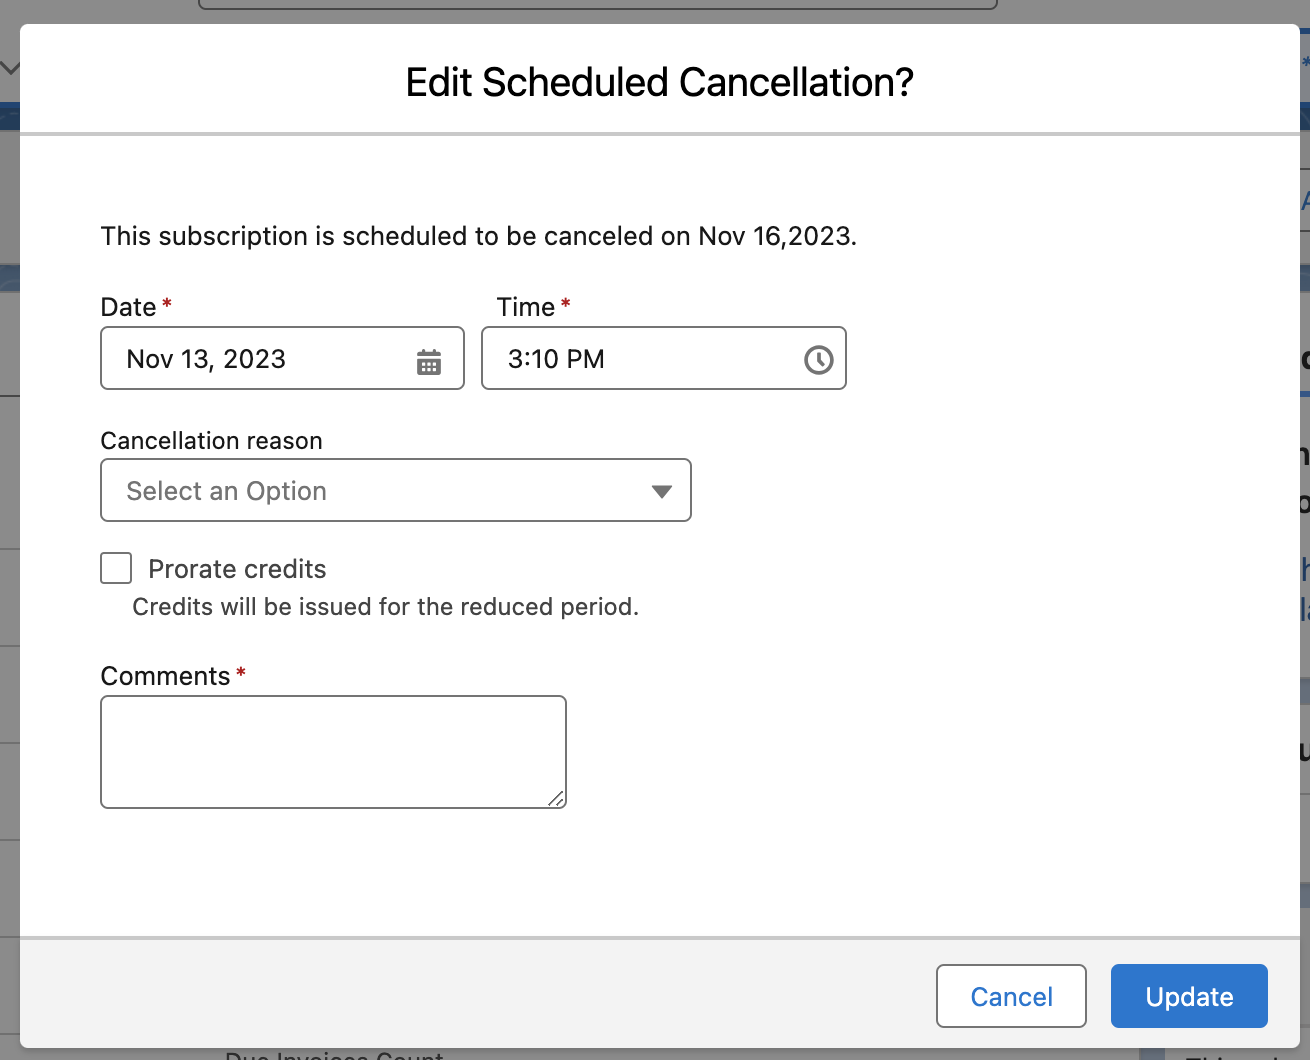
-
Choose a Cancellation reason.
-
Select the Prorate credits to provide credits for the unused period upon cancellation. If you prefer not to provide credits, leave this unchecked.
-
Add Comments to describe the change.
-
Click Update to apply the new cancellation schedule.
Remove Scheduled Subscription Cancellation
Available under: CB Subscription
This action removes a scheduled subscription cancellation.
Note
To use this functionality, add the cbCancelSubscriptionCard Lighting component to the CB Subscription page layout.
-
Navigate to the CB Subscription record with a scheduled cancellation.
-
In the Scheduled Cancellation Lightning card, click Remove Scheduled Cancellation.
-
In the Billing Cycles dropdown, select one of the following:
- Fixed: The subscription remains active for a set Number of billing cycles after the next renewal.
- Forever: The subscription remains active unless explicitly canceled.
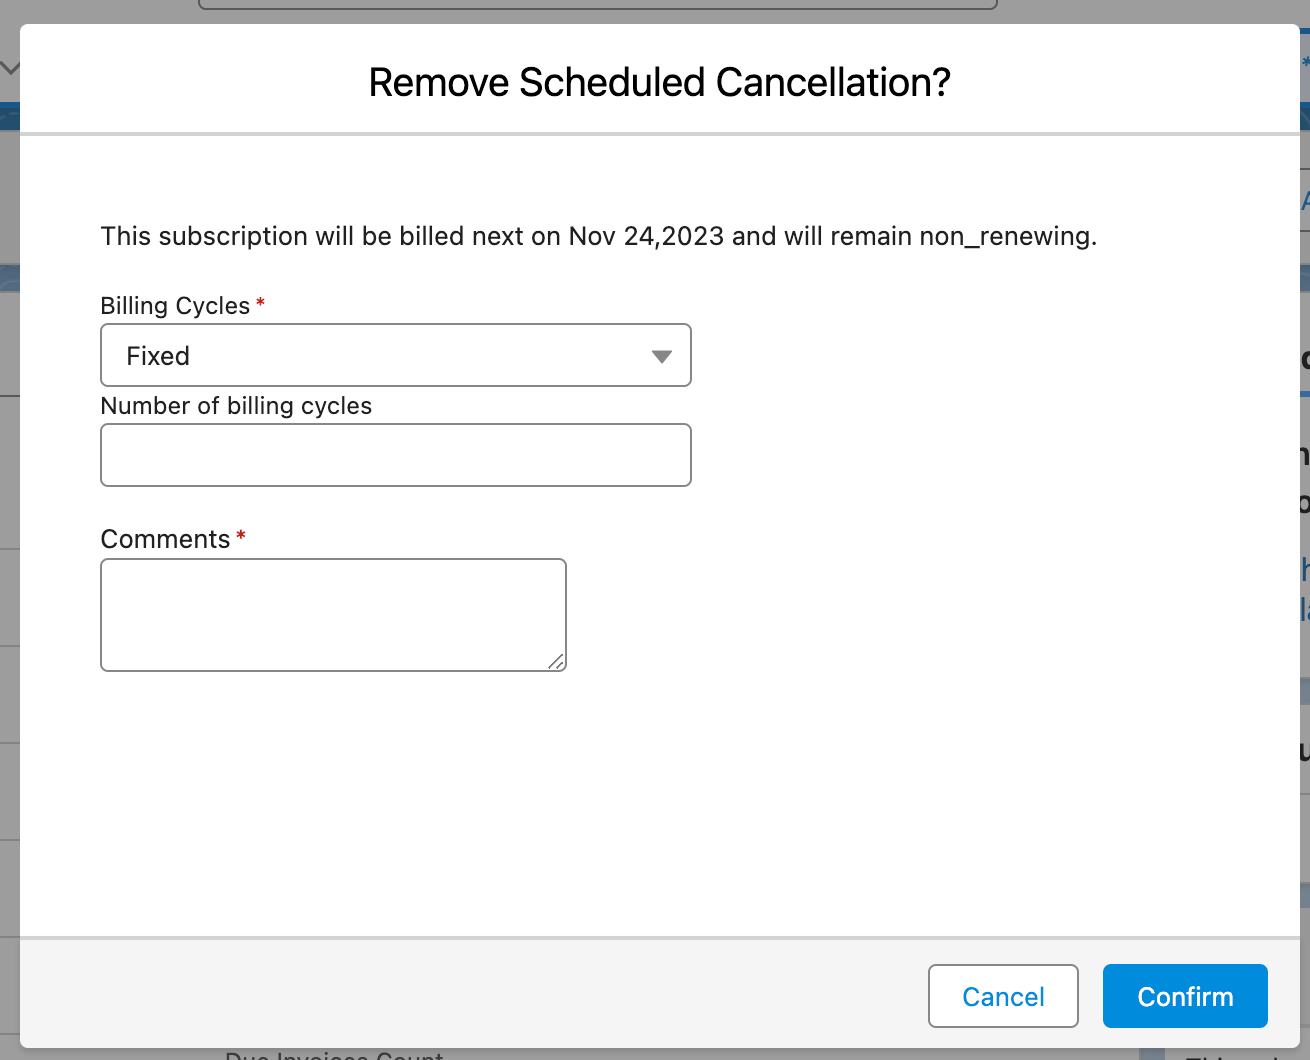
-
Add Comments to describe the change.
-
Click Confirm to remove the scheduled cancellation.
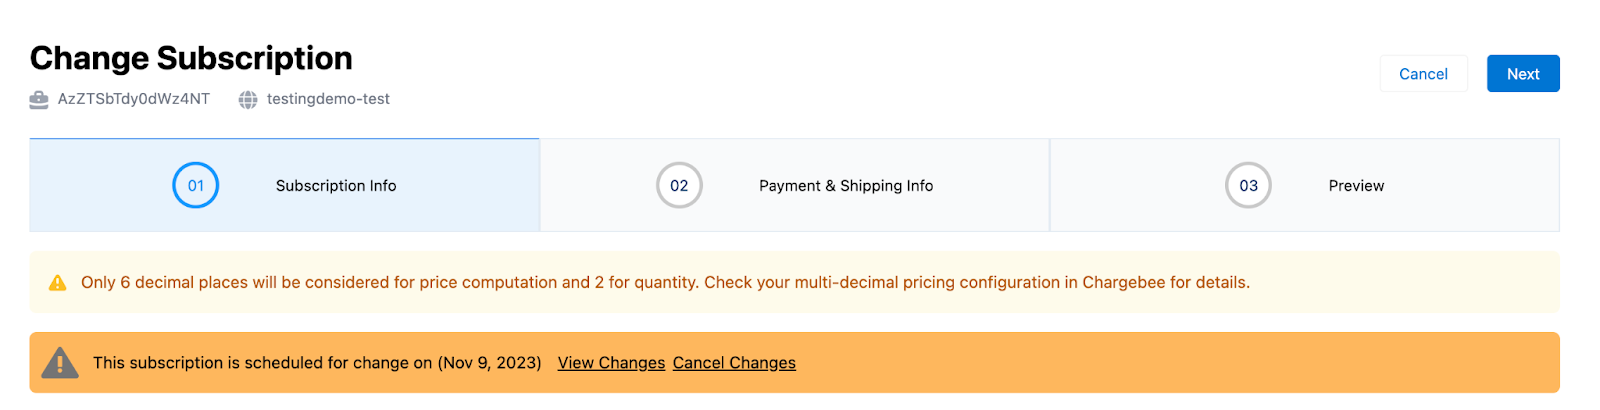
Cancel Subscription Change
Available under: CB Subscription
This action cancels a scheduled subscription change, which can be done using a Lightning card or the Change Subscription action.
Cancel using the Lightning card
Note
To use this functionality, add the cbCancelSubscriptionCard Lighting component to the CB Subscription page layout.
-
Navigate to the CB Subscription record with a scheduled change.
-
In the Scheduled Changes Lightning card, click View Changes to see a summary.
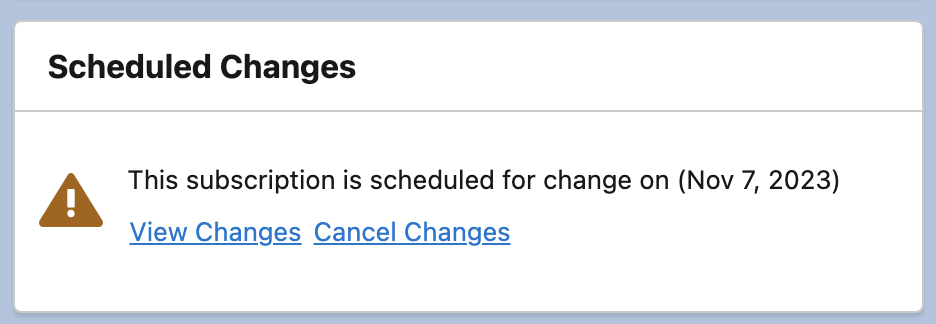
-
Click Cancel Changes to remove the schedule.
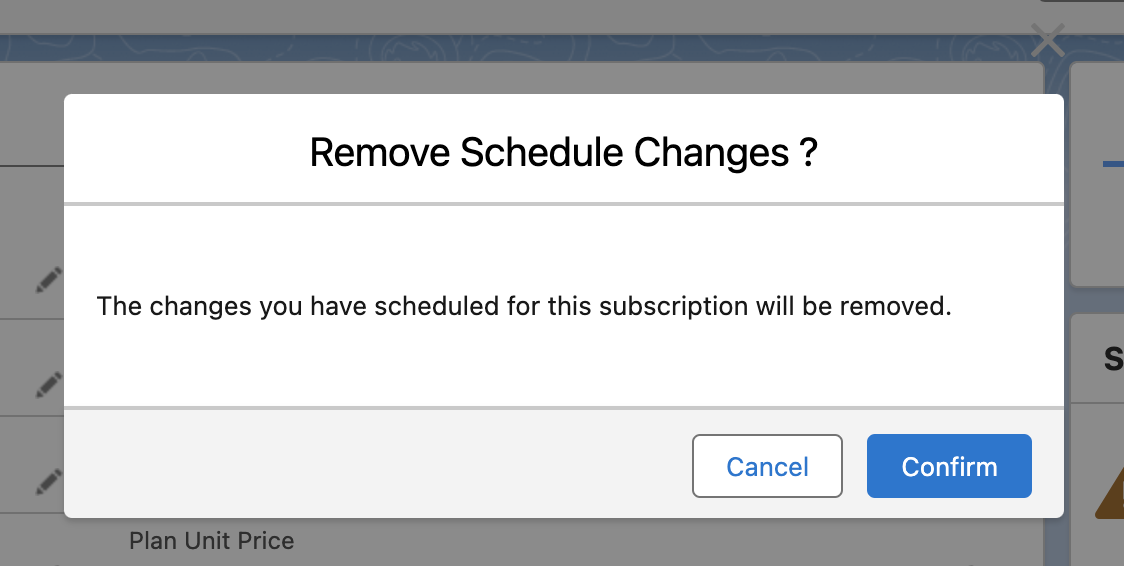
-
Click Confirm on the Remove Schedule Changes dialog. The scheduled changes for the subscription are immediately removed.
Cancel using Change Subscription action
-
Navigate to the CB Subscription record that has a change scheduled.
-
Click Change Subscription. At the top of the page, a notification about the scheduled change appears.
-
Click View Changes to see a summary of the scheduled change.
-
Click Cancel Changes and then click Confirm on the Remove Schedule Changes? dialog. The scheduled changes for the subscription are immediately removed.
-
If no further changes are needed, click Cancel to return to the CB Subscription record.
-
If additional changes are required, continue with those modifications.
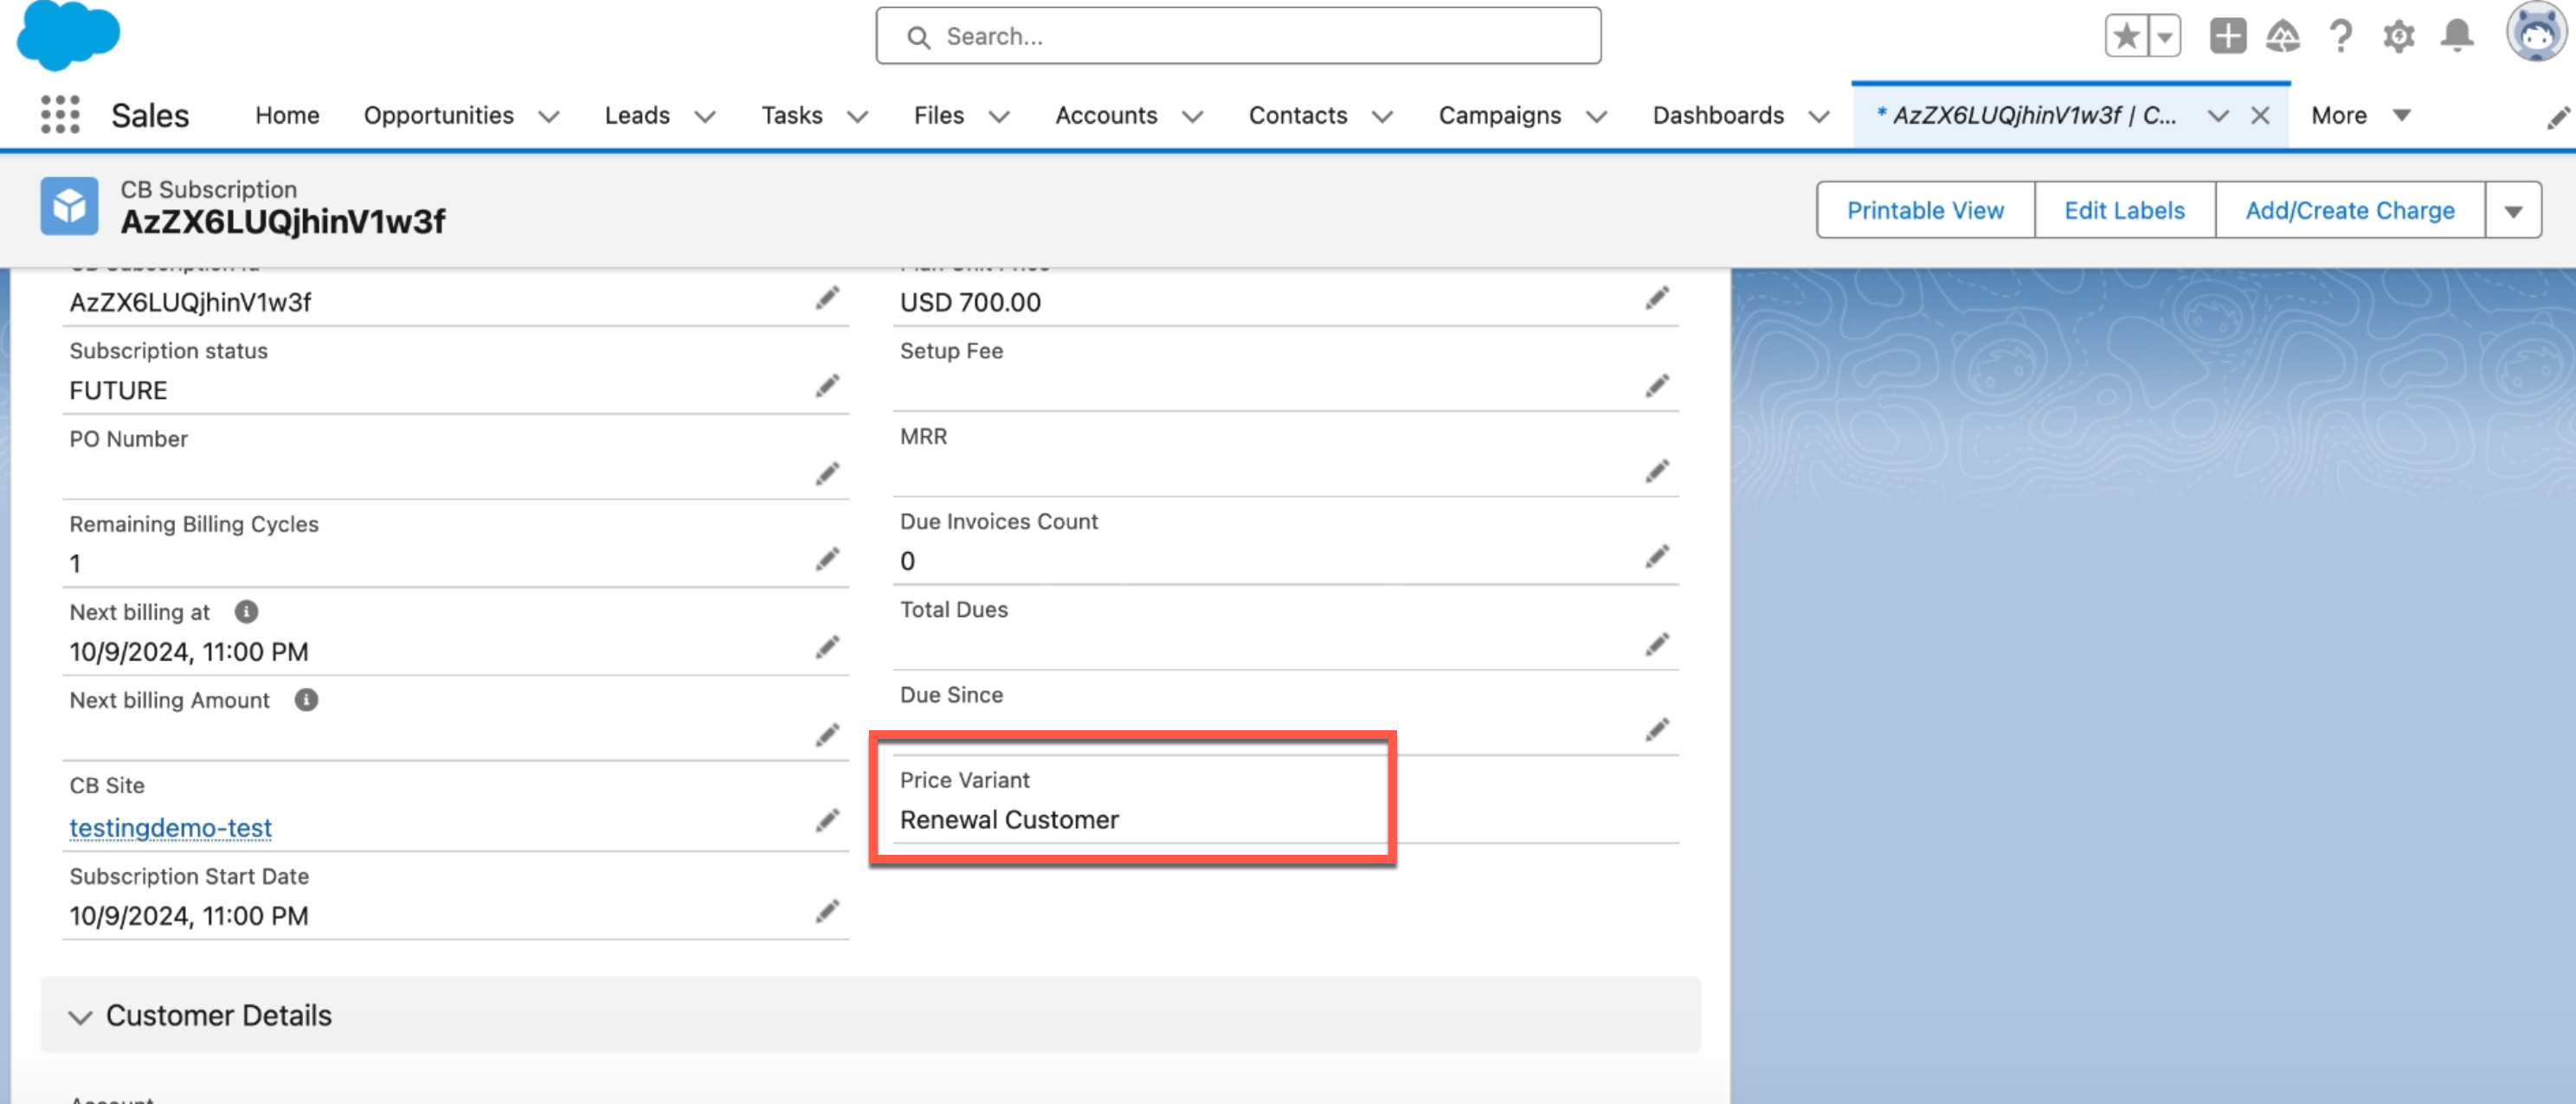
Price Variants
Available under: CB Subscription
Overview The Variant Pricing feature empowers businesses to manage diverse pricing options for products or services in the Chargebee Product Catalog as a single item (Plan, Addon, or Charge). It allows for tailored pricing adjustments based on geography, partnerships, product versions, and more, while maintaining streamlined product management and precise pricing alignment with Salesforce. Price Variants allow you to define multiple pricing options for the same plan or addon within the same currency and billing frequency. Acting as a unique identifier, they distinguish between Price Points sharing the same currency and frequency. A single Price Variant can be applied across multiple plans, addons, or charges, providing flexibility and consistency. To know more about Variant Pricing, click here.
Benefits of Using Variant Pricing
- Tailored pricing to meet regional, partner-specific, or product-specific requirements.
- Simplified management of complex pricing structures within a unified system.
- Accurate and synchronized pricing data between Chargebee and Salesforce.
How to Use the Price Variant in Salesforce
- View the selected price variant for any subscription in Salesforce.
- Create / Change the Price Variant for subscription in Salesforce.
- Ensure all updates are synchronized seamlessly between Chargebee and Salesforce.
Note
You can also manage Price Variants from the CB Opportunity Actions. Similar to CB Subscription Actions, you can view, create, update, or sync Price Variants seamlessly from the Opportunity interface.
View the Price Variant for a Subscription
-
Login to Salesforce and open the desired subscription in Salesforce.
-
Scroll down to find the new Price Variant field in the subscription Details page of Salesforce. This field displays the currently selected price variant for the subscription.
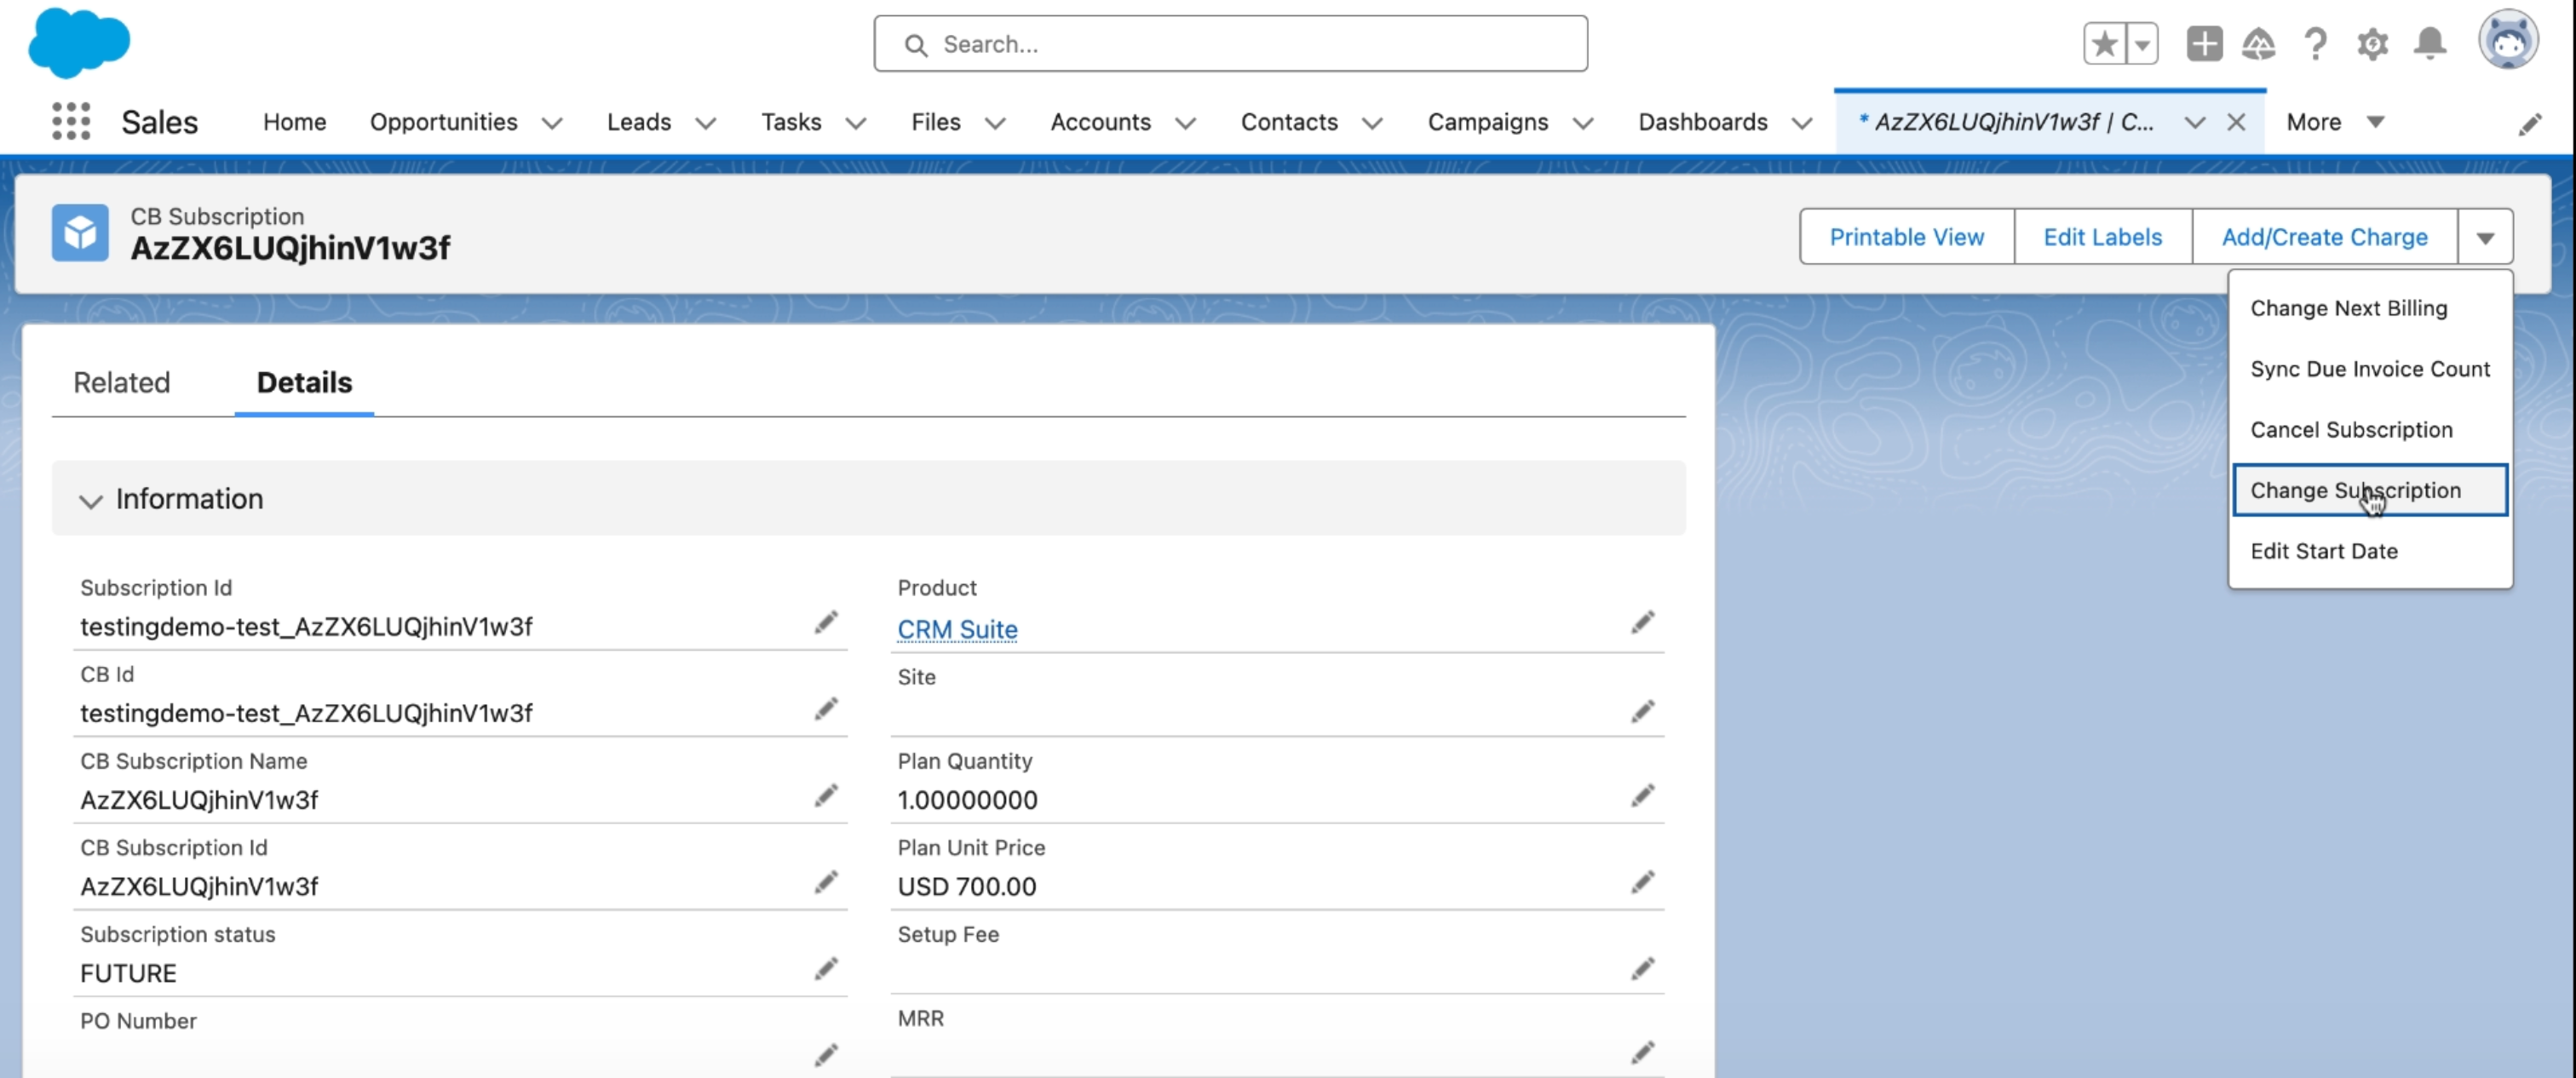
Create/Change the Price Variant for a Subscription
-
Login to Salesforce and open the desired subscription in Salesforce > go to its Details tab.
-
Scroll down to find the Price Variant field on the screen.
-
Click Change Subscription to make changes to Price Variant. You can also Change Subscription via the CB opportunity screen.
-
Scroll to the bottom of the page and click Edit to modify the Price Variant. You can select a different price variant or choose No Price Variant, if applicable.
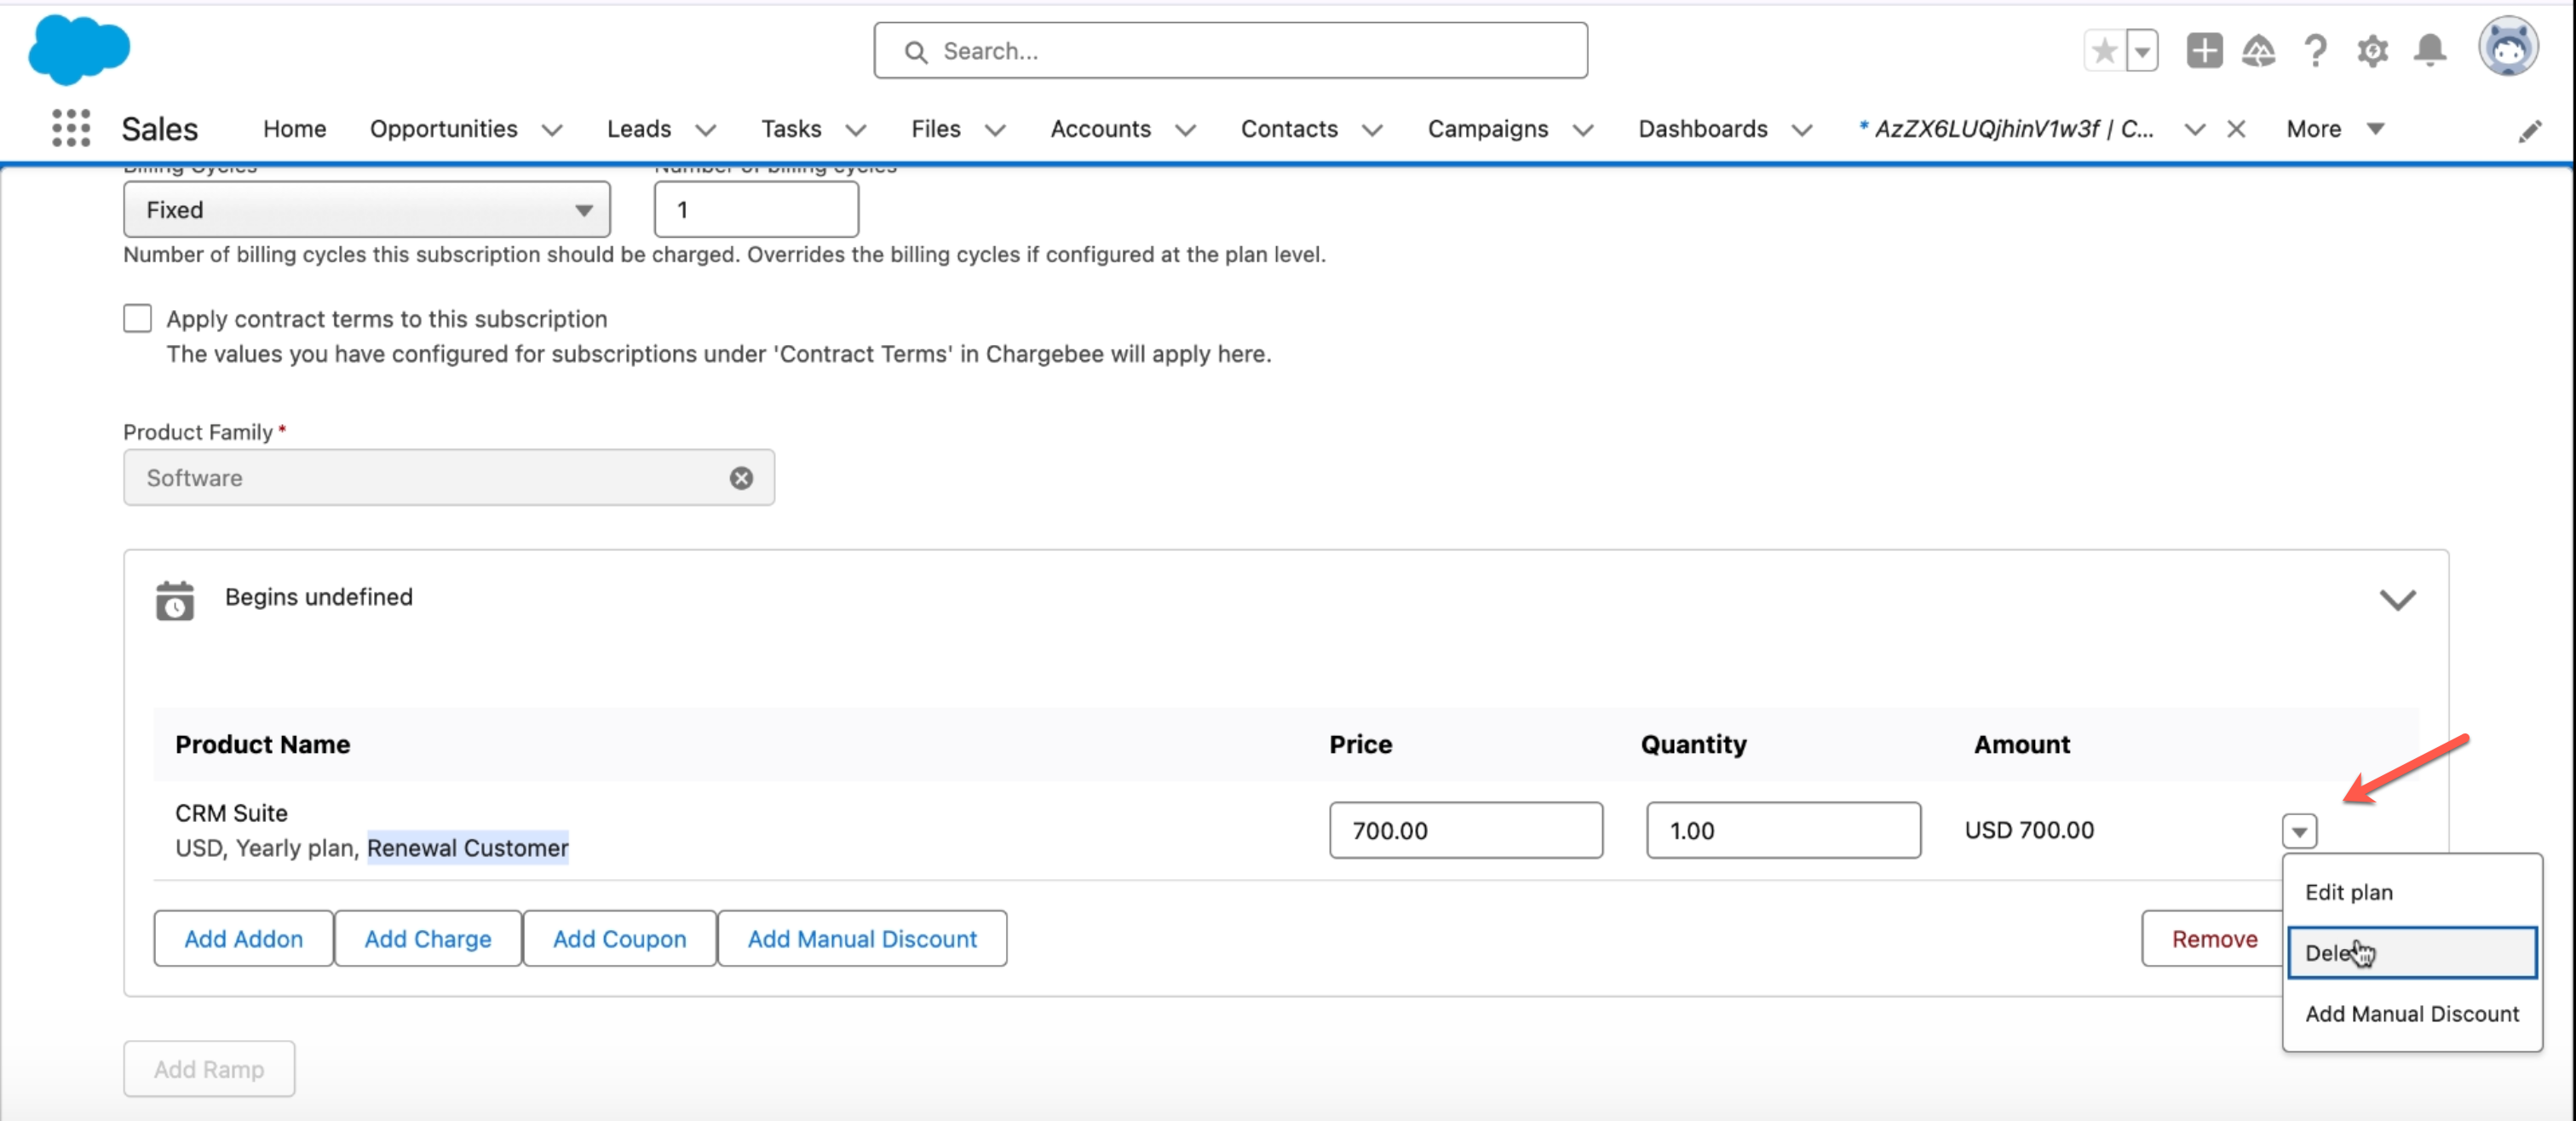
-
Click Choose Variant and make changes. Click Update.
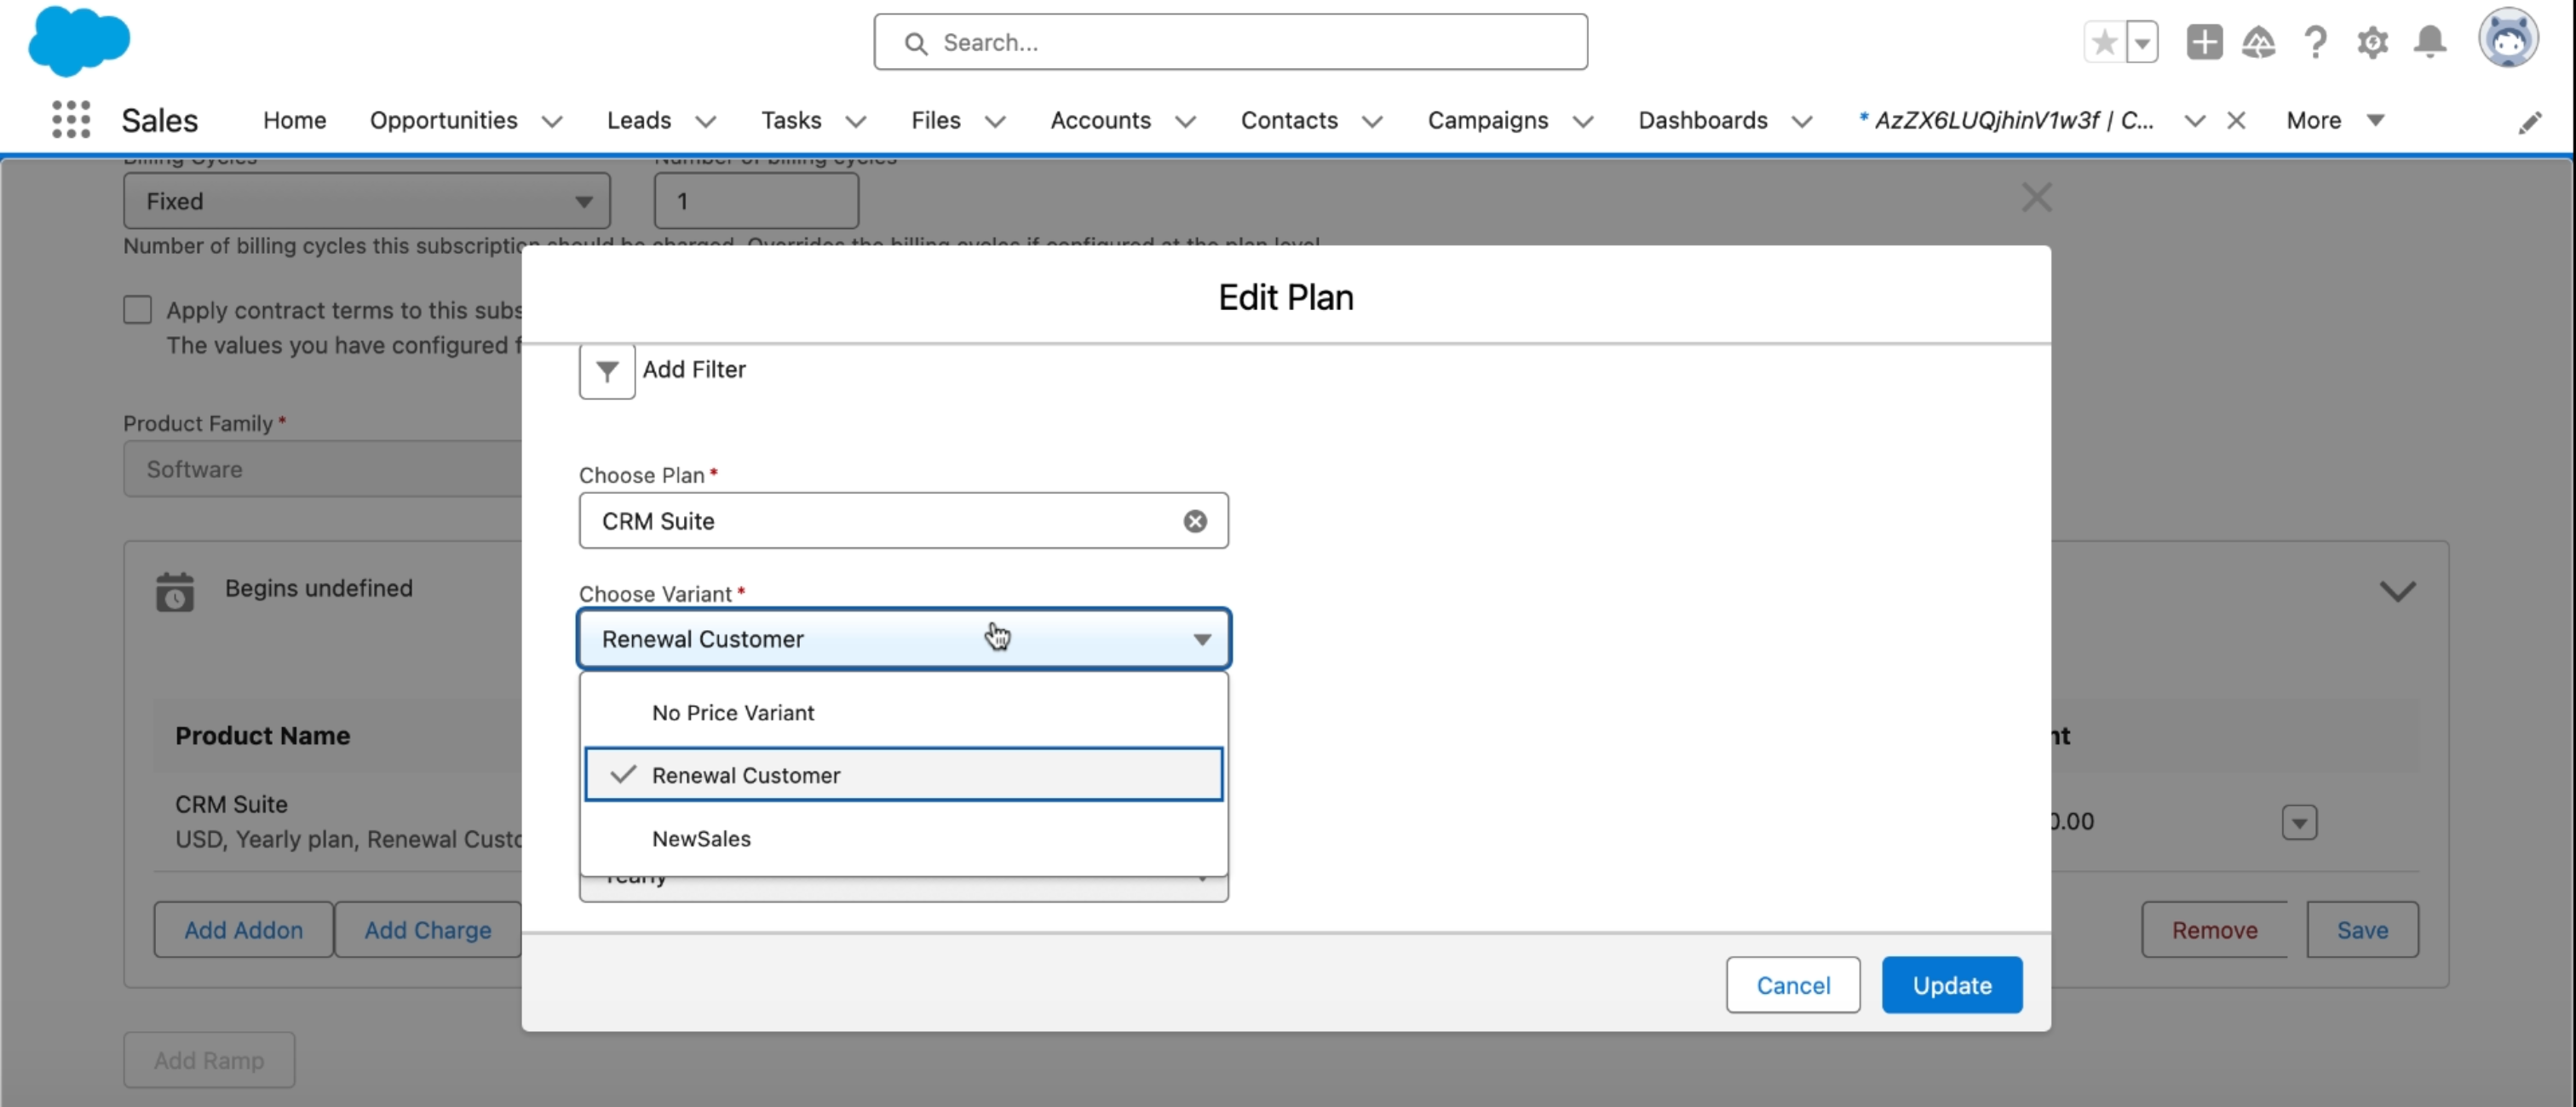
-
Click Save > Proceed to update the subscription.
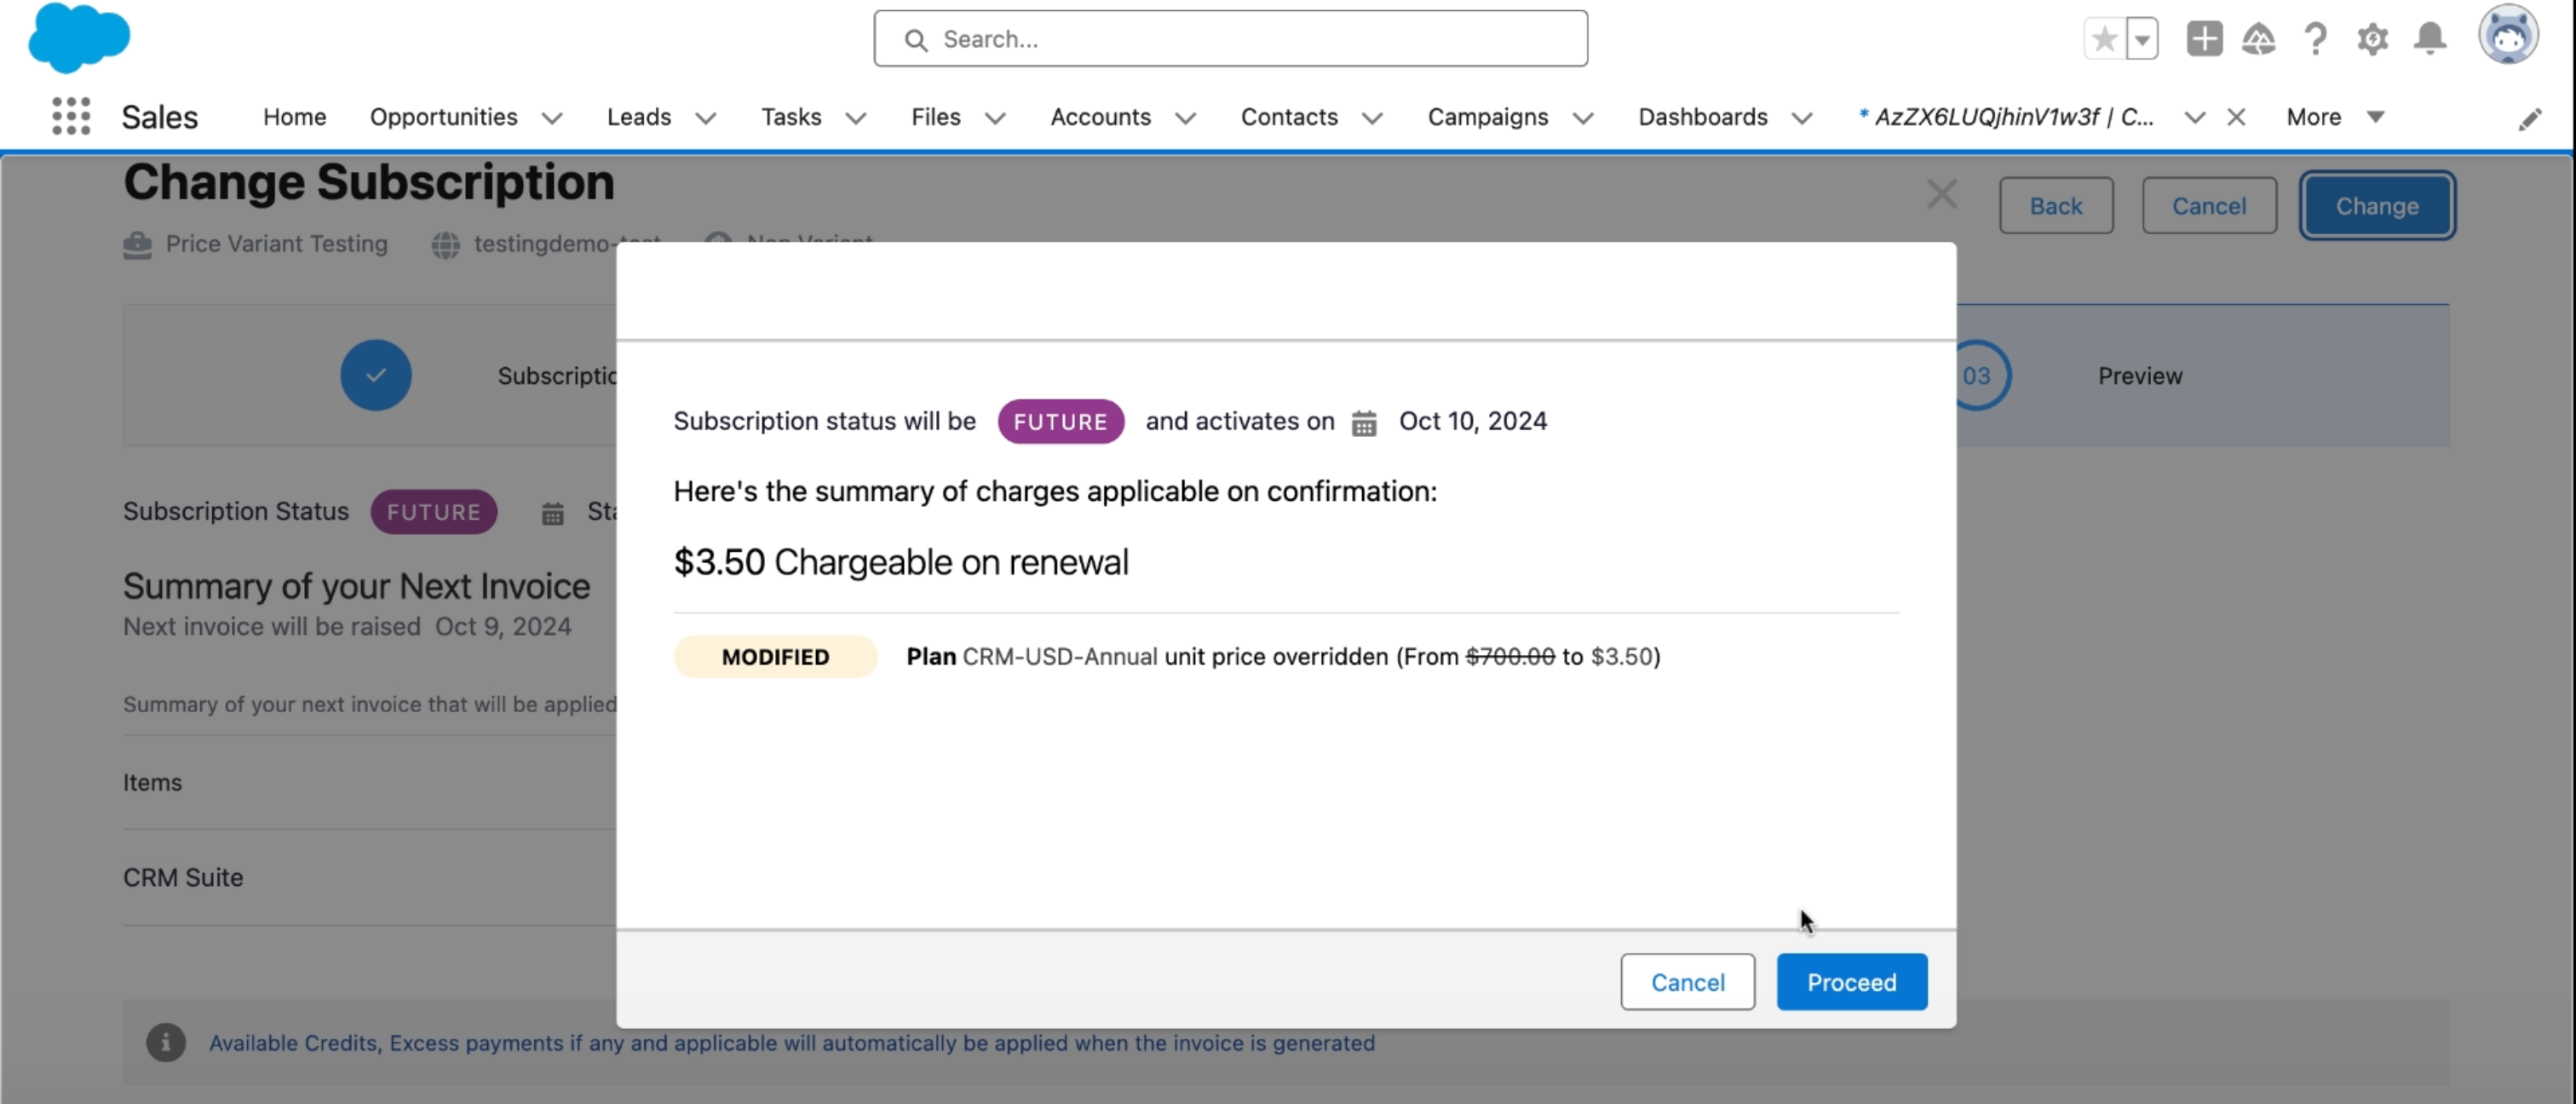
-
The changes are updated in your Chargebee Subscription.
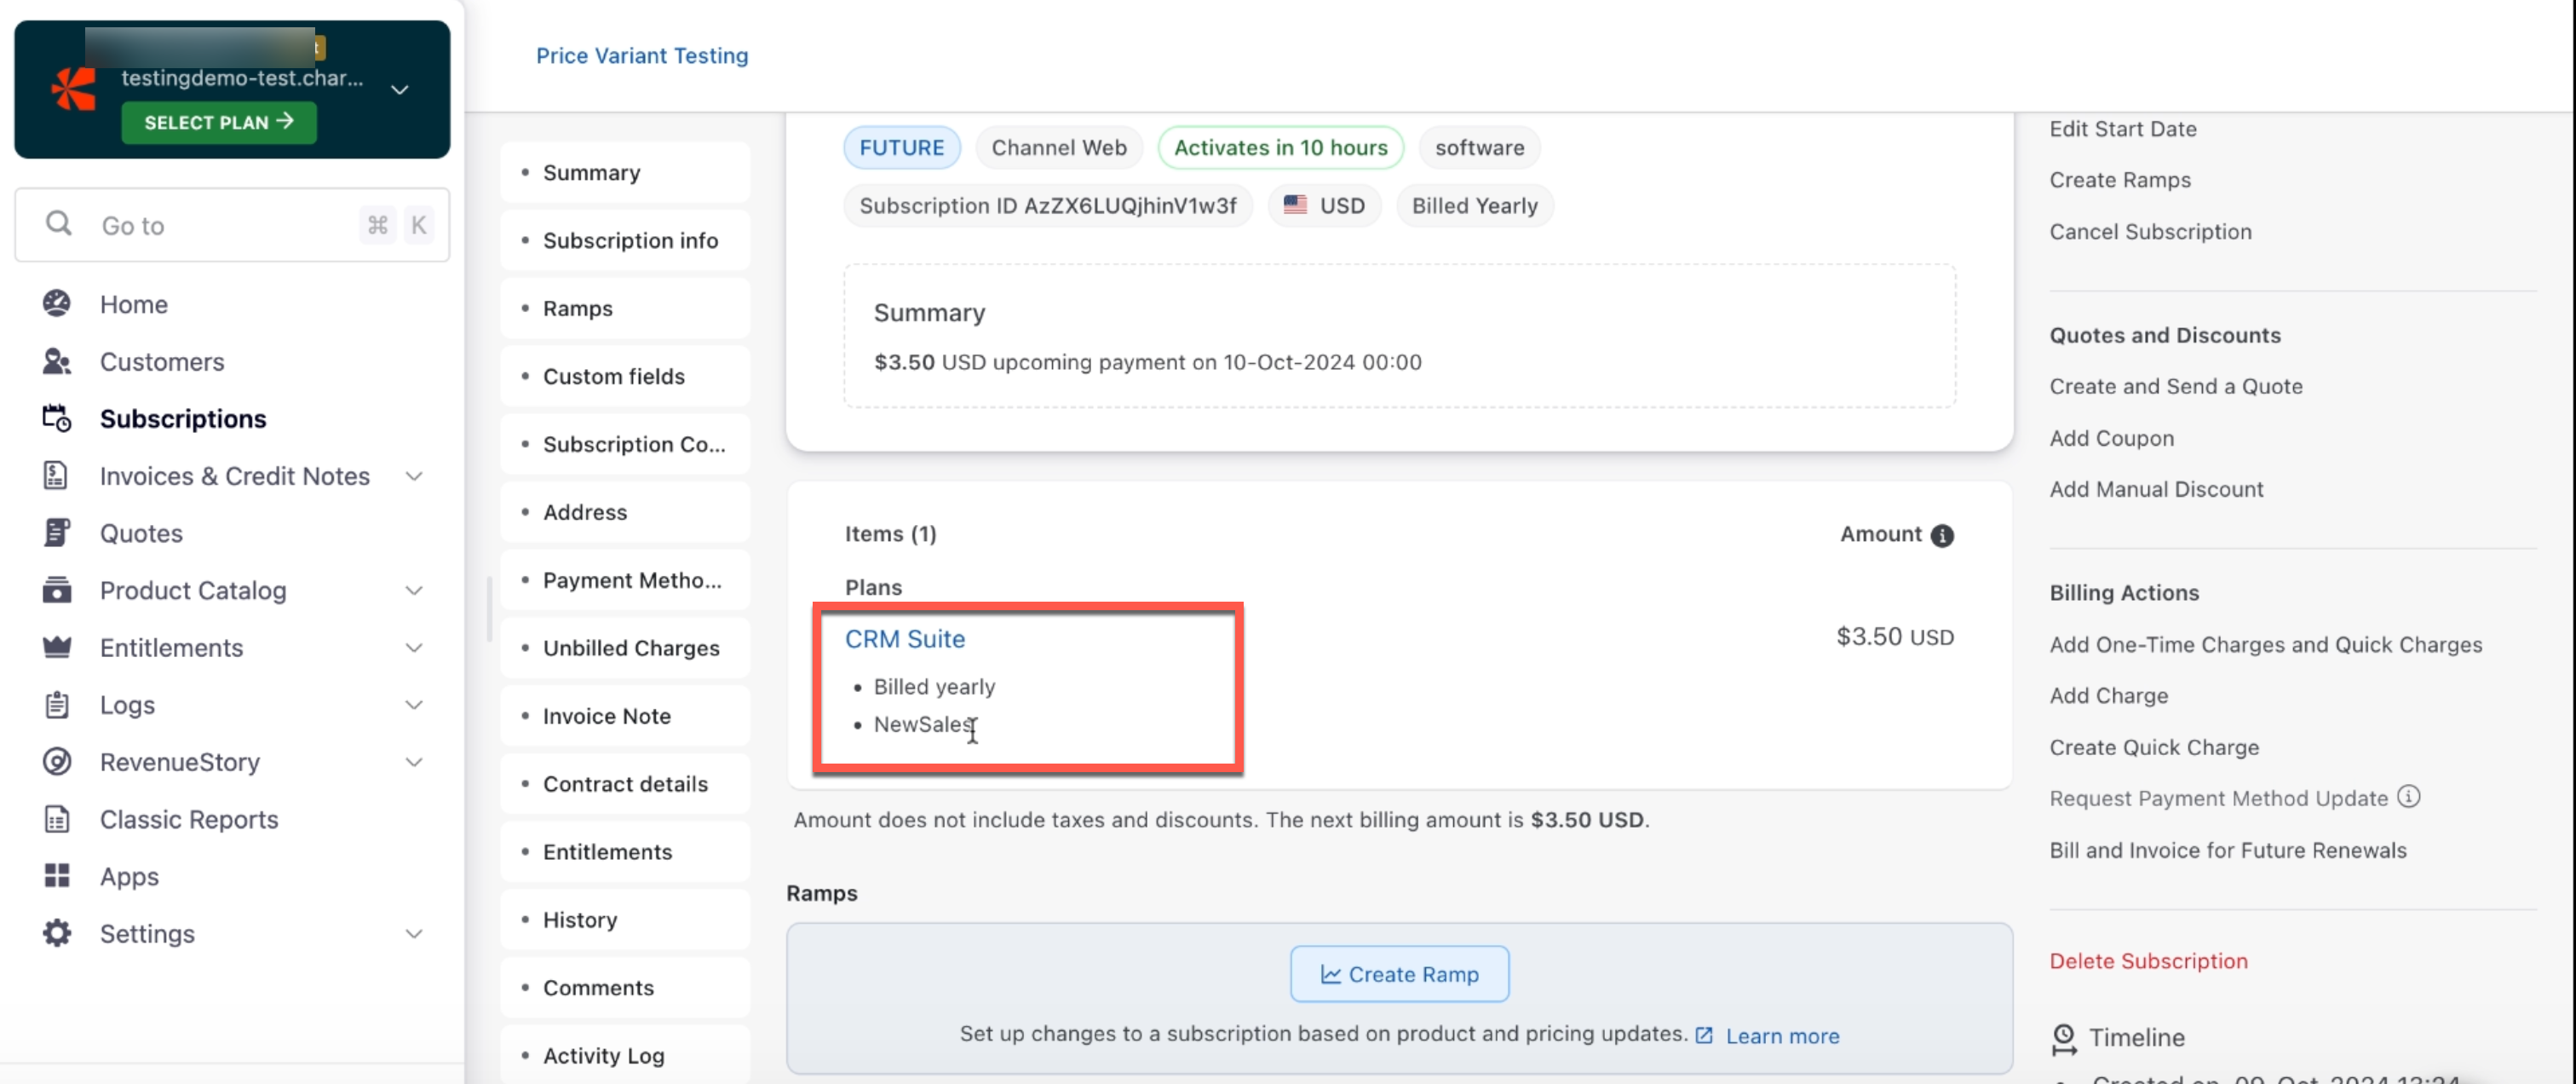
Synchronizing Changes to Chargebee
-
Once the changes are saved and submitted, they will be sent to Chargebee.
-
Open the corresponding subscription in Chargebee to verify the updates. The updated price variant will reflect in the subscription details, for example, a change from Renewal to New Sale Price Variant will be visible.
Setting up Entitlements
Available under: CB Subscription The View Subscription Entitlements Lightning Web Component (LWC) allows Salesforce users to view a detailed list of entitlements associated with a Chargebee subscription—directly from the Salesforce interface.
Steps to Set Up
To enable this feature, add the cbViewSubscriptionEntitlment Lightning Component to your desired record page.
- In Salesforce, navigate to the record page (e.g., Account or Subscription) where you want to display the entitlements.
- Click Edit Page to enter Lightning App Builder.
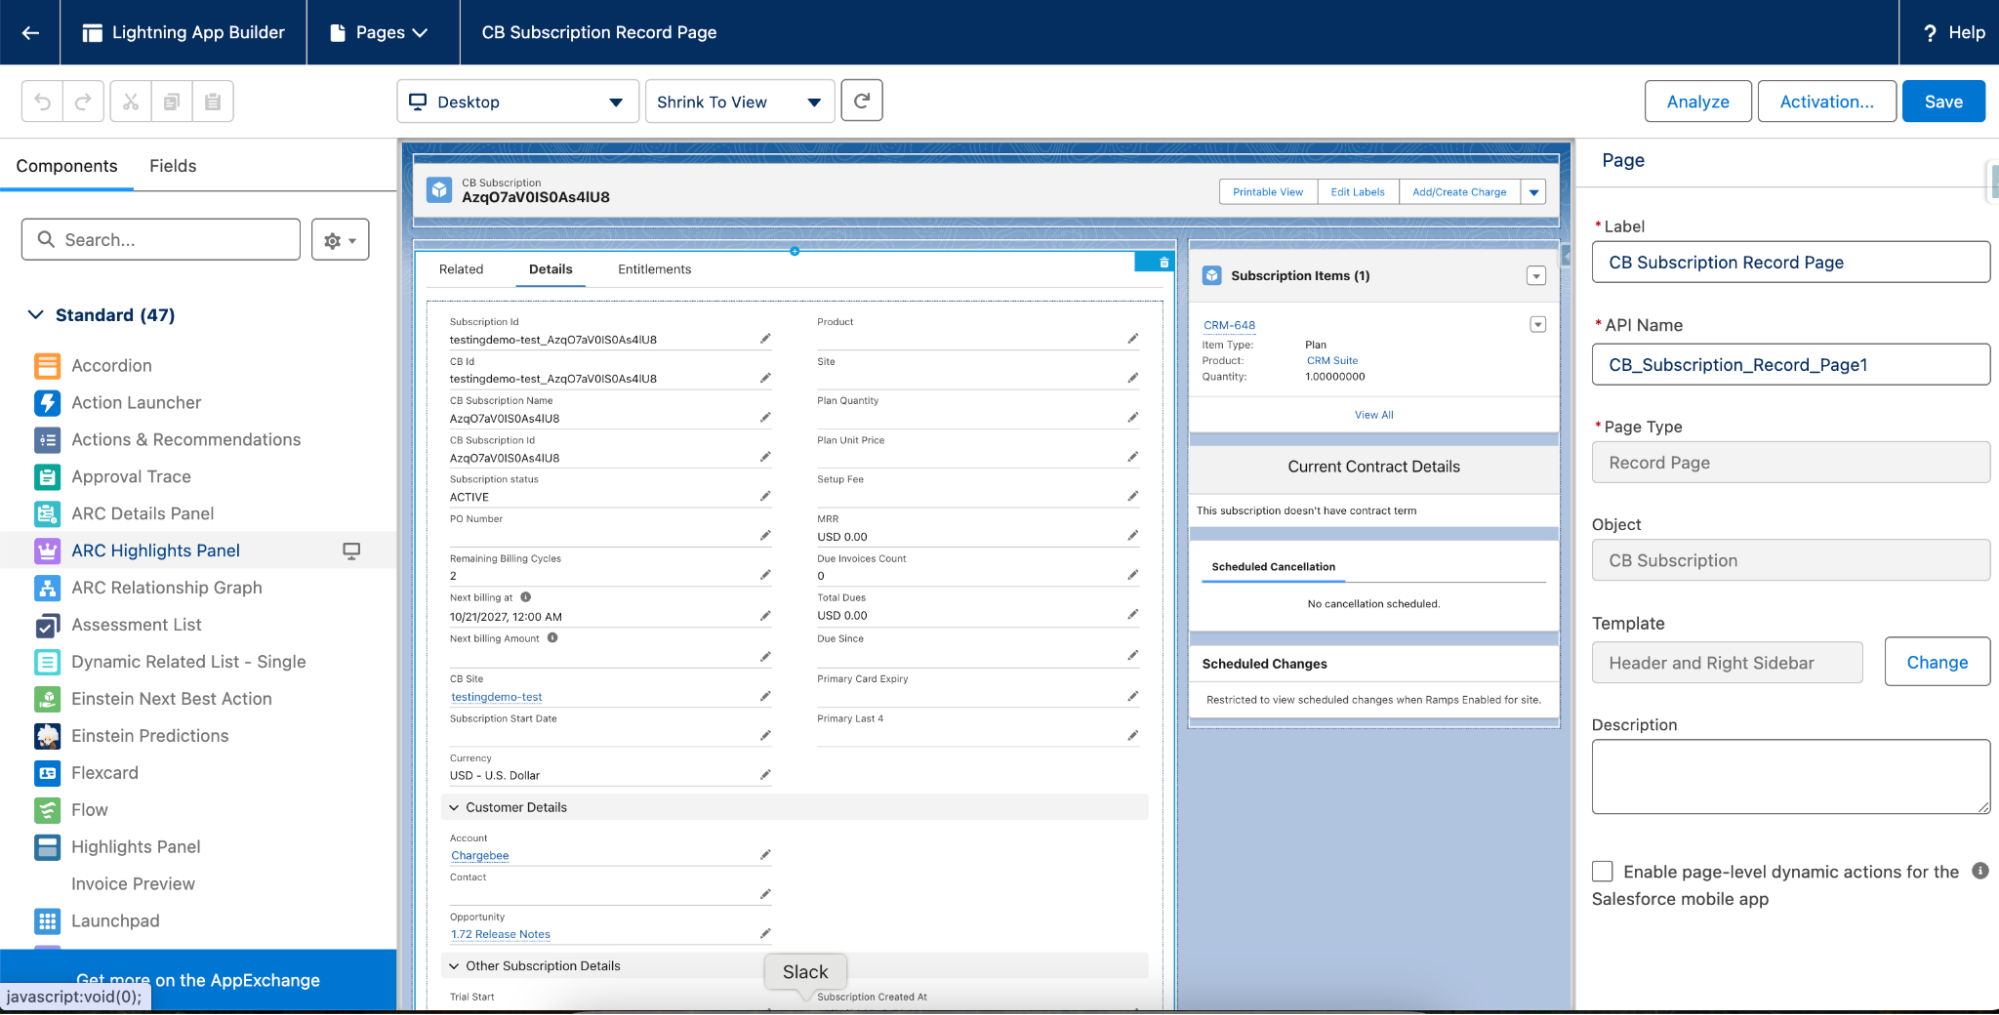
- In the left-hand panel, scroll down to Custom - Managed components.
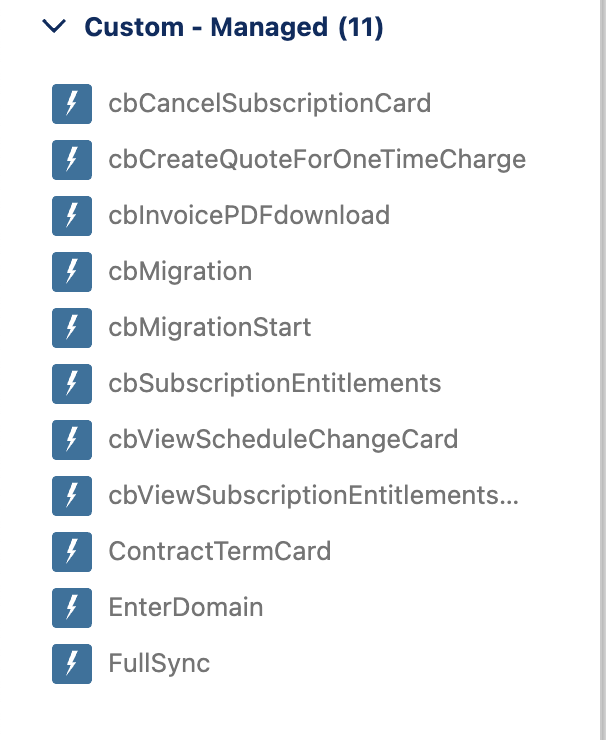
- Find the component named cbViewSubscriptionEntitlment.

- Drag and drop it onto the page layout where you want it to appear.
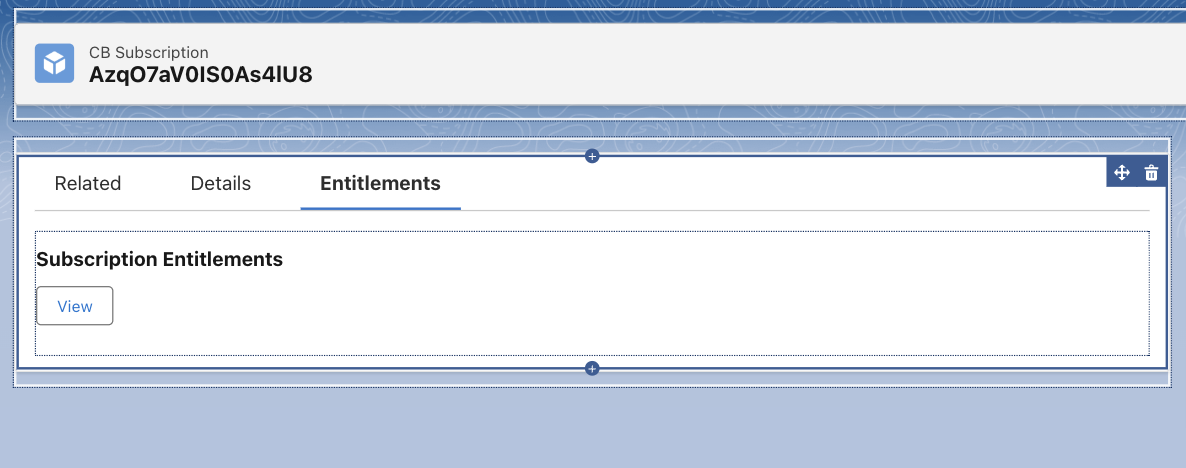
- Click Save and then Activate if needed.
Viewing Entitlements
Once the component is placed:
- Navigate to a record that includes the cbViewSubscriptionEntitlment component.
- Click the “View” button within the component.
- A detailed breakdown of the associated entitlements will be displayed, showing what the customer has access to as part of their subscription.

CB Quote Actions
A quote in Chargebee is a document used to let a potential buyer know how much the goods or services will cost before they commit to the purchase. You can create and work with Chargebee quotes from within Salesforce. The actions listed in this section are those that can be performed from the CB Quote custom object in Salesforce.
Send Email
Available under: CB Quote
Once a quote is created and for as long as it is open, you can send the quote to the customer so that they can review it. The Send Email option does just that. It launches an email composer with the quote PDF attached. The body of the email, by default, also has a quote acceptance link which the customer can follow to pay and subscribe themselves. The quote acceptance link can also be found in the CB Acceptance Link field of the CB Quotes object. The shipping address details used while creating the quote are prefilled for the customer on the checkout page. When the subscription is created in Chargebee on checkout, the address is attached to it.
The subscription once created, is reflected in Salesforce when the next sync is run. Also, the opportunity is updated if setting 1 and 2 are configured appropriately.
Note
Salesforce Approvals This operation is subject to any Salesforce approval workflows when the appropriate setting is enabled in Chargebee.
Convert Quote
Available under: CB Quote
This operation bills the quote and completes the purchase of the items in the quote.
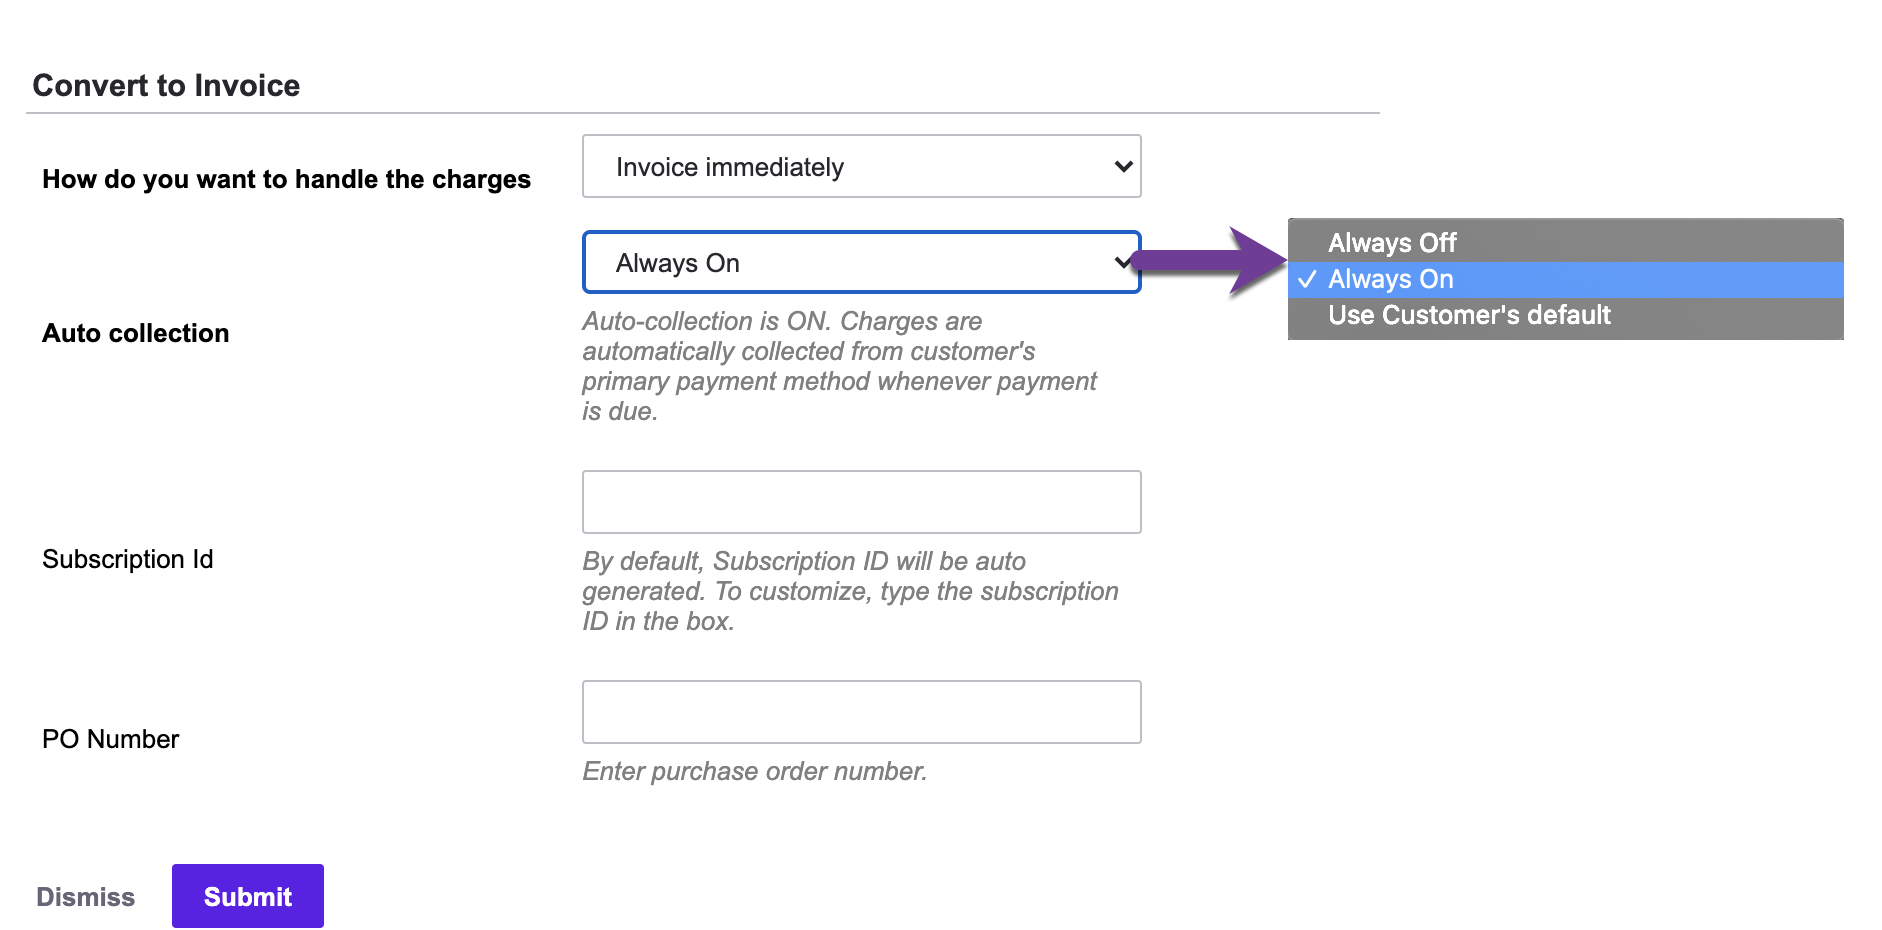
The charges raised can be invoiced immediately or left as unbilled charges. If you turn Auto collection on, Chargebee attempts to collect payment for any invoice that is raised for the subscription. You can also specify the Subscription Id and the PO Number for the subscription that will be created. The former is auto-generated to a random value if not specified. Once the subscription is created in Chargebee, it is synced to Salesforce during the next sync.
Extend Expiry
Available under: CB Quote
A Chargebee quote cannot be invoiced once expired. This action extends the expiration date of an open quote.
- Navigate to the quote.
- Click on the Extend Expiry button.
- Select the new expiration date from the options available and click Save.
A new quote PDF is immediately generated with the updated expiration date and made available under the Notes & Attachments related list of quote.
Generate Quote PDF
Available under: CB Quote
If you extended the expiry of a quote from Chargebee and not Salesforce, this information is reflected in Salesforce only in the next sync and the quote PDF is not regenerated. Use this action to generate a fresh copy of the quote PDF at any time.
- Navigate to the quote and click Generate Quote PDF.
- Uncheck Display detailed charges on the generated PDF to generate the quote PDF with only a summary of charges.
- The new PDF is seen under the Notes & Attachments related list for the quote.
Sync to Opportunity
Available under: CB Quote
Summary
This updates the products and value of the linked opportunity with those on the quote.
Use Case
When you have created multiple quotes for an opportunity, the products and value on the opportunity match those of the last quote created. If your client decides to go with a different quote than the one last created, you can navigate that quote and invoke this action so that the opportunity shows an accurate picture of the deal.
Steps
-
Navigate to the quote that you want to sync to an opportunity.
-
If the quote wasn't already linked to any opportunity, then update the Opportunity field of the quote to create the link.
-
Click Sync to Opportunity. The following message appears.
-
Click Yes, go ahead to update the linked opportunity with the items on the quote.
CB Invoice Actions
The actions listed in this section are those that can be performed from the CB Invoice custom object in Salesforce.
Issue Refunds within Salesforce
Available under: CB Invoice As a Salesforce user who uses Chargebee, issuing refunds to customers can be a common occurrence.
Instead of switching from Salesforce to Chargebee to complete a refund, you can now issue refunds within Salesforce from the Chargebee Invoice object using the Issue Refund feature. Issue Refund allows you to initiate and complete refunds for customers without ever having to leave the Salesforce platform. To issue a refund within Salesforce, follow these steps:
-
Log in to your Salesforce account, and navigate to CB Invoices > Details page.
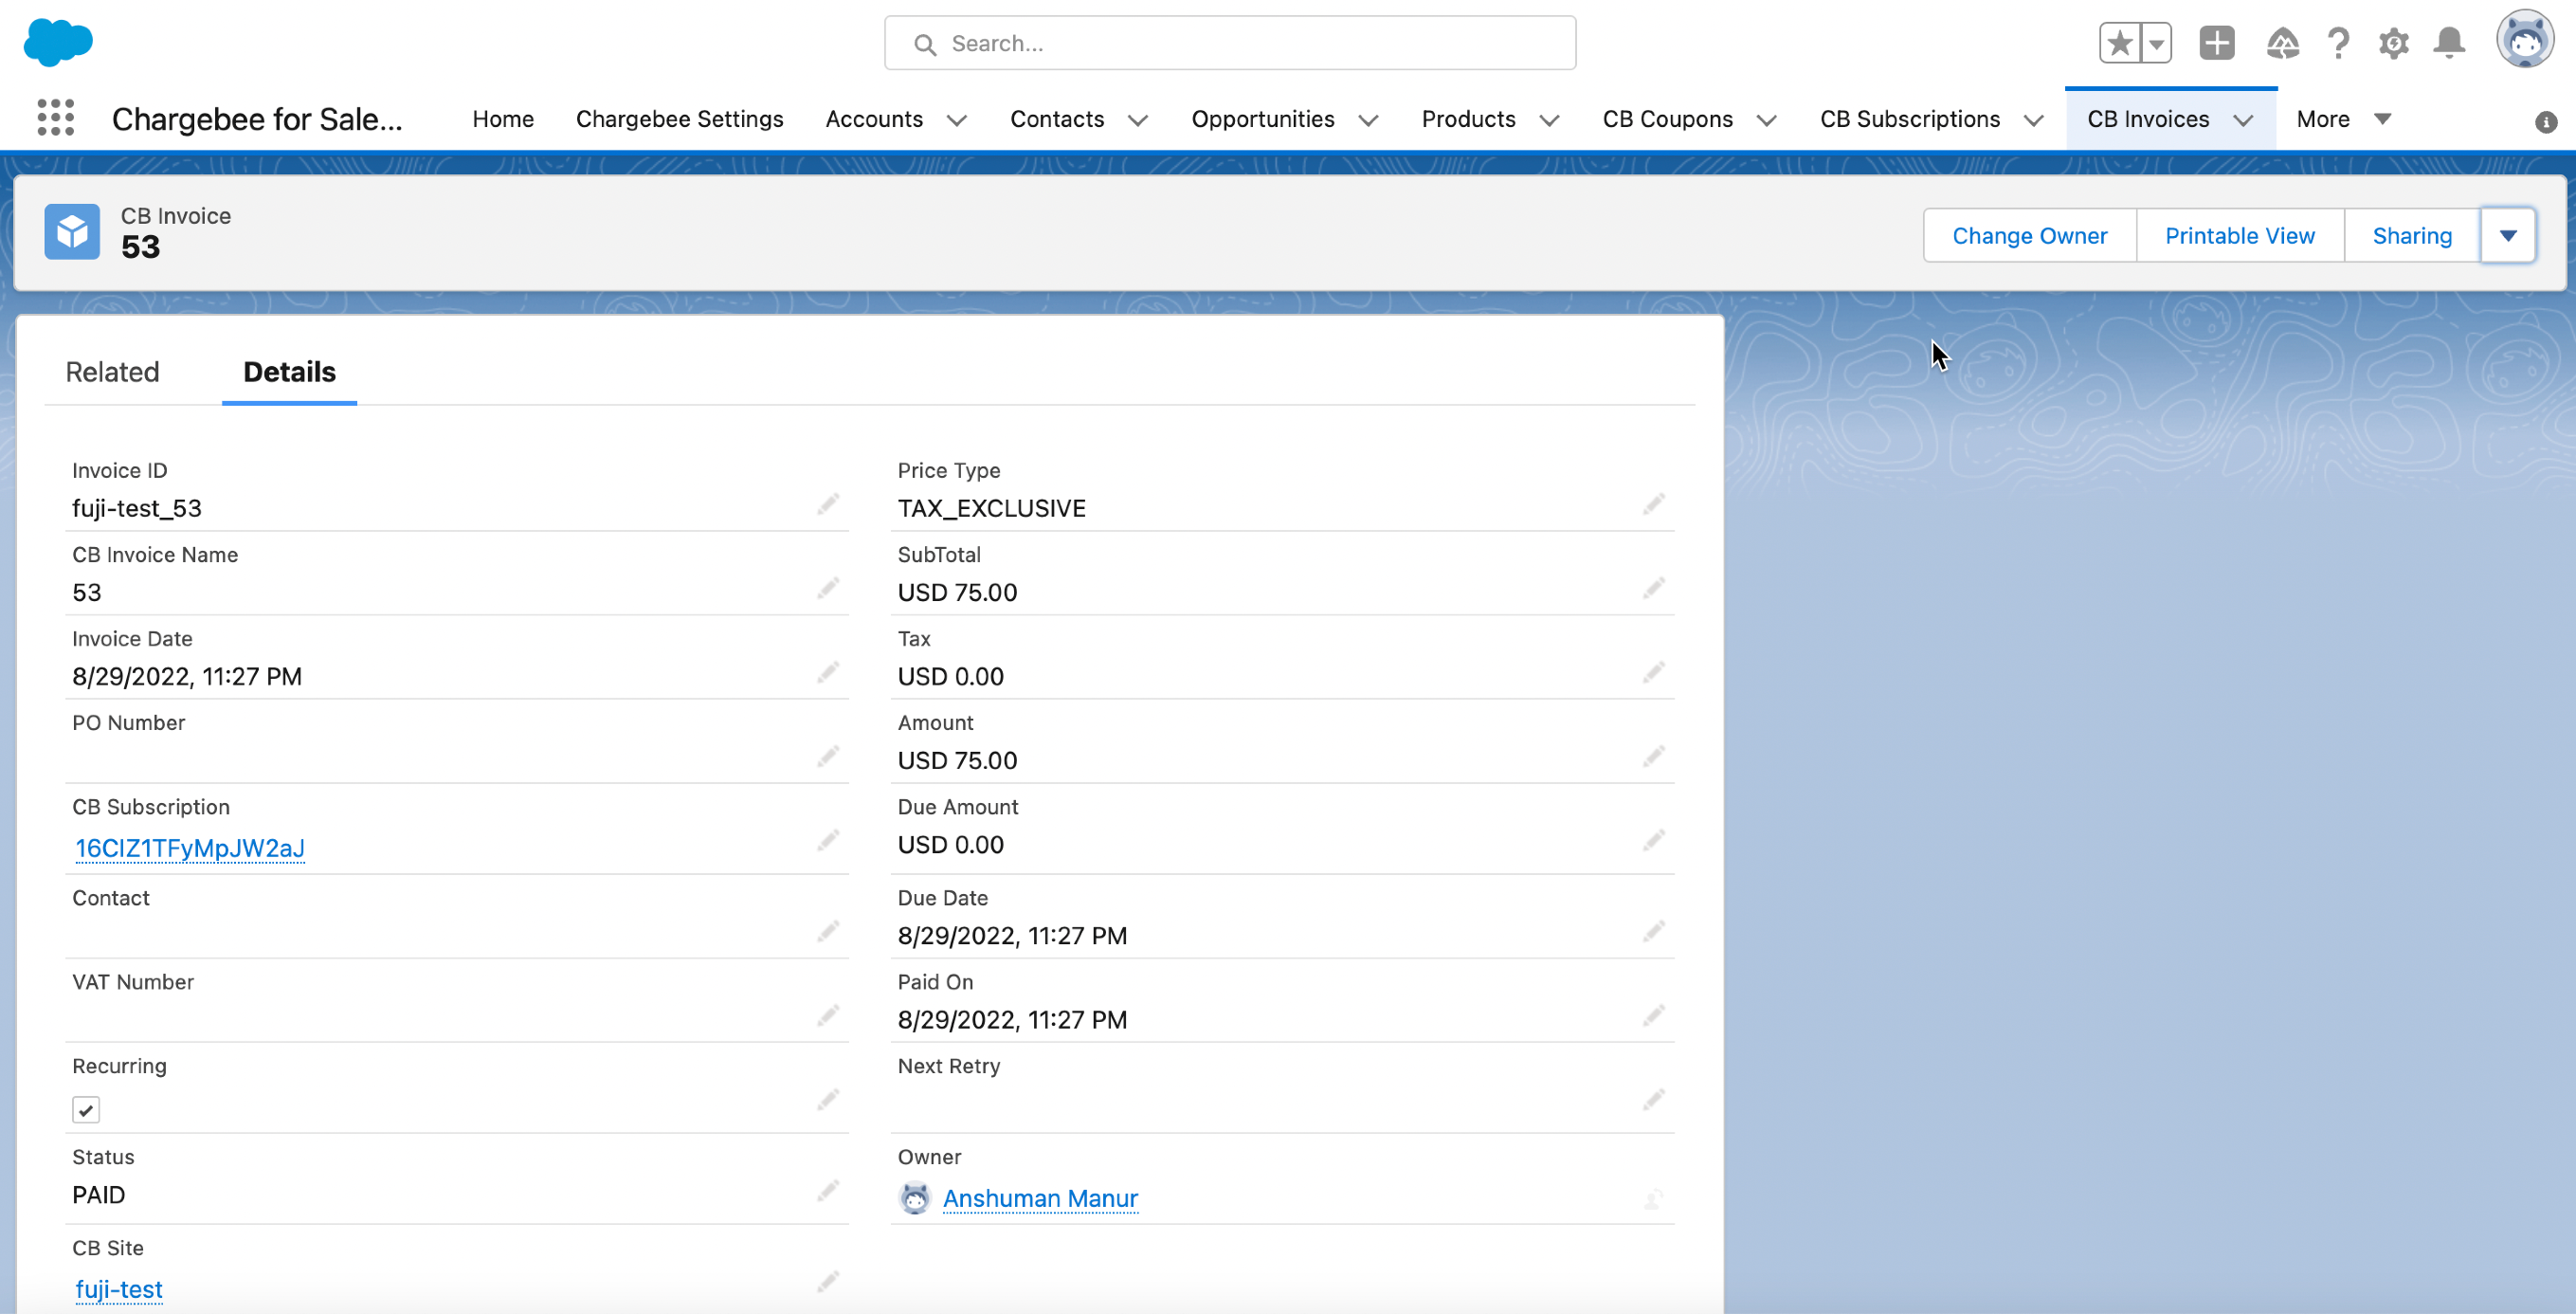
-
Before you issue a refund make sure the Invoice Status is paid.
-
Click the action toolbar at the top > Issue Refund.
-
Mention the amount to be refunded > select a Reason Code for refund > click Proceed.
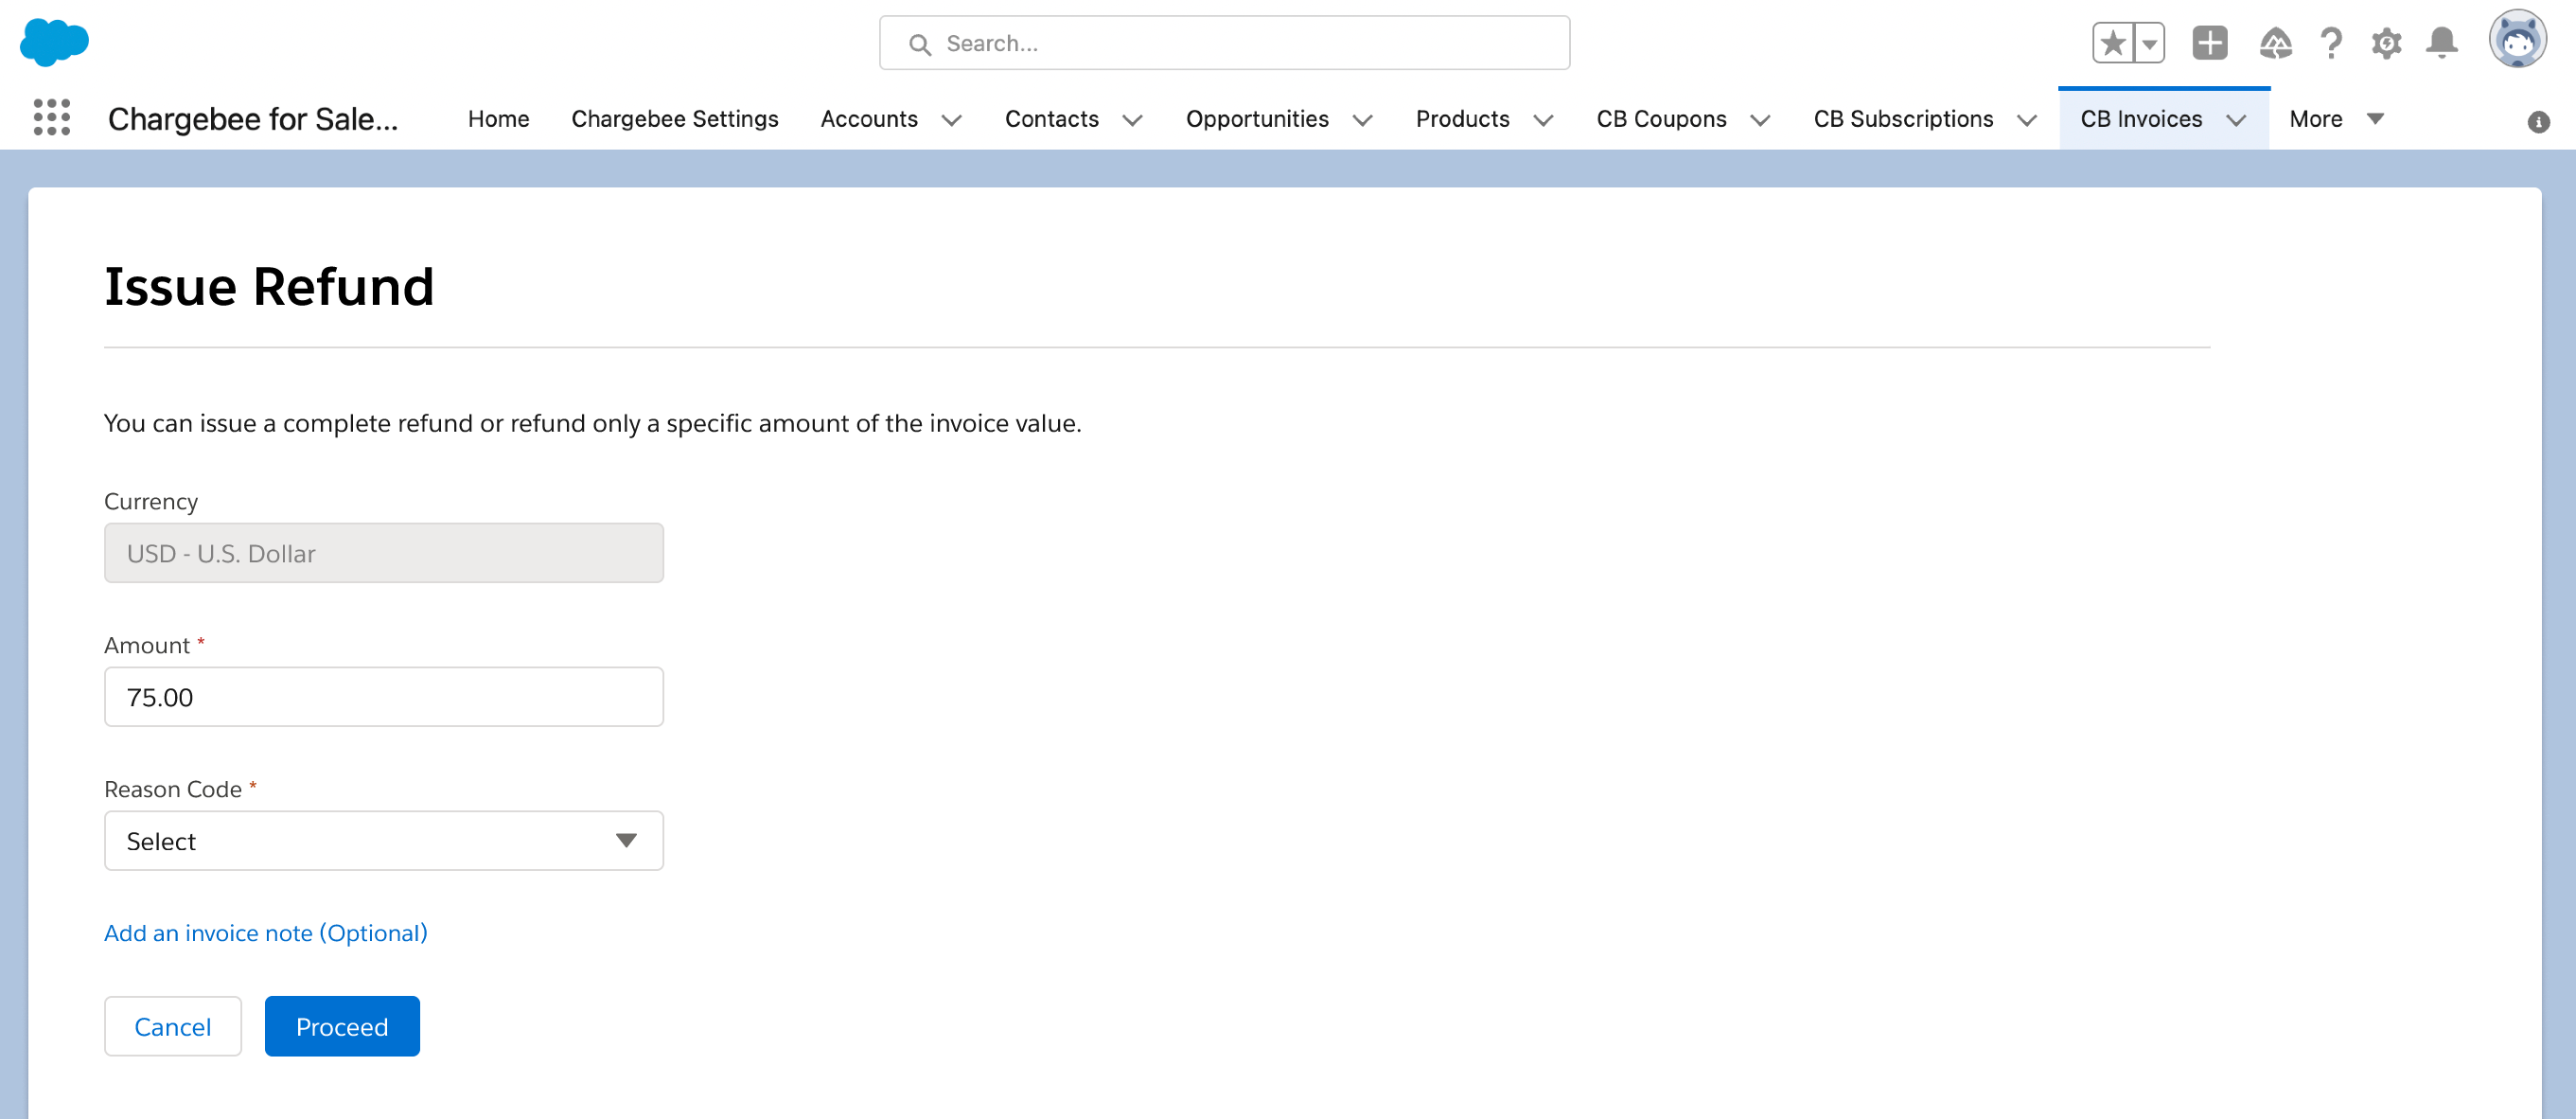
-
A prompt appears asking you to confirm the refund > click Confirm.
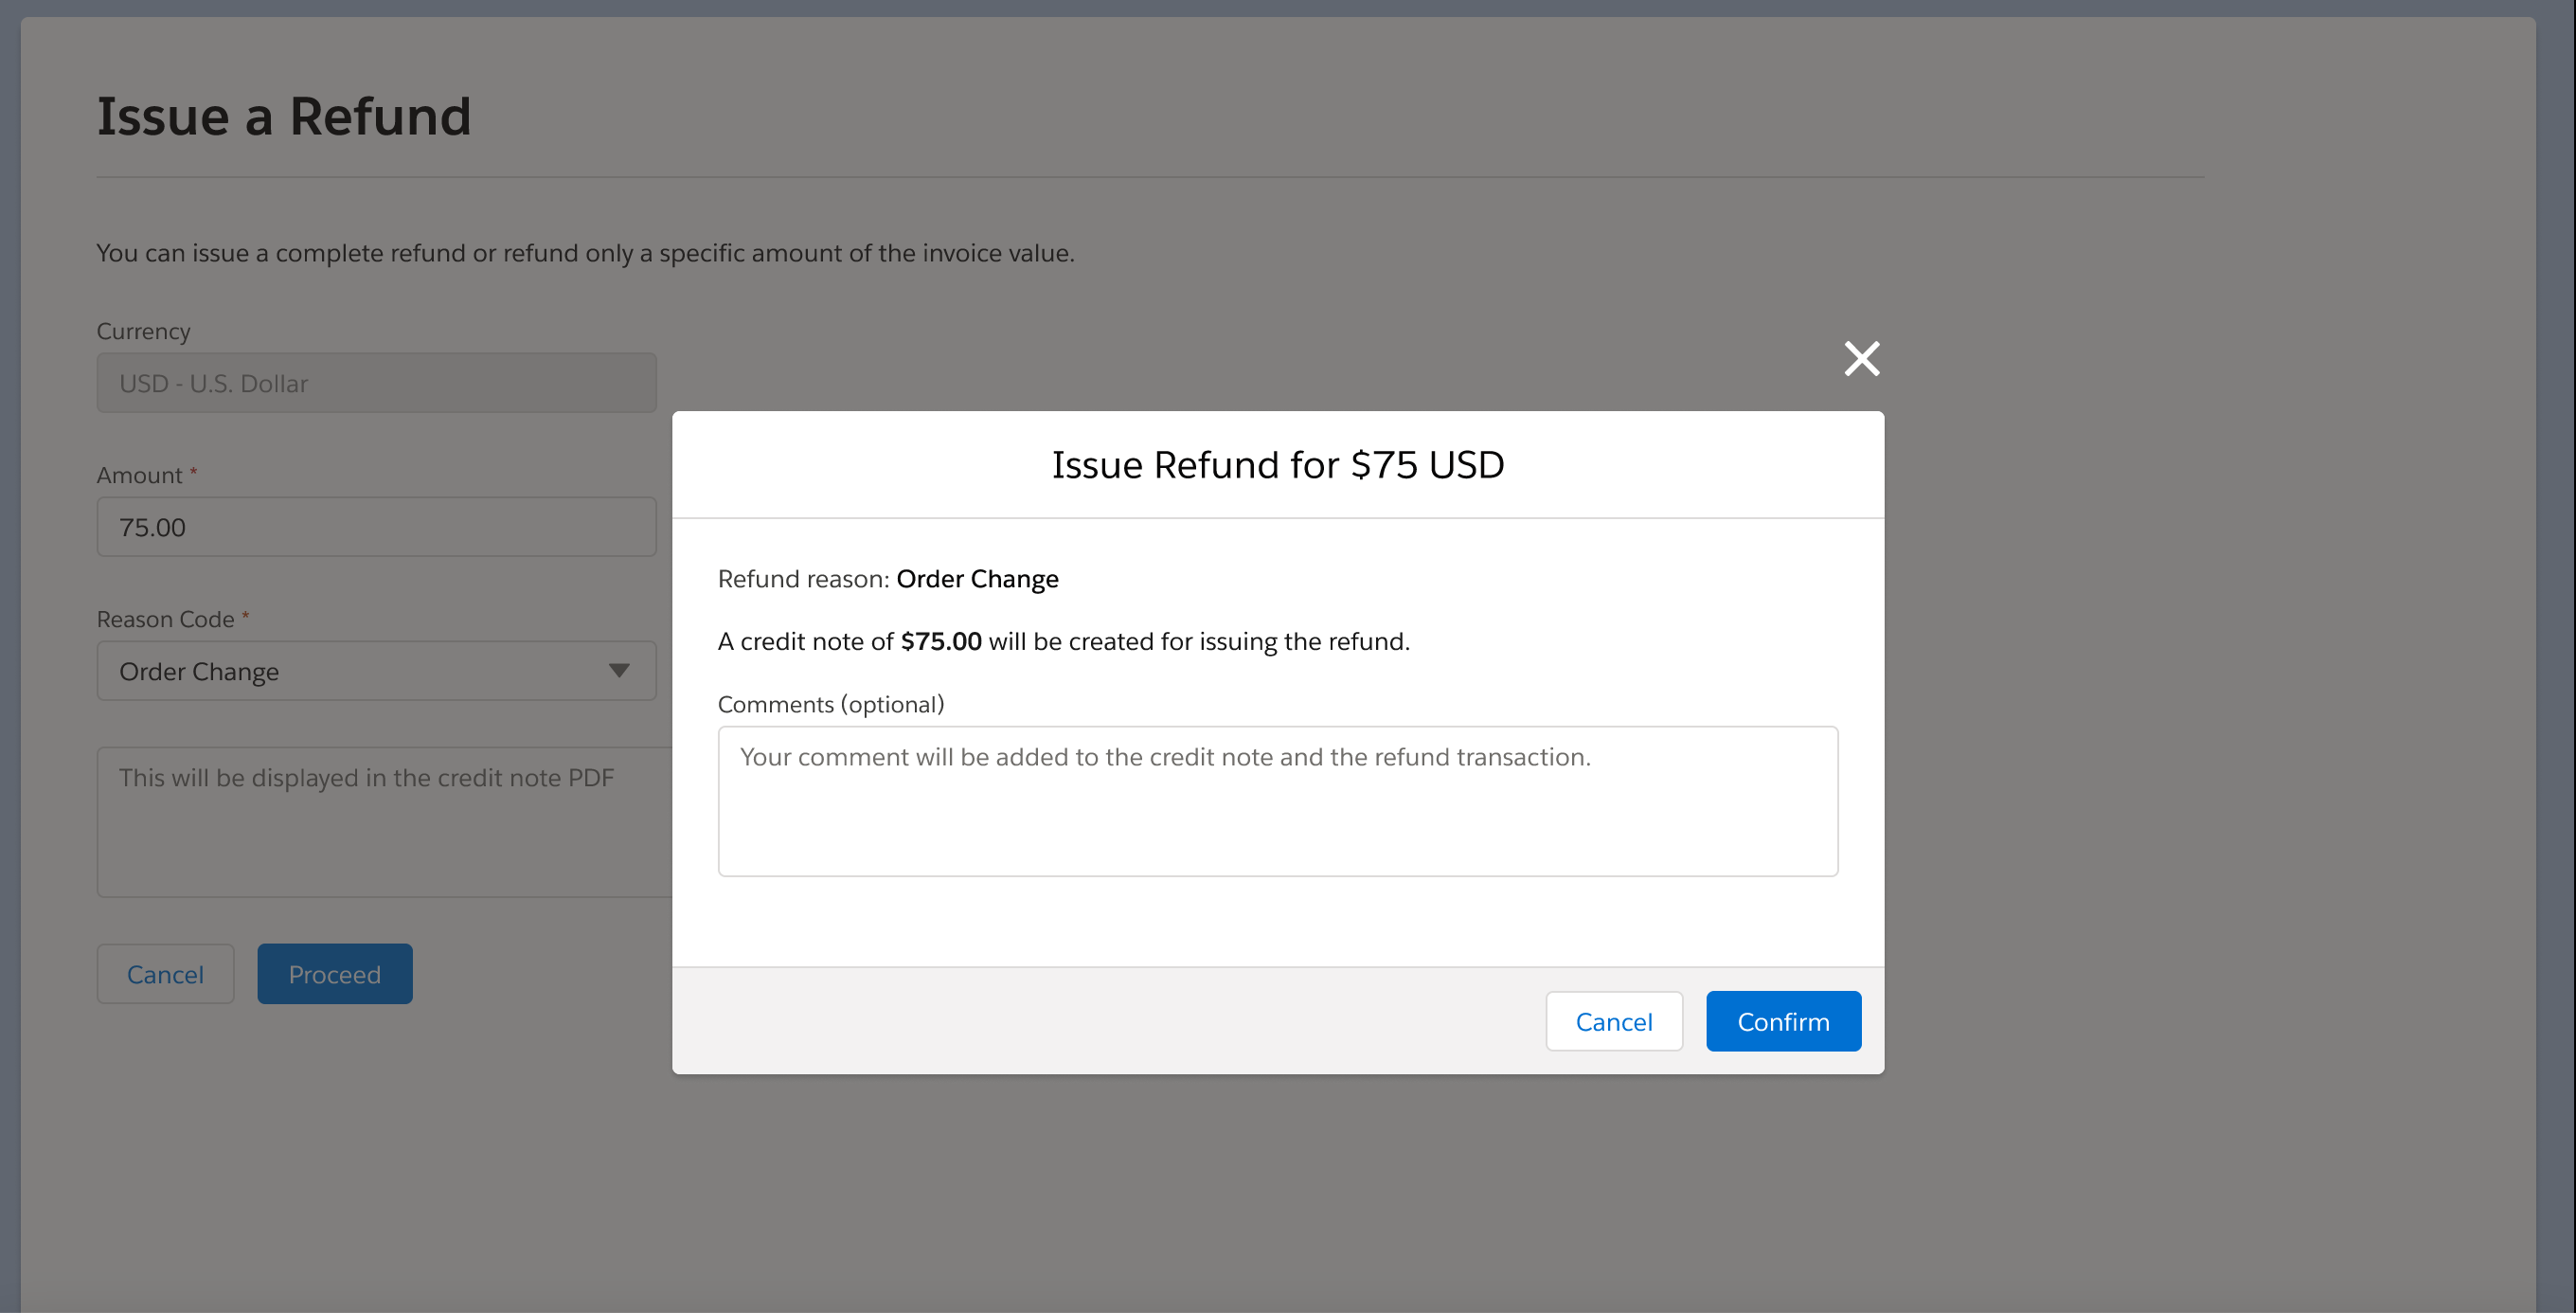
-
Your refund is complete!
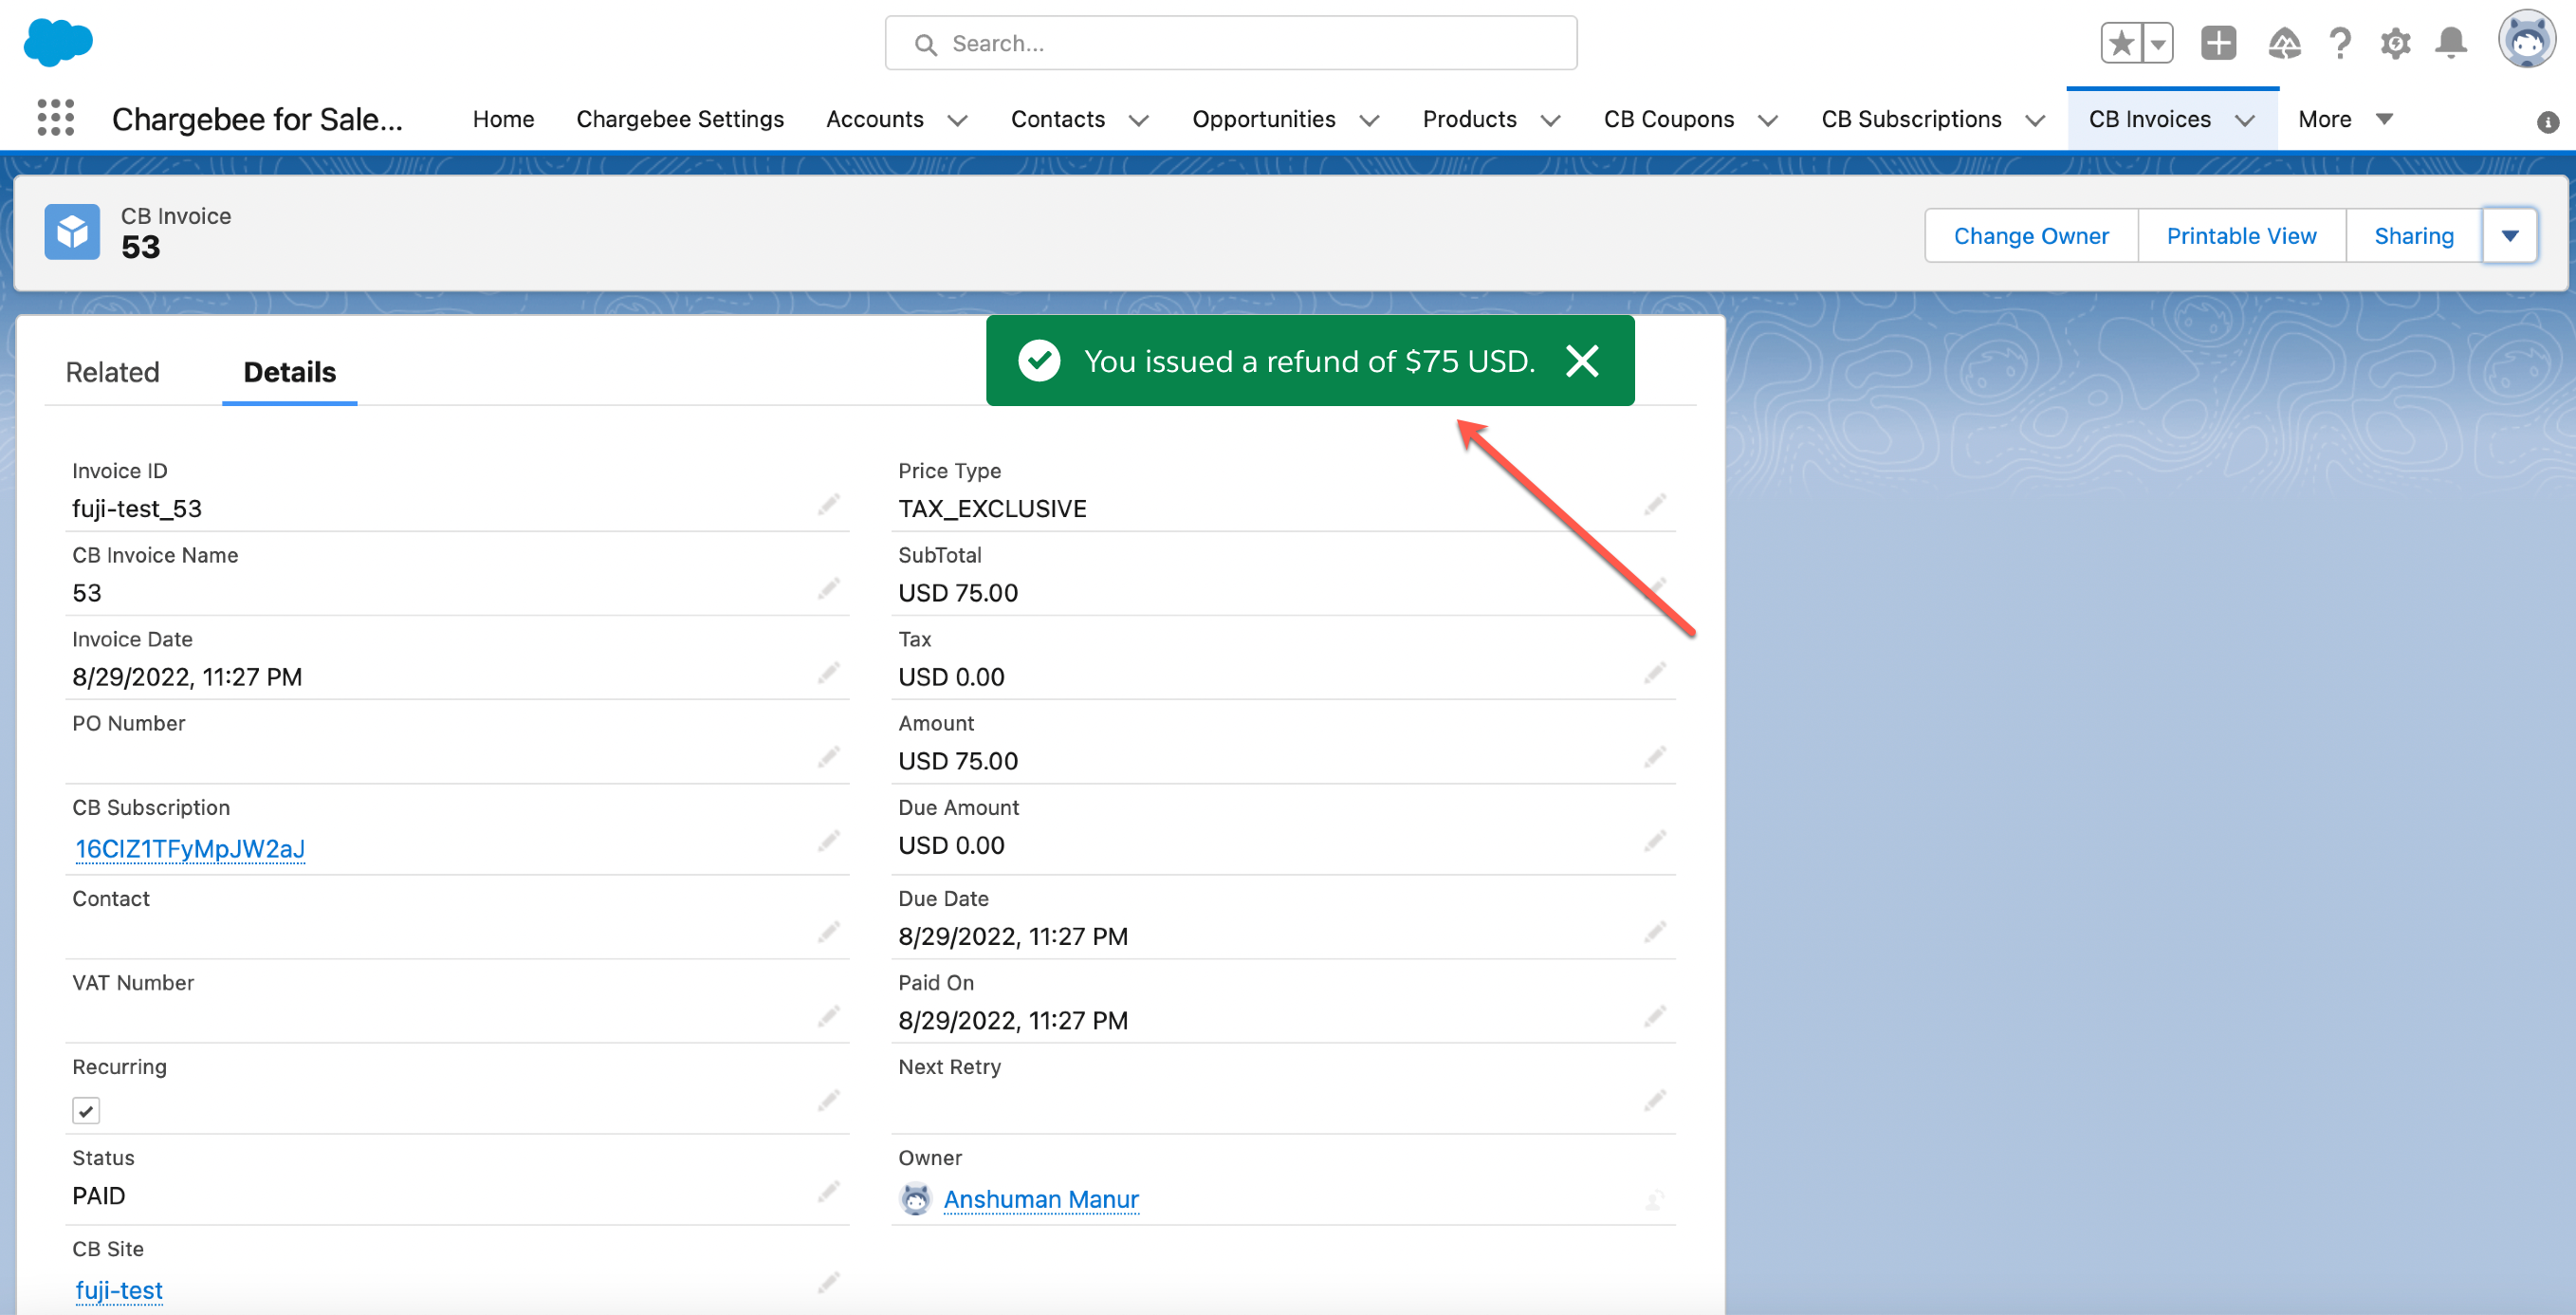
Download Invoice PDF
Available under: CB Invoice Invoicing is an essential component for running a business, and it's important to have a streamlined process in place for generating and managing invoices. Using Generate Invoices you can conveniently view and download invoices as PDFs directly from Salesforce. To download an invoice PDF, follow the steps below:
-
Log in to your Salesforce account > CB Invoices > Details Tab.
-
Click on the action toolbar at the top > click Generate PDF.
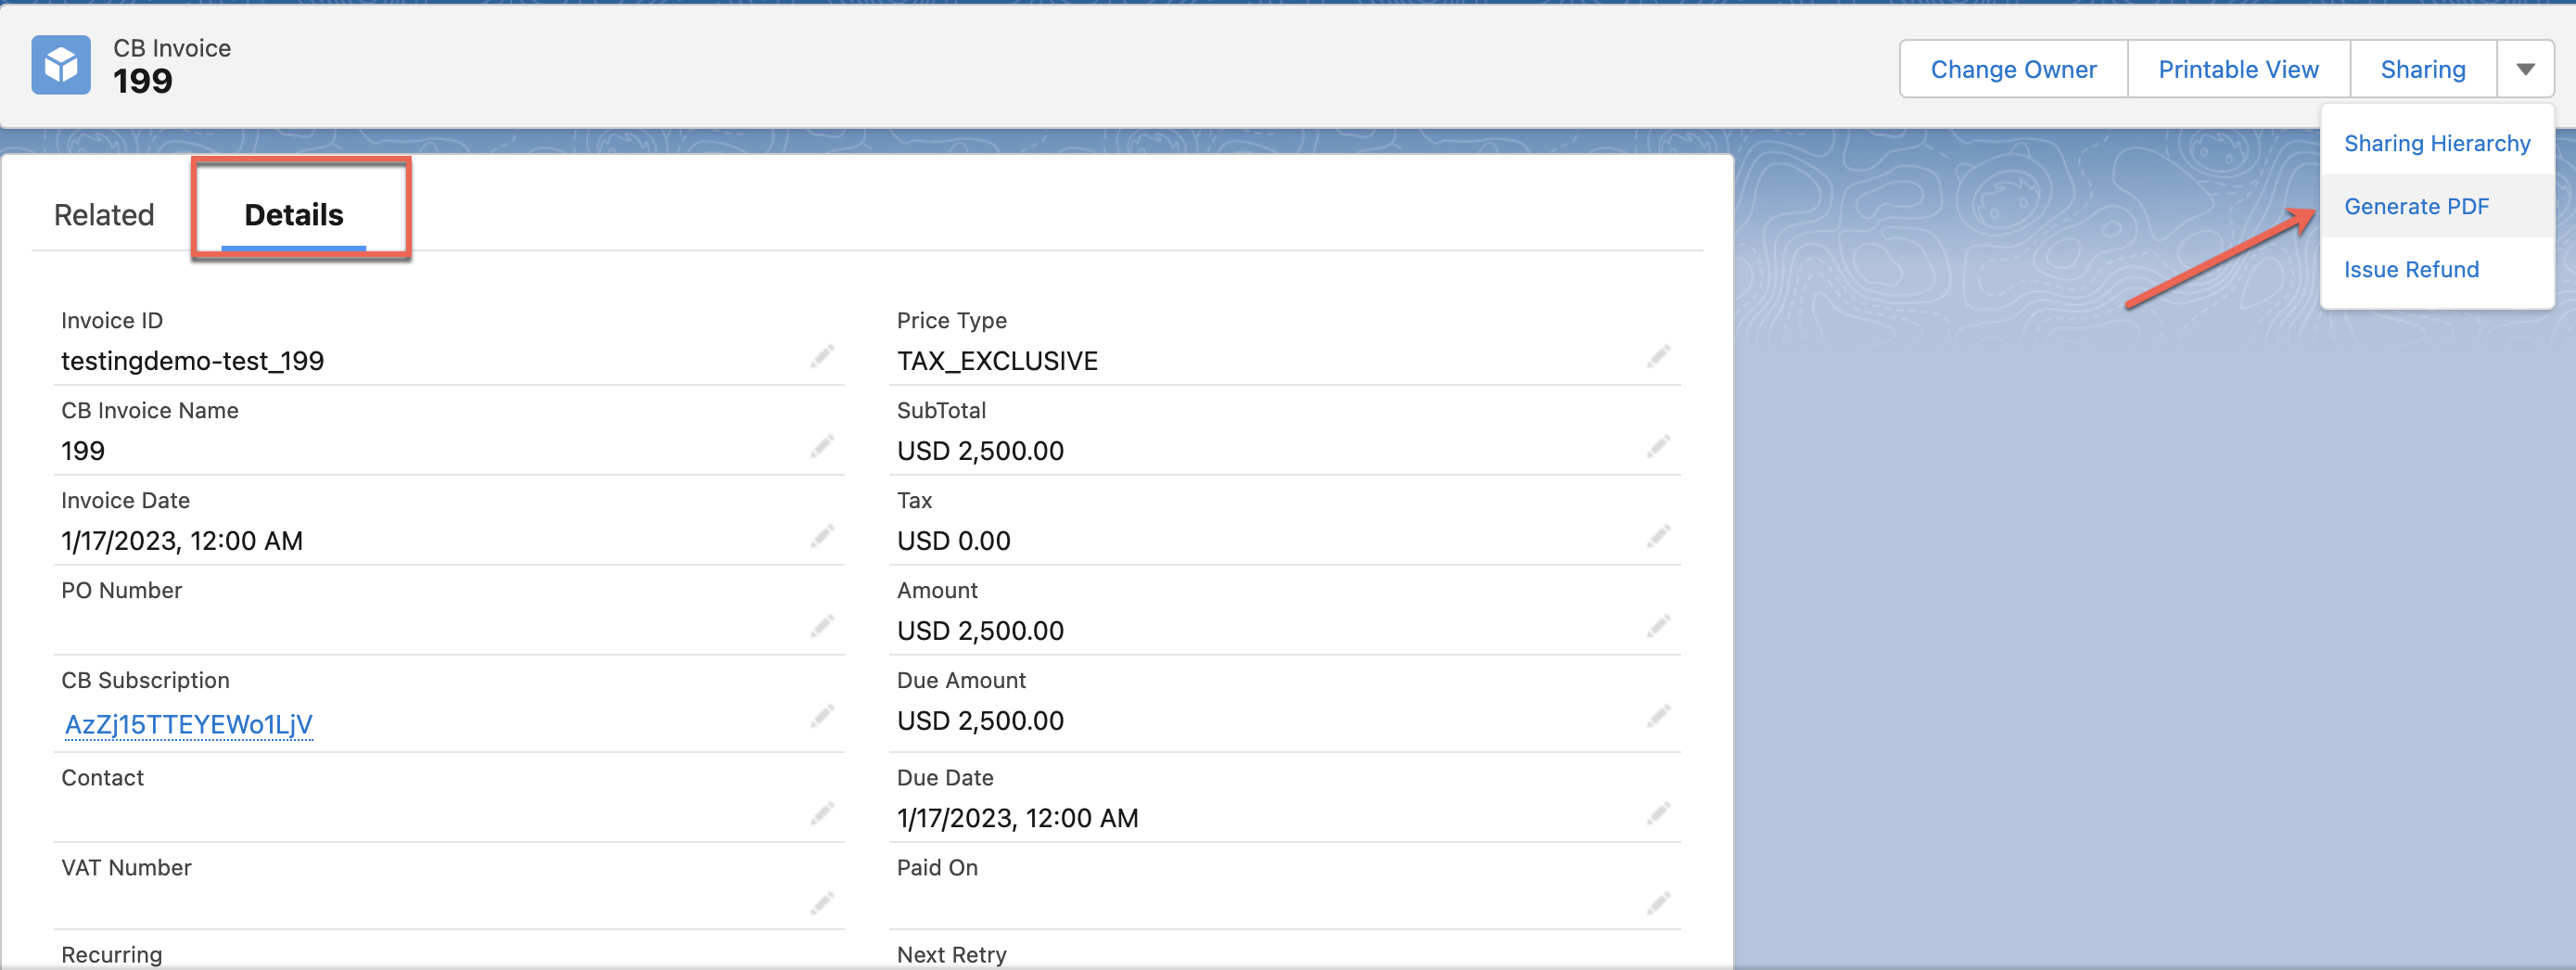
-
A pop screen appears asking you to confirm > click Confirm.
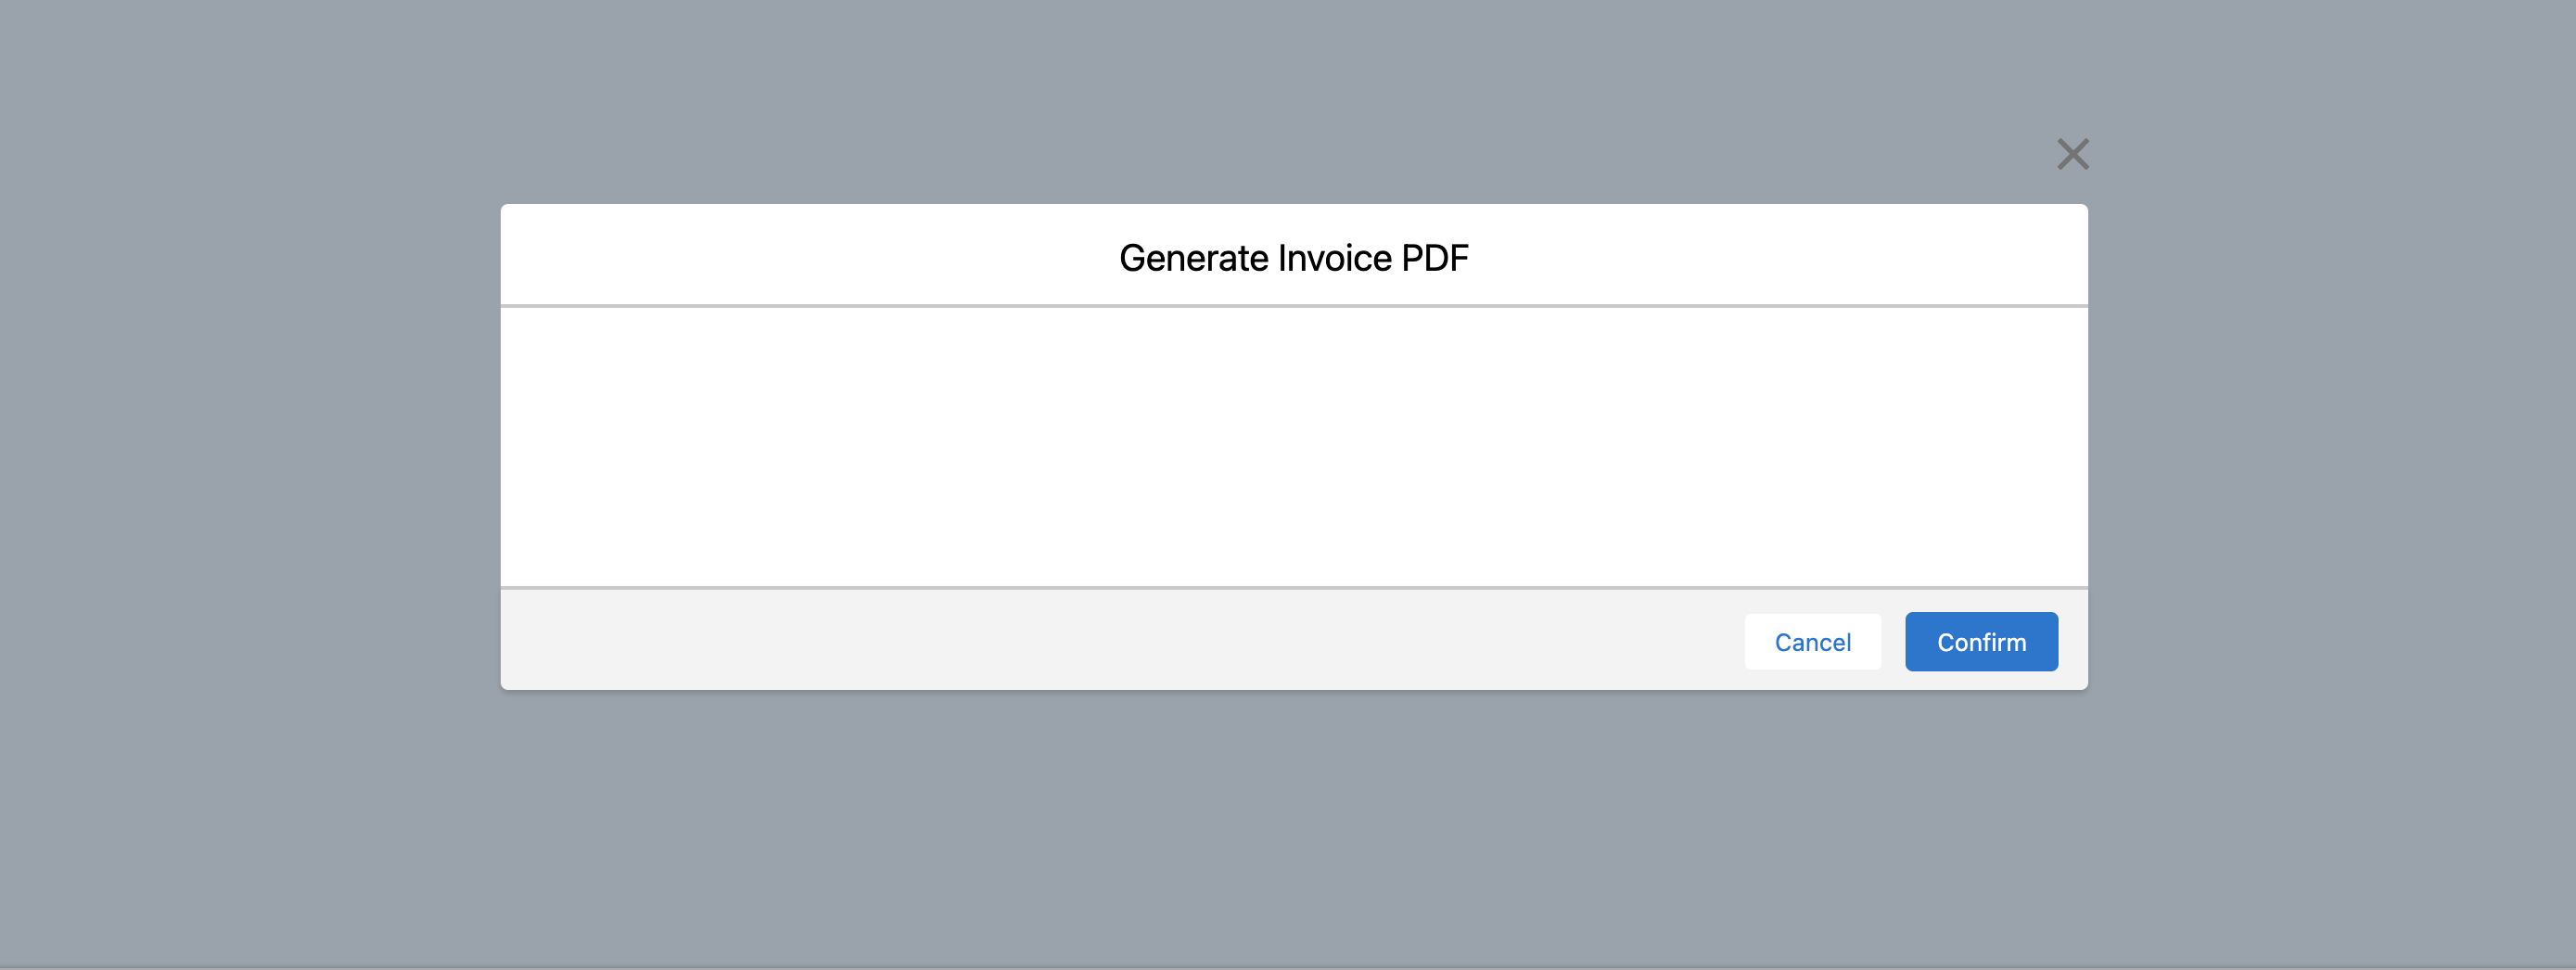
-
To view your generated PDF, navigate to the CB Invoice page > Related Tab. Your generated PDF will be under the Files section > click the invoice to view or download it.
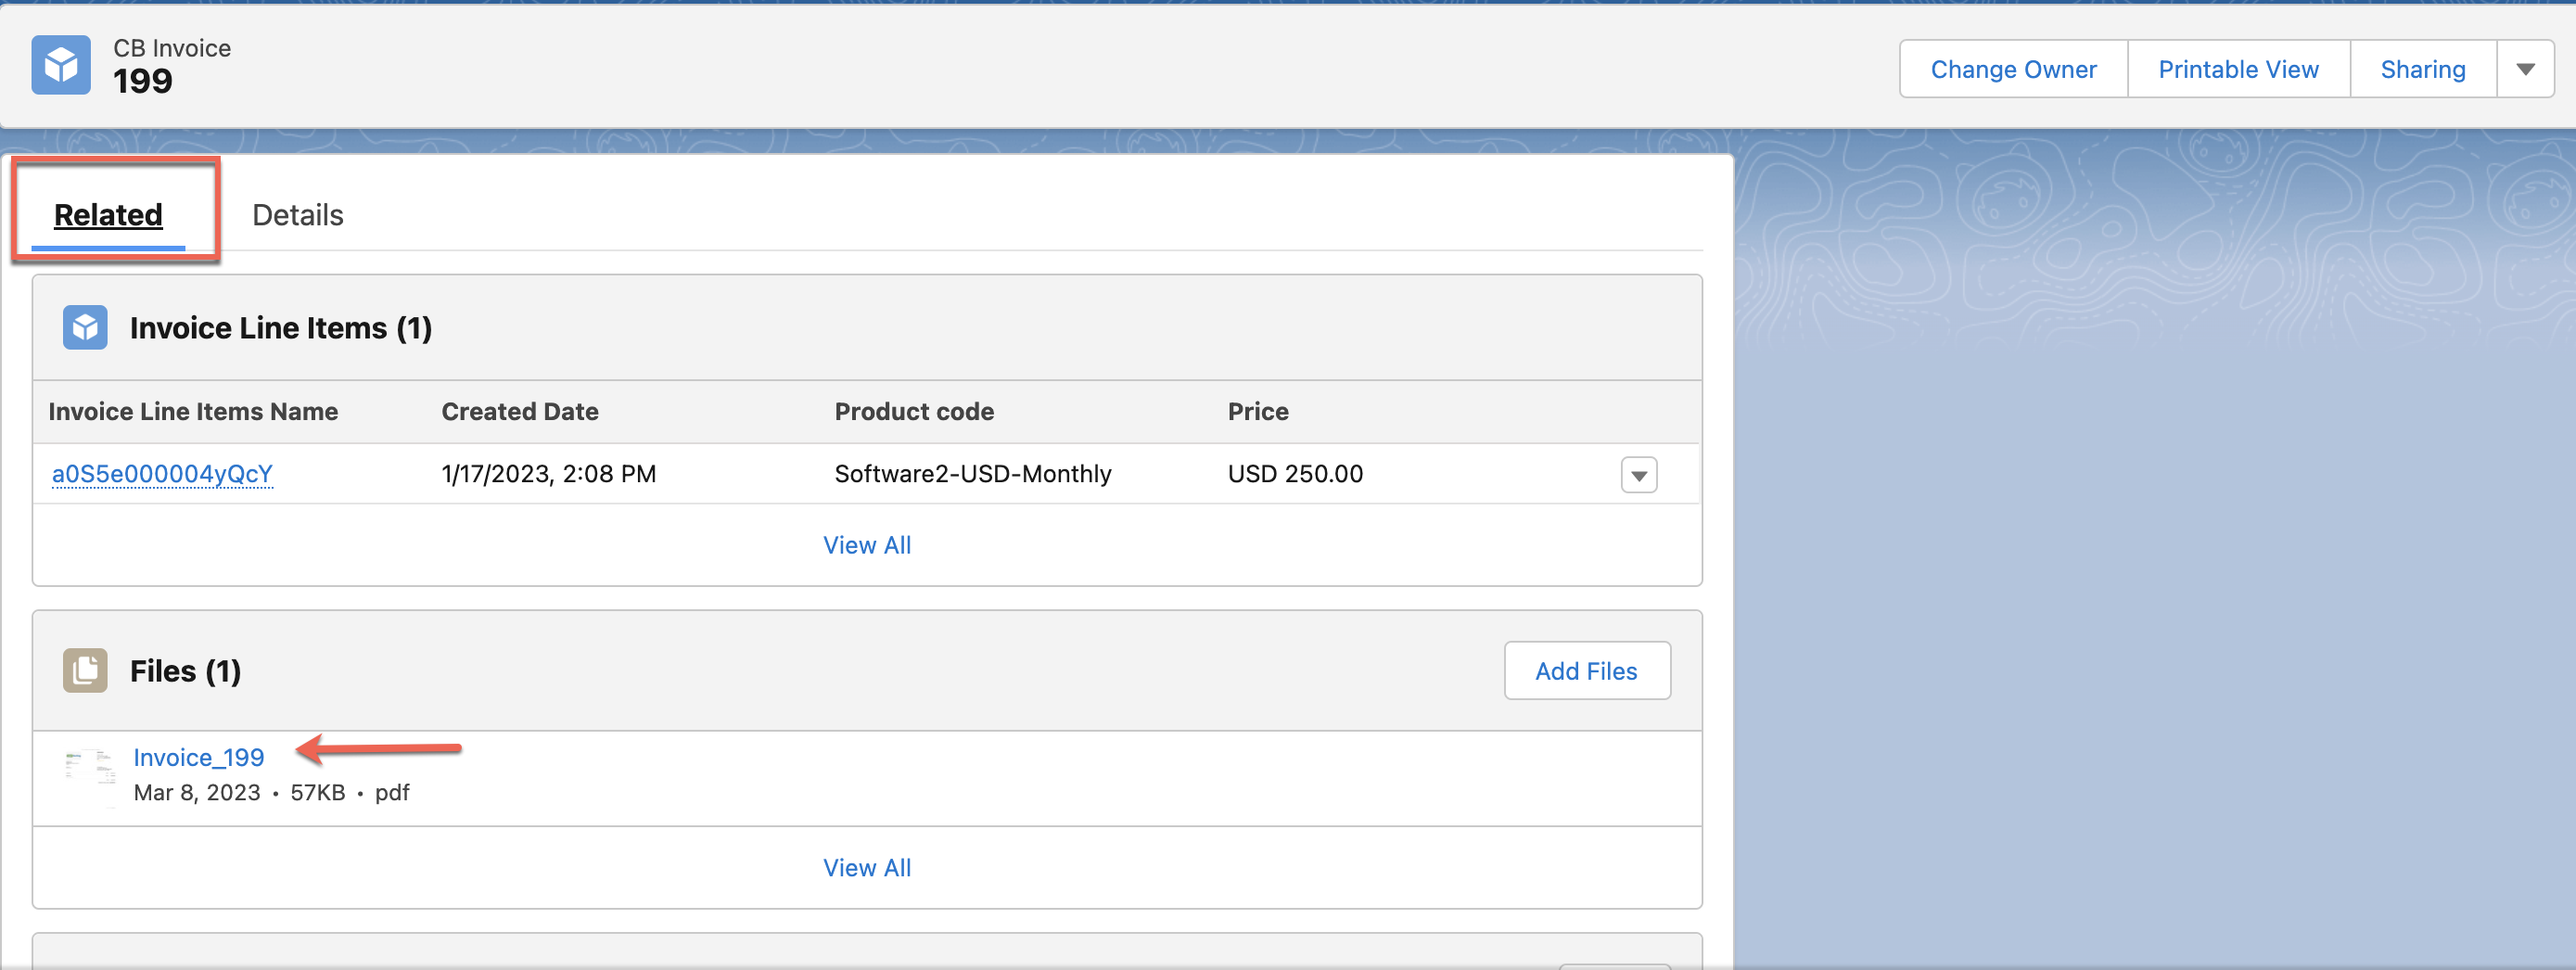
Articles & FAQs
Was this article helpful?