New in Chargebee: Explore Reveal and understand your payment performance end-to-end.Try Now
Docschargebee docs
HomeBillingPaymentsRevRecGrowthReveal
Support

Product Updates


  • Release Notes

Getting Started


  • Overview
  • Chargebee Billing Data Centers
  • Object Relationship Model
  • Understanding Sites
  • Chargebee Tech Glossary
  • Articles and FAQ

Implementing Chargebee


  • Implementation Guide
  • Go-live Checklist
  • Articles and FAQ

Agentic AI


  • Chargebee Copilot
  • MCP Servers

Developer Resources


  • Developer Resources Overview
  • API Explorer
  • Articles and FAQ

Product Catalog


  • Product Catalog Overview
  • Coupons
  • Articles and FAQ

Subscriptions


  • Working with Subscriptions
  • Billing
  • Orders
  • Articles and FAQ

Customers


  • Managing Customers
  • Account Hierarchy
  • Email Notifications
  • Branding
  • Configure Multiple Languages
  • Articles and FAQ

Entitlements


  • Entitlements Overview
  • Features Overview
  • Feature Management
  • Managing Product Entitlements
  • Subscription Entitlements
  • Customer Entitlements
  • Grandfathering Entitlements
  • Articles and FAQ

Usage Based Billing


  • Understanding Usages
  • Setting up Usage Based Billing
  • Usage Alerts
  • Prepaid credits
  • Metered Billing
  • Articles and FAQ

Chargebee CPQ


  • Chargebee CPQ
  • Chargebee CPQ for Salesforce
  • Chargebee CPQ for HubSpot

Invoices, Credit Notes, and Quotes


  • Invoices
  • Credit Notes
  • Quotes [Legacy]
  • Transactions
  • Articles and FAQ

Taxes


  • Overview
  • Configuring Taxes
  • Country-specific Taxes
  • Articles and FAQ

Hosted Capabilities


  • Overview
  • Hosted Checkout
  • Hosted Self-Serve Portal
  • Hosted Pages Features
  • Additional Hosted Pages
  • Payment Components
  • Pricing Table
  • Managing Payments with Chargebee.js
  • Mobile-Optimized Hosted Pages
  • Articles and FAQ

Site Configuration


  • Users & Roles
  • Custom Fields & Metadata
  • Approvals
  • Mandatory Fields
  • File Attachments & Comments
  • Advanced Filter Options
  • Multicurrency Pricing
  • Multi-decimal Support
  • Configuring Reason Codes
  • Events and Webhooks
  • API Keys
  • Time Zone
  • Time Machine
  • Transfer Configurations
  • Articles and FAQ

Multi Business Entity


  • Multi Business Entity Overview
  • Customer Transfer Overview
  • Articles and FAQ

Mobile Subscriptions


  • Overview
  • Omnichannel Subscriptions
  • Omnichannel One-Time Orders
  • Mobile Subscriptions (Legacy)

Reports and Analytics


  • RevenueStory
  • Home Dashboard
  • Frequently Asked Questions
  • FAQs for Classic Reports Sunset
  • Articles and FAQ

Integrations


  • Sales
  • Customer Support and Success
  • Finance
  • Tax
  • eInvoicing
  • Marketing
  • Stitch
  • Collaboration
  • Contract Management
  • Ecommerce Management
  • Articles and FAQ

Data Privacy & Security


  • Two Factor Authentication
  • SAML Single Sign-On
  • System for Cross-Domain Identity Management (SCIM)
  • EU-GDPR
  • Consent Management
  • Personal Data Management
  • Compliance Certificates
  • HIPAA Guidelines
  • PCI Recommendations and Integration Types
  • Articles and FAQ

Data Operations


  • Bulk Operations
  • Migration
  • Articles and FAQ
  1. Billing
  2. Taxes
  3. Articles and FAQ
  4. Configuration
  1. Billing
  2. Taxes
  3. Articles and FAQ
  4. Configuration

How is the tax validation performed in Anrok integration?

Problem Statement

This article helps you understand how is the tax validation performed in anrok integration.

Scope

What are the fields mandatory for new customers on Anrok tax validation?

How Anrok performs tax validation for existing customers?

After the tax validation, how to update the VAT ID on the customer's page?

Summary

For new customers, we must enable mandate fields for tax validation on hosted pages, whereas for existing customers Anrok can perform a validation on which you can manually update the required fields for Anrok tax validation.

New Customers

  • Navigate to Settings > Configure Chargebee > Checkout & Portal > Fields and enable the Shipping/Billing Address fields.
  • Mark the Zip Code, Country, and State fields as mandatory in the hosted pages.

Existing Customers

  • Click Apps > Go to Marketplace > Tax Management > Anrok > Validating Addresses for Existing Customers > Run Check

Solution

New Customers' Address for Tax determination:

  • For physical goods, Chargebee uses your customers' shipping addresses to calculate tax. If the shipping address is unavailable, the billing address is used.

  • For digital goods, Chargebee uses your customers' billing addresses to calculate tax.

  • If you're using Hosted Pages, ensure you set up the following:

    • Navigate to Settings > Configure Chargebee > Checkout & Portal > Fields and enable the Shipping/Billing Address fields.
    • Mark the Zip Code, Country, and State fields as mandatory in the hosted pages.

Validating Addresses for Existing Customers

The Chargebee-Anrok integration validates the taxable address for all new customers who subscribe to you after enabling Anrok. For customers who have signed up before enabling Anrok, Chargebee will cancel their subscriptions during renewal if the tax cannot be determined. Subscriptions on the verge of cancellation can be determined using the Validate Existing Addresses feature that allows you to view and fix invalid addresses.

Under Validate Existing Addresses, select your taxable region - United States from the drop-down, and click Run Check.

image

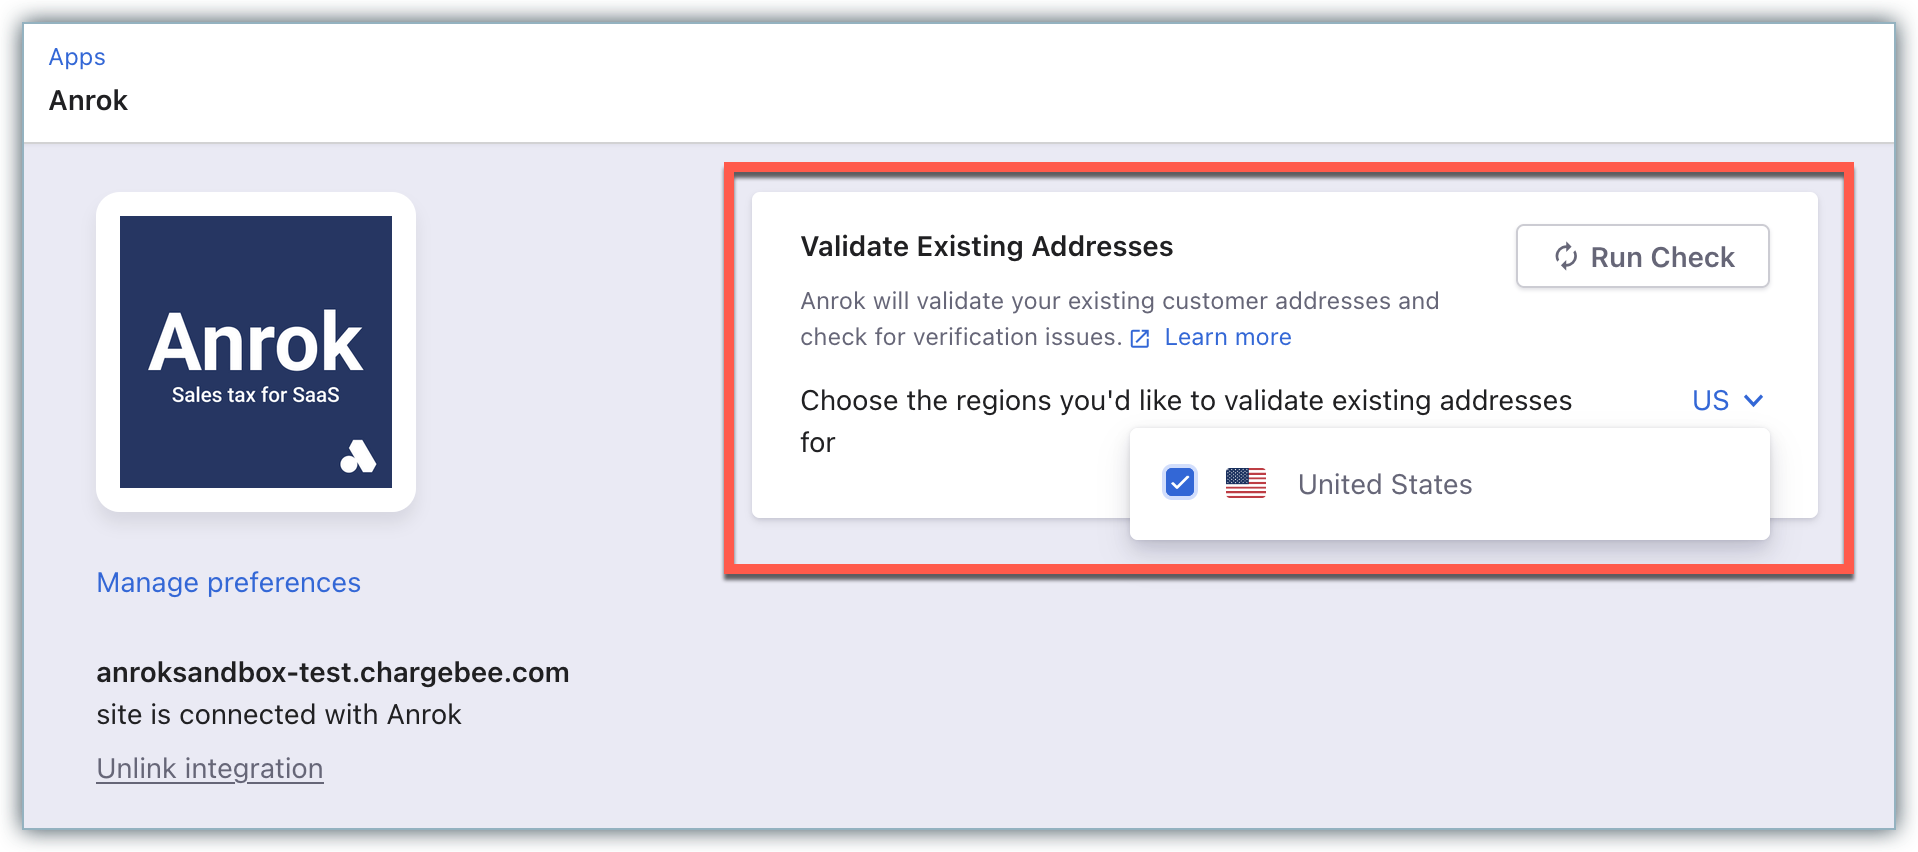
During the first check that is run after the integration is configured, all the existing subscriptions' taxable addresses get validated. Subsequent address validations will check only the addresses that are added after prior validation and not all the addresses. You can look for any possible address errors and have them fixed.

In order to validate the address, Chargebee makes a taxability API check to validate if the address is taxable.

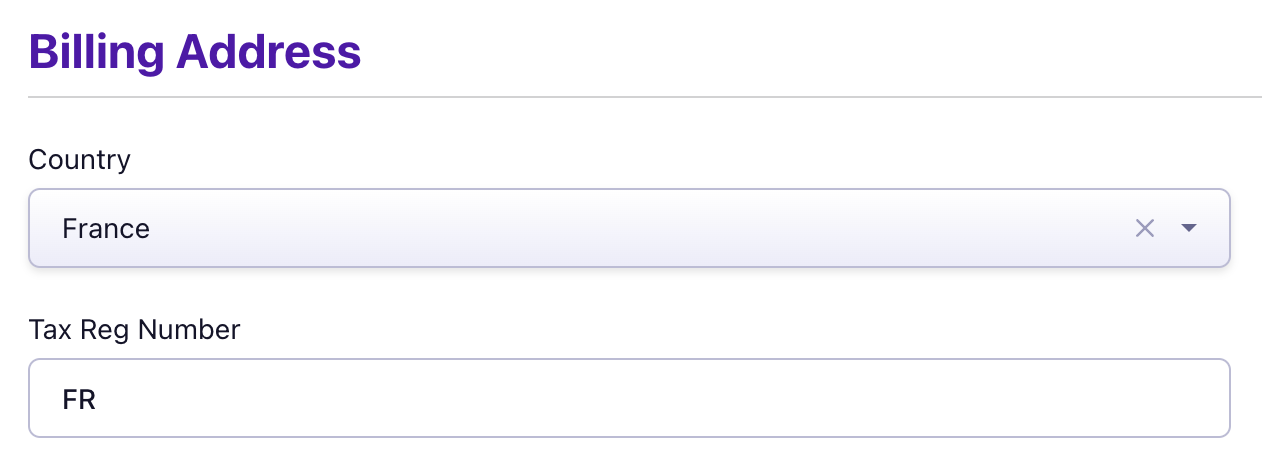
How to add a VAT ID to a customer record

A VAT ID can be added to a customer record in Chargebee by taking the following steps:

  • Navigate to Settings -> Configure Chargebee
  • Select Taxes
  • Select the region associated with the VAT ID you are adding (US Region or other applicable regions)
  • Toggle Collect Tax Registration Number from Customers
  • There's now a Tax Reg Number field on the customer page (Edit/Change Customer details page)
    image

Multiple VAT IDs may be associated with a single customer, Anrok will see the applicable VAT ID for the country to which the transaction applies.

Related Articles

Can I collect tax from customers outside my country?
Can I configure taxes for both B2B and B2C?
Can I exempt selected customers from paying taxes?
How to calculate Tax Reversal for a month?
How to Edit the Tax Rate for one individual EU country
Subscription cancelled due to Tax calculation failure reason
What are all the valid values for the field "tax2_juris_type" in the Upload CSV file for taxes?
How to find the ID of a tax profile in your Chargebee site?
Apply taxes without collecting address in the checkout
Tax configuration for zip codes in US and tax jurisdiction on tax reports
Subscription cancelled due to Non-Compliant EU Customer error
What are the GST applicability for businesses in India?
How to configure Tax API in Chargebee?
How to configure Reverse Charge?
Tax Provider onboarding guide to Chargebee Marketplace

Show more

Was this article helpful?